User Manual
Page 2
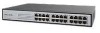
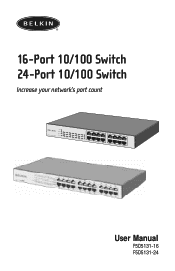
16-Port 10/100 Switch 24-Port 10/100 Switch Increase your network's port count User Manual F5D5131-16 F5D5131-24
16-Port 10/100 Switch 24-Port 10/100 Switch Increase your network's port count User Manual F5D5131-16 F5D5131-24

User Manual
Page 3
TABLE OF CONTENTS Introduction Features 1 Package Contents 1 Cabling Distances 1 Recommended Cabling Standard 1 Physical Dimensions 1 Getting to Know your Switch Front Panel LEDs 2 Connecting Networking Devices to your Switch Connecting your Switch to your Computers 4 Connecting your Switch to another Switch 4 Placement of the Switch Placement on a Flat Surface 5 Placement in a 19-Inch Rack 5 Troubleshooting 6 Information 7
TABLE OF CONTENTS Introduction Features 1 Package Contents 1 Cabling Distances 1 Recommended Cabling Standard 1 Physical Dimensions 1 Getting to Know your Switch Front Panel LEDs 2 Connecting Networking Devices to your Switch Connecting your Switch to your Computers 4 Connecting your Switch to another Switch 4 Placement of the Switch Placement on a Flat Surface 5 Placement in a 19-Inch Rack 5 Troubleshooting 6 Information 7

User Manual
Page 4
... • High-speed, dedicated 10/100Mbps Ethernet ports - 16 ports (Belkin 16-Port 10/100 Switch F5D5131-16) - 24 ports (Belkin 24-Port 10/100 Switch F5D5131-24) • Standards - IEEE 802.3u 100Base-Tx - and 24-Port 10/100 Switches allow you don't have to your existing 10/100 network. INTRODUCTION Congratulations on a wall, or with existing major operating systems, your...
... • High-speed, dedicated 10/100Mbps Ethernet ports - 16 ports (Belkin 16-Port 10/100 Switch F5D5131-16) - 24 ports (Belkin 24-Port 10/100 Switch F5D5131-24) • Standards - IEEE 802.3u 100Base-Tx - and 24-Port 10/100 Switches allow you don't have to your existing 10/100 network. INTRODUCTION Congratulations on a wall, or with existing major operating systems, your...
User Manual
Page 5
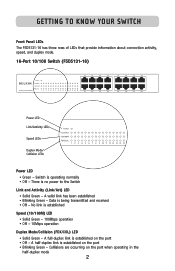
...8226; Blinking Green - A half-duplex link is established on the port when operating in the half-duplex mode 2 GETTING TO KNOW YOUR SWITCH Front Panel LEDs The F5D5131-16 has three rows of LEDs that provide information about connection activity, speed, and duplex mode. 16-Port 10/100... Switch (F5D5131-16) Power LED Link/Activity LEDs Speed LEDs Duplex Mode/ Collision LEDs Power LED • Green - There is operating normally • Off - Switch is no power to the Switch Link and Activity (Link/Act) LED • Solid Green -...
...8226; Blinking Green - A half-duplex link is established on the port when operating in the half-duplex mode 2 GETTING TO KNOW YOUR SWITCH Front Panel LEDs The F5D5131-16 has three rows of LEDs that provide information about connection activity, speed, and duplex mode. 16-Port 10/100... Switch (F5D5131-16) Power LED Link/Activity LEDs Speed LEDs Duplex Mode/ Collision LEDs Power LED • Green - There is operating normally • Off - Switch is no power to the Switch Link and Activity (Link/Act) LED • Solid Green -...
User Manual
Page 6
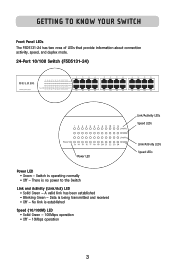
... two rows of LEDs that provide information about connection activity, speed, and duplex mode. 24-Port 10/100 Switch (F5D5131-24) Power LED Power LED • Green - There is established Speed (10/100M) LED • Solid Green - 100Mbps operation • Off - 10Mbps operation ...Link/Activity LEDs Speed LEDs Link/Activity LEDs Speed LEDs 3 No link is no power to the Switch Link and Activity (Link/Act) LED &#...
... two rows of LEDs that provide information about connection activity, speed, and duplex mode. 24-Port 10/100 Switch (F5D5131-24) Power LED Power LED • Green - There is established Speed (10/100M) LED • Solid Green - 100Mbps operation • Off - 10Mbps operation ...Link/Activity LEDs Speed LEDs Link/Activity LEDs Speed LEDs 3 No link is no power to the Switch Link and Activity (Link/Act) LED &#...

User Manual
Page 7
... can use a single cable. When cascading or connecting switches or hubs, the user can automatically negotiate speeds and full- CONNECTING NETWORKING DEVICES TO YOUR SWITCH Connecting your Switch to your Switch to another Switch 1. and half-duplex modes to allow users to attach 10/100Base-Tx network switches or hubs. 3. Connecting your Computers 1. If multiple cables are cascading...
... can use a single cable. When cascading or connecting switches or hubs, the user can automatically negotiate speeds and full- CONNECTING NETWORKING DEVICES TO YOUR SWITCH Connecting your Switch to your Switch to another Switch 1. and half-duplex modes to allow users to attach 10/100Base-Tx network switches or hubs. 3. Connecting your Computers 1. If multiple cables are cascading...

User Manual
Page 8
... bottom of the mounting bracket with the included screws. 3. If already affixed, remove. 2. Placement in a 19-inch rack. Place the Switch in the rack and align the holes of the Switch in the area that is placed in the rack. 4. Affix the four rubber feet shipped with the... surface. Place and tighten the screws of each side of the four corners. 2. Place on the Switch when rack-mounting. Attach the mounting bracket to each mounting bracket into the rack. 5 PLACEMENT OF THE SWITCH The Switches can be placed on a flat surface, on a Flat Surface 1. Placement on a wall, or...
... bottom of the mounting bracket with the included screws. 3. If already affixed, remove. 2. Placement in a 19-inch rack. Place the Switch in the rack and align the holes of the Switch in the area that is placed in the rack. 4. Affix the four rubber feet shipped with the... surface. Place and tighten the screws of each side of the four corners. 2. Place on the Switch when rack-mounting. Attach the mounting bracket to each mounting bracket into the rack. 5 PLACEMENT OF THE SWITCH The Switches can be placed on a flat surface, on a Flat Surface 1. Placement on a wall, or...

User Manual
Page 9
You may be asked to describe detailed information during operation. 6 Before you Call If possible, turn on your system before you call Belkin for technical assistance and call our toll-free technical support number. TROUBLESHOOTING For further information regarding the installation of this product, please visit www.belkin.com/networking or call from a telephone at or near the switch.
You may be asked to describe detailed information during operation. 6 Before you Call If possible, turn on your system before you call Belkin for technical assistance and call our toll-free technical support number. TROUBLESHOOTING For further information regarding the installation of this product, please visit www.belkin.com/networking or call from a telephone at or near the switch.


