User Manual
Page 15
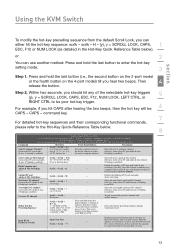
... 1~2 / x = 1~4 Press the computer icon on the left of firmware that is enabled) for PC channel no. This resets hot-key preceding sequence to the Hot-Key Quick-Reference Table below ). command key. 7 For detailed hot-key sequences and their ...(Hot key: Joint-select PC port/audio & mic, & mic, if binding is currently on the KVM Switch. Using the KVM Switch section To modify the hot-key preceding sequence from the default Scroll Lock, you can use another method:...Hot-Key Quick Reference Table below . 8 Hot Key Quick Reference Table 2-/4-Port SOHO KVM Switch with Audio -- & Mic --
... 1~2 / x = 1~4 Press the computer icon on the left of firmware that is enabled) for PC channel no. This resets hot-key preceding sequence to the Hot-Key Quick-Reference Table below ). command key. 7 For detailed hot-key sequences and their ...(Hot key: Joint-select PC port/audio & mic, & mic, if binding is currently on the KVM Switch. Using the KVM Switch section To modify the hot-key preceding sequence from the default Scroll Lock, you can use another method:...Hot-Key Quick Reference Table below . 8 Hot Key Quick Reference Table 2-/4-Port SOHO KVM Switch with Audio -- & Mic --

User Manual
Page 23
... make sure that the power adapter is connected to the KVM Switch. Power on the Mac host and copy/download the firmware-upgrade utility, "Belkin Soho.pkg", and the firmware-upgrade file, "*.blk", to the KVM Switch. Finally, unplug the power cable from the KVM Switch, and perform a cold reset. The monitor, mouse, and keyboard should also remain connected...
... make sure that the power adapter is connected to the KVM Switch. Power on the Mac host and copy/download the firmware-upgrade utility, "Belkin Soho.pkg", and the firmware-upgrade file, "*.blk", to the KVM Switch. Finally, unplug the power cable from the KVM Switch, and perform a cold reset. The monitor, mouse, and keyboard should also remain connected...
User Manual
Page 28
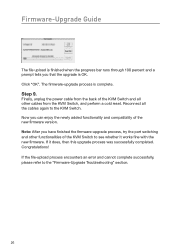
Reconnect all other functionalities of the KVM Switch to the "Firmware-Upgrade Troubleshooting" section. 26 Firmware-Upgrade Guide The file upload is finished when the progress bar runs through 100 percent and a prompt ... completed. Note: After you have finished the firmware-upgrade process, try the port switching and other cables from the back of the KVM Switch and all the cables again to the KVM Switch. Finally, unplug the power cable from the KVM Switch, and perform a cold reset. If it works fine with the new firmware. Click "OK". The firmware...
Reconnect all other functionalities of the KVM Switch to the "Firmware-Upgrade Troubleshooting" section. 26 Firmware-Upgrade Guide The file upload is finished when the progress bar runs through 100 percent and a prompt ... completed. Note: After you have finished the firmware-upgrade process, try the port switching and other cables from the back of the KVM Switch and all the cables again to the KVM Switch. Finally, unplug the power cable from the KVM Switch, and perform a cold reset. If it works fine with the new firmware. Click "OK". The firmware...
User Manual
Page 33
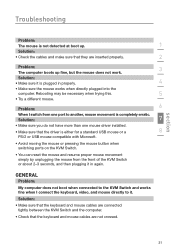
...• Make sure that they are not crossed. 31 Solution: • Make sure that the keyboard and mouse cables are connected tightly between the KVM Switch and the computer. • Check that the keyboard and mouse cables are inserted properly. 2 Problem: 3 The computer boots up . 1 Solution:... • Avoid moving the mouse or pressing the mouse button when switching ports on the KVM Switch. • You can reset the mouse and resume proper mouse movement simply by unplugging the mouse from the front of the KVM Switch or about 2-3 seconds, and then plugging it in properly. 4 ...
...• Make sure that they are not crossed. 31 Solution: • Make sure that the keyboard and mouse cables are connected tightly between the KVM Switch and the computer. • Check that the keyboard and mouse cables are inserted properly. 2 Problem: 3 The computer boots up . 1 Solution:... • Avoid moving the mouse or pressing the mouse button when switching ports on the KVM Switch. • You can reset the mouse and resume proper mouse movement simply by unplugging the mouse from the front of the KVM Switch or about 2-3 seconds, and then plugging it in properly. 4 ...