User Manual
Page 1
Washing Machine User's Manual WI1573 Document Number 2820524087/ 22-05-14.(17:28)
Washing Machine User's Manual WI1573 Document Number 2820524087/ 22-05-14.(17:28)

User Manual
Page 2
... regard to the packaging material collection points designated by the local authorities. Do not dispose of symbols Throughout this user manual the following symbols are manufactured from your product which has been manufactured with our National Environment Regulations. A Warning for... well. We hope that this user manual is also applicable for hazardous situations with the domestic or other models. Please read this entire user manual and all warnings and information in the user manual. Therefore, please read this user manual first! B Warning for prefering an Beko product.
... regard to the packaging material collection points designated by the local authorities. Do not dispose of symbols Throughout this user manual the following symbols are manufactured from your product which has been manufactured with our National Environment Regulations. A Warning for... well. We hope that this user manual is also applicable for hazardous situations with the domestic or other models. Please read this entire user manual and all warnings and information in the user manual. Therefore, please read this user manual first! B Warning for prefering an Beko product.
User Manual
Page 4
... open the loading door or remove the filter while there is designed to have the grounding installation made by grabbing the plug. 4 / EN Washing Machine /User's Manual There is repaired by someone. • Never place the product on the safe usage of airflow beneath the machine will cause electrical parts to a grounded...
... open the loading door or remove the filter while there is designed to have the grounding installation made by grabbing the plug. 4 / EN Washing Machine /User's Manual There is repaired by someone. • Never place the product on the safe usage of airflow beneath the machine will cause electrical parts to a grounded...
User Manual
Page 5
... on a high platform or near the edge on a cascaded surface. • Do not place the product on the power cable. • Never use . Washing Machine /User's Manual 5 / EN During this period, original spare parts will damage the painted, chrome plated and plastic surfaces. 1.2 Intended use • This product has been designed for...
... on a high platform or near the edge on a cascaded surface. • Do not place the product on the power cable. • Never use . Washing Machine /User's Manual 5 / EN During this period, original spare parts will damage the painted, chrome plated and plastic surfaces. 1.2 Intended use • This product has been designed for...

User Manual
Page 6
... close the loading door when leaving the room where the product is in progress. 1.4 Package information • Packaging materials of the product. 6 / EN Washing Machine /User's Manual While washing the laundry at the end of electrical and electronic equipment. Help protect the environment and natural resources by closing the cover of the...
... close the loading door when leaving the room where the product is in progress. 1.4 Package information • Packaging materials of the product. 6 / EN Washing Machine /User's Manual While washing the laundry at the end of electrical and electronic equipment. Help protect the environment and natural resources by closing the cover of the...
User Manual
Page 7
... and materials which can be reused and are suitable for recycling. This product has been manufactured with EU WEEE Directive (2012/19/EU). Washing Machine /User's Manual 7 / EN Do not dispose of its service life. Compliance with RoHS Directive: The product you have purchased complies with normal domestic and other wastes at...
... and materials which can be reused and are suitable for recycling. This product has been manufactured with EU WEEE Directive (2012/19/EU). Washing Machine /User's Manual 7 / EN Do not dispose of its service life. Compliance with RoHS Directive: The product you have purchased complies with normal domestic and other wastes at...

User Manual
Page 8
Adjustable feet 6- Drain hose 8 / EN Washing Machine /User's Manual Control panel 4- Filter cap 5- Top panel 3- Power cable 2- Loading door 7- 2 Your washing machine 2.1 Overview 1 8 2 3 7 6 4 5 1- Detergent drawer 8-
Adjustable feet 6- Drain hose 8 / EN Washing Machine /User's Manual Control panel 4- Filter cap 5- Top panel 3- Power cable 2- Loading door 7- 2 Your washing machine 2.1 Overview 1 8 2 3 7 6 4 5 1- Detergent drawer 8-

User Manual
Page 9
Drain hose 3- Mechanical water shut-off b- Standard 5- Blind plug** 7- Your washing machine 2.2 Package Contents 3 4 2 1 a b c 5 7 6 1- Mains water inlet hose (One of your machine. ** This is supplied if your machine is used for the mains hose connection.) a- Plastic plug group * Number of transportation safety bolts may change depending on the model of the following filter types is equipped with double water inlet. User Manual 6- Transportation safety bolts * 4- Electronical water shut-off c- Washing Machine /User's Manual 9 / EN Power cable 2-
Drain hose 3- Mechanical water shut-off b- Standard 5- Blind plug** 7- Your washing machine 2.2 Package Contents 3 4 2 1 a b c 5 7 6 1- Mains water inlet hose (One of your machine. ** This is supplied if your machine is used for the mains hose connection.) a- Plastic plug group * Number of transportation safety bolts may change depending on the model of the following filter types is equipped with double water inlet. User Manual 6- Transportation safety bolts * 4- Electronical water shut-off c- Washing Machine /User's Manual 9 / EN Power cable 2-

User Manual
Page 10
... class / Scale from A (Highest Efficiency) to improve the quality of the product. 10 / EN Washing Machine /User's Manual Your washing machine 2.3 Technical specifications Complying Commission Delegated Regulation (EU) No 1061/2010 Supplier name or trademark Beko Model name WI1573 Rated capacity (kg) 7 Energy efficiency class / Scale from A+++ (Highest Efficiency) to D (Lowest Efficiency) A++ Annual Energy...
... class / Scale from A (Highest Efficiency) to improve the quality of the product. 10 / EN Washing Machine /User's Manual Your washing machine 2.3 Technical specifications Complying Commission Delegated Regulation (EU) No 1061/2010 Supplier name or trademark Beko Model name WI1573 Rated capacity (kg) 7 Energy efficiency class / Scale from A+++ (Highest Efficiency) to D (Lowest Efficiency) A++ Annual Energy...
User Manual
Page 11
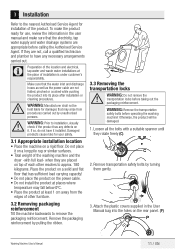
...technician and plumber to installation, visually check if the product has any necessary arrangements carried out. Attach the plastic covers supplied in the user manual and make the product ready for your safety. 3.1 Appropriate installation location • Place the machine on the power cable. •... floor. A warning: Prior to have it on the rear panel. (P) Washing Machine /User's Manual 11 / EN Damaged products cause risks for use, review the information in the User Manual bag into its place after installation or cleaning procedures. To make sure that the water inlet...
...technician and plumber to installation, visually check if the product has any necessary arrangements carried out. Attach the plastic covers supplied in the user manual and make the product ready for your safety. 3.1 Appropriate installation location • Place the machine on the power cable. •... floor. A warning: Prior to have it on the rear panel. (P) Washing Machine /User's Manual 11 / EN Damaged products cause risks for use, review the information in the User Manual bag into its place after installation or cleaning procedures. To make sure that the water inlet...
User Manual
Page 12
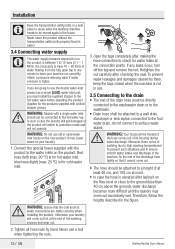
... water leaks at the end of the washing process and wear out. 2. warning: Do not use a tool when tightening the nuts. 12 / EN Washing Machine /User's Manual Retighten the nut carefully after making the hose connection to check for cold water inlet. 3. Never use old or used water inlet hoses on the...
... water leaks at the end of the washing process and wear out. 2. warning: Do not use a tool when tightening the nuts. 12 / EN Washing Machine /User's Manual Retighten the nut carefully after making the hose connection to check for cold water inlet. 3. Never use old or used water inlet hoses on the...

User Manual
Page 13
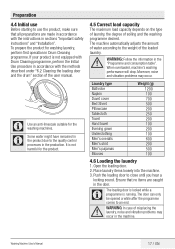
... its place and cause crushing and vibration problems. 1. Otherwise, the product may not be equal to a grounded outlet protected by adjusting the feet. Washing Machine /User's Manual 13 / EN Adjust the feet until the product stands level and balanced. 100cm 40cm • To prevent flowing of the hose may move from its...
... its place and cause crushing and vibration problems. 1. Otherwise, the product may not be equal to a grounded outlet protected by adjusting the feet. Washing Machine /User's Manual 13 / EN Adjust the feet until the product stands level and balanced. 100cm 40cm • To prevent flowing of the hose may move from its...
User Manual
Page 14
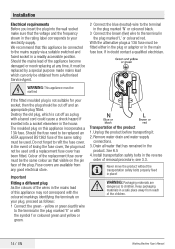
... from any time, it . 2. Do not forget to children. Drain all water that visible on the pin face of the children. 14 / EN Washing Machine /User's Manual see 3.3. With the alternative plugs a 13A fuse must not be obtained from a Authorised Service Agent. Unplug the product before transporting it must be cut off...
... from any time, it . 2. Do not forget to children. Drain all water that visible on the pin face of the children. 14 / EN Washing Machine /User's Manual see 3.3. With the alternative plugs a 13A fuse must not be obtained from a Authorised Service Agent. Unplug the product before transporting it must be cut off...
User Manual
Page 15
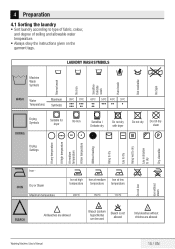
... Iron at high Iron at medium Iron at low temperature temperature temperature 200 0C 150 0C 110 0C BLEACH All bleaches are allowed Washing Machine /User's Manual 15 / EN
... Iron at high Iron at medium Iron at low temperature temperature temperature 200 0C 150 0C 110 0C BLEACH All bleaches are allowed Washing Machine /User's Manual 15 / EN
User Manual
Page 16
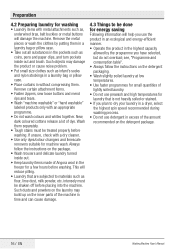
... the highest capacity allowed by putting them . see, "Programme and consumption table". • Always follow the instructions on the detergent package. 16 / EN Washing Machine /User's Manual
... the highest capacity allowed by putting them . see, "Programme and consumption table". • Always follow the instructions on the detergent package. 16 / EN Washing Machine /User's Manual
User Manual
Page 17
...of water according to close until you hear a locking sound. Push the loading door to the weight of the loaded laundry. Washing Machine /User's Manual 17 / EN C Use an anti-limescale suitable for washing laundry, perform first operation in the "Programme and consumption table". A warning: ... sure that no items are made in accordance with the methods described under "6.2 Cleaning the loading door and the drum" section of the user manual. To prepare the product for the washing machines. When overloaded, machine's washing performance will drop. Open the loading door. 2. Moreover, ...
...of water according to close until you hear a locking sound. Push the loading door to the weight of the loaded laundry. Washing Machine /User's Manual 17 / EN C Use an anti-limescale suitable for washing laundry, perform first operation in the "Programme and consumption table". A warning: ... sure that no items are made in accordance with the methods described under "6.2 Cleaning the loading door and the drum" section of the user manual. To prepare the product for the washing machines. When overloaded, machine's washing performance will drop. Open the loading door. 2. Moreover, ...
User Manual
Page 18
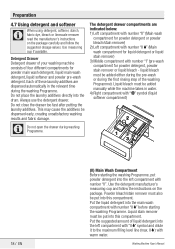
... the manufacturer's instructions on the package. Use measuring cup if available. Put the liquid detergent into the drum. Washing Machine /User's Manual Always use the detergent drawer. This may cause the additives be added either during the pre-wash or during the first rinsing ...with number "II " before starting the washing Programme, put powder detergent into this compartment. Liquid stain remover must also be added manually while the machine takes in the relevant time during washing Programme. Put the suggested dosage values. Detergent Drawer Detergent drawer of your ...
... the manufacturer's instructions on the package. Use measuring cup if available. Put the liquid detergent into the drum. Washing Machine /User's Manual Always use the detergent drawer. This may cause the additives be added either during the pre-wash or during the first rinsing ...with number "II " before starting the washing Programme, put powder detergent into this compartment. Liquid stain remover must also be added manually while the machine takes in the relevant time during washing Programme. Put the suggested dosage values. Detergent Drawer Detergent drawer of your ...

User Manual
Page 19
... to select a Programme with number "I ) Pre-Wash Compartment Put the powder pre-wash detergent or powder stain remover into the pre-wash compartment. Washing Machine /User's Manual 19 / EN When using starch.
... to select a Programme with number "I ) Pre-Wash Compartment Put the powder pre-wash detergent or powder stain remover into the pre-wash compartment. Washing Machine /User's Manual 19 / EN When using starch.
User Manual
Page 20
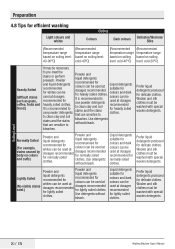
... dosages recommended for heavily soiled clothes. Use detergents without bleach. Woolen and silk clothes must be washed with special woolen detergents. 20 / EN Washing Machine /User's Manual Woolen and silk clothes must be washed with special woolen detergents. Preparation 4.8 Tips for efficient washing Light colours and whites Clothes Colours Dark colours Delicates...
... dosages recommended for heavily soiled clothes. Use detergents without bleach. Woolen and silk clothes must be washed with special woolen detergents. 20 / EN Washing Machine /User's Manual Woolen and silk clothes must be washed with special woolen detergents. Preparation 4.8 Tips for efficient washing Light colours and whites Clothes Colours Dark colours Delicates...
User Manual
Page 21
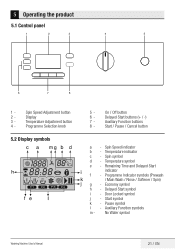
Temperature Adjustment button 4 - Auxiliary Function symbols m - No Water symbol Washing Machine /User's Manual 21 / EN Auxiliary Function buttons 8 - Economy symbol h - Pause symbol l - Spin Speed Adjustment button 2 - Programme Selection knob 5.2 Display symbols F1 F2 F3 F4 5 - Start / Pause / Cancel ...
Temperature Adjustment button 4 - Auxiliary Function symbols m - No Water symbol Washing Machine /User's Manual 21 / EN Auxiliary Function buttons 8 - Economy symbol h - Pause symbol l - Spin Speed Adjustment button 2 - Programme Selection knob 5.2 Display symbols F1 F2 F3 F4 5 - Start / Pause / Cancel ...