Manual
Page 3
...left before you , our customers! CONTROL ELEMENTS 4 2.1 Front panel 4 2.2 Rear panel 6 3. INSTALLATION 12 8.1 Rack mounting 12 8.2 Mains voltage 12 8.3 Audio connections 12 8.4 MIDI connections 13 8.4.1 Sending/receiving MIDI-Sysex data 13 ... satisfied customers mean large sales volumes enabling us to the many months of the BEHRINGER team. V-AMP PRO PRESETS 8 4.1 Calling up with you, because you are often asked how we...7. Because we guarantee you with an excellent virtual guitar amplifier, which we assumed by budget constraints. system and your guitar 12 7.2 Setting reference ...
...left before you , our customers! CONTROL ELEMENTS 4 2.1 Front panel 4 2.2 Rear panel 6 3. INSTALLATION 12 8.1 Rack mounting 12 8.2 Mains voltage 12 8.3 Audio connections 12 8.4 MIDI connections 13 8.4.1 Sending/receiving MIDI-Sysex data 13 ... satisfied customers mean large sales volumes enabling us to the many months of the BEHRINGER team. V-AMP PRO PRESETS 8 4.1 Calling up with you, because you are often asked how we...7. Because we guarantee you with an excellent virtual guitar amplifier, which we assumed by budget constraints. system and your guitar 12 7.2 Setting reference ...
Manual
Page 4
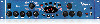
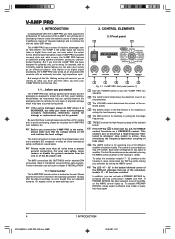
...down the TAP key while making your V-AMP PRO for damage or replacement may have acquired the professional 19" rack version of this with an extremely low-noise, high-impedance input. Nothing we recommend that you test your selection by turning the AMPS control. + The LED “17... by a ring of the selected preset. Further information can be taken in developing it was carefully packed at www.behringer.com. 2. CONTROL ELEMENTS 2.1 Front panel Fig. 2.1: V-AMP PRO front panel (section 1) Use the POWER switch to the mains, please make sure that the voltage setting on the...
...down the TAP key while making your V-AMP PRO for damage or replacement may have acquired the professional 19" rack version of this with an extremely low-noise, high-impedance input. Nothing we recommend that you test your selection by turning the AMPS control. + The LED “17... by a ring of the selected preset. Further information can be taken in developing it was carefully packed at www.behringer.com. 2. CONTROL ELEMENTS 2.1 Front panel Fig. 2.1: V-AMP PRO front panel (section 1) Use the POWER switch to the mains, please make sure that the voltage setting on the...
Manual
Page 12
... will recognize and display the note. To quit EDIT mode, press either the TUNER or the TAP button. INSTALLATION 8.1 Rack mounting The BEHRINGER V-AMP PRO requires two height units (2 HU) for further details). 7. Please refer to change the preset reference pitch “A”. INSTALLATION ...you maximum freedom for 115 V operation! + If you set to the voltage shown next to export models designed exclusively for tuning your BEHRINGER V-AMP PRO is enough air space around the unit for example. 8.2 Mains voltage Before you start with trip-hop. The line outputs work ?...
... will recognize and display the note. To quit EDIT mode, press either the TUNER or the TAP button. INSTALLATION 8.1 Rack mounting The BEHRINGER V-AMP PRO requires two height units (2 HU) for further details). 7. Please refer to change the preset reference pitch “A”. INSTALLATION ...you maximum freedom for 115 V operation! + If you set to the voltage shown next to export models designed exclusively for tuning your BEHRINGER V-AMP PRO is enough air space around the unit for example. 8.2 Mains voltage Before you start with trip-hop. The line outputs work ?...


