Quick Start Guide
Page 1
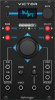
Quick Start Guide VICTOR Quad Vector Morphing Oscillator Module for Eurorack with 128 Waveforms and OLED Oscilloscope V 0.0
Quick Start Guide VICTOR Quad Vector Morphing Oscillator Module for Eurorack with 128 Waveforms and OLED Oscilloscope V 0.0
Quick Start Guide
Page 11
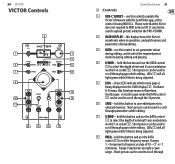
... DATA control (3) can be used to control it using MIDI CCs. Short presses can be used to select the depth of external X-axis modulation via the Y-in the PRO-VS MINI. (2) OLED DISPLAY - LEDs (5) will all light green while Y Mod is being adjusted. (8)... FREQ - Range 9 represents an eight octave range. 20 VICTOR VICTOR Controls (2) (1) (3) (5) (4) (6) (7) (8) (9) (12) (10) (13) (11) (14) (15) (16) (17) Quick Start Guide 21 (EN) Controls (1) USB-C SOCKET ...
... DATA control (3) can be used to control it using MIDI CCs. Short presses can be used to select the depth of external X-axis modulation via the Y-in the PRO-VS MINI. (2) OLED DISPLAY - LEDs (5) will all light green while Y Mod is being adjusted. (8)... FREQ - Range 9 represents an eight octave range. 20 VICTOR VICTOR Controls (2) (1) (3) (5) (4) (6) (7) (8) (9) (12) (10) (13) (11) (14) (15) (16) (17) Quick Start Guide 21 (EN) Controls (1) USB-C SOCKET ...
Quick Start Guide
Page 61
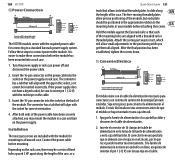
...should be a series of fixed holes spaced 2 HP apart along the length of the case. Connect the power cable before mounting. Hold the module against the Eurorack rails so that will align with the socket for correct orientation. 4. El conector tiene una pestaña que se alineará...12V GROUND - 12V + 12V GROUND - 12V Connect end P1 to the module socket Connect end P2 to the power supply The VICTOR module comes with the required power cable for connecting to the mounting holes in your module before attaching the screws. Insert the 10-pin connector into the socket on ...
...should be a series of fixed holes spaced 2 HP apart along the length of the case. Connect the power cable before mounting. Hold the module against the Eurorack rails so that will align with the socket for correct orientation. 4. El conector tiene una pestaña que se alineará...12V GROUND - 12V + 12V GROUND - 12V Connect end P1 to the module socket Connect end P2 to the power supply The VICTOR module comes with the required power cable for connecting to the mounting holes in your module before attaching the screws. Insert the 10-pin connector into the socket on ...
Quick Start Guide
Page 68
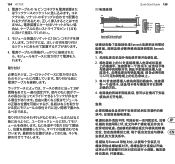
134 VICTOR 2 16 1 (-12 V 3 10 4 取り付け 2 HP (CN P1 21 Red Stripe Quick Start Guide 135 P2 12 10 9 200 mm ± 10 15 16 HOT USED + 12V GROUND - 12V + 12V GROUND - 12V Connect end P1 to the module socket Connect end P2 to the power supply Eurorack Eurorack 案例。 1 2 16 1 (-12 V 3. 将 10 4 安装 2 HP Eurorack
134 VICTOR 2 16 1 (-12 V 3 10 4 取り付け 2 HP (CN P1 21 Red Stripe Quick Start Guide 135 P2 12 10 9 200 mm ± 10 15 16 HOT USED + 12V GROUND - 12V + 12V GROUND - 12V Connect end P1 to the module socket Connect end P2 to the power supply Eurorack Eurorack 案例。 1 2 16 1 (-12 V 3. 将 10 4 安装 2 HP Eurorack

