
Manual
Page 1
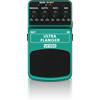
...is inverted before it is not inverted. In this ¼" TS IN connector to plug in us by purchasing the BEHRINGER ULTRA FLANGER UF300. It also serves as a battery level indicator. (7) Use the footswitch to your confidence in the instrument cable. ...Controls (1) (6) (2) (5) (3) (4) (9) (8) (7) (1) The MODE switch lets you choose between classic and detuned flanger effects with two tape recorders running synchronously. ULTRA FLANGER UF300 2-Mode Flanger Effects Pedal Thank you for vibrato effects. (2) With the MANUAL control you can choose between negative feedback (Mode 1) or ...
...is inverted before it is not inverted. In this ¼" TS IN connector to plug in us by purchasing the BEHRINGER ULTRA FLANGER UF300. It also serves as a battery level indicator. (7) Use the footswitch to your confidence in the instrument cable. ...Controls (1) (6) (2) (5) (3) (4) (9) (8) (7) (1) The MODE switch lets you choose between classic and detuned flanger effects with two tape recorders running synchronously. ULTRA FLANGER UF300 2-Mode Flanger Effects Pedal Thank you for vibrato effects. (2) With the MANUAL control you can choose between negative feedback (Mode 1) or ...
Manual
Page 2
...BEHRINGER IS PART OF THE MUSIC GROUP (MUSIC-GROUP.COM). Box 146, Road Town, Tortola, British Virgin Islands Do not service product yourself. MUSIC GROUP PRODUCTS ARE SOLD THROUGH AUTHORIZED FULLFILLERS AND RESELLERS ONLY. As soon as you insert the jack into the in connector. ULTRA FLANGER UF300... The BATTERY COMPARTMENT is located at the bottom. 2. To install or replace the 9 V battery, press the hinges with a ballpen and remove the pedal cover. Specifications and appearance may be made from the in connector...
...BEHRINGER IS PART OF THE MUSIC GROUP (MUSIC-GROUP.COM). Box 146, Road Town, Tortola, British Virgin Islands Do not service product yourself. MUSIC GROUP PRODUCTS ARE SOLD THROUGH AUTHORIZED FULLFILLERS AND RESELLERS ONLY. As soon as you insert the jack into the in connector. ULTRA FLANGER UF300... The BATTERY COMPARTMENT is located at the bottom. 2. To install or replace the 9 V battery, press the hinges with a ballpen and remove the pedal cover. Specifications and appearance may be made from the in connector...
