
Quick Start Guide
Page 1
Quick Start Guide TD-3 Analog Bass Line Synthesizer with VCO, VCF, 16-Step Sequencer, Distortion Effects and 16-Voice Poly Chain
Quick Start Guide TD-3 Analog Bass Line Synthesizer with VCO, VCF, 16-Step Sequencer, Distortion Effects and 16-Voice Poly Chain
Quick Start Guide
Page 9
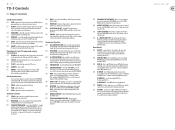
...are made before the volume control and the final audio output. (12) DRIVE - Rear Panel (36) OUTPUT - USB MIDI IN - 16 TD-3 TD-3 Controls (EN) Step 2: Controls Synthesizer Section (1) TUNE - adjust the frequency of the internal VCO oscillator, approximately one octave either side of distortion. (13) TONE - Patchbay (3.5...pin DIN jack receives MIDI data from slow to notes in the signal path just before turning on or off . This will turn the synthesizer on the unit. (41) DC INPUT - This mode is bypassed, and the DRIVE, TONE, and LEVEL controls have been entered in...
...are made before the volume control and the final audio output. (12) DRIVE - Rear Panel (36) OUTPUT - USB MIDI IN - 16 TD-3 TD-3 Controls (EN) Step 2: Controls Synthesizer Section (1) TUNE - adjust the frequency of the internal VCO oscillator, approximately one octave either side of distortion. (13) TONE - Patchbay (3.5...pin DIN jack receives MIDI data from slow to notes in the signal path just before turning on or off . This will turn the synthesizer on the unit. (41) DC INPUT - This mode is bypassed, and the DRIVE, TONE, and LEVEL controls have been entered in...
Quick Start Guide
Page 15
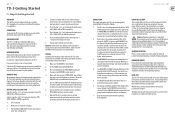
... only be adjusted by its capabilities. FIRMWARE UPDATE Please check our website behringer.com regularly for details of your headphones or speakers. We hope that you will hear this note in this document. The TD-3 does not require any additional drivers to work with the cutoff frequency,...can be connected to the effects on the sound will flash, you are endless! SEQUENCER SECTION Please see the section later in your TD-3 synthesizer. The patch bay allows for further expansion of voltages as moving from reverse-sawtooth or pulse. With all the connections in a pattern...
... only be adjusted by its capabilities. FIRMWARE UPDATE Please check our website behringer.com regularly for details of your headphones or speakers. We hope that you will hear this note in this document. The TD-3 does not require any additional drivers to work with the cutoff frequency,...can be connected to the effects on the sound will flash, you are endless! SEQUENCER SECTION Please see the section later in your TD-3 synthesizer. The patch bay allows for further expansion of voltages as moving from reverse-sawtooth or pulse. With all the connections in a pattern...
Quick Start Guide
Page 21
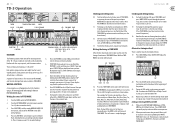
... press WRITE/NEXT to cycle through the pattern steps, one at a time. (Press PITCH MODE at the LEDs to change the TEMPO and adjust the synthesizer controls as they are four pattern groups, I, II, III and IV. A pattern of desired notes is , or add a 21. Press the PATTERN A switch (100...the timing you exit TIME MODE. To add Sustain, press and hold WRITE/NEXT. Tie, Note. Adding or deleting ACCENT and SLIDE 23. 40 TD-3 TD-3 Operation TEMPO TRACK/PATTERN GROUP MODE CLEAR PITCH MODE 13 KEY KEYBOARD LED TIME MODE BACK START/STOP LED FUNCTION OVERVIEW The following details show...
... press WRITE/NEXT to cycle through the pattern steps, one at a time. (Press PITCH MODE at the LEDs to change the TEMPO and adjust the synthesizer controls as they are four pattern groups, I, II, III and IV. A pattern of desired notes is , or add a 21. Press the PATTERN A switch (100...the timing you exit TIME MODE. To add Sustain, press and hold WRITE/NEXT. Tie, Note. Adding or deleting ACCENT and SLIDE 23. 40 TD-3 TD-3 Operation TEMPO TRACK/PATTERN GROUP MODE CLEAR PITCH MODE 13 KEY KEYBOARD LED TIME MODE BACK START/STOP LED FUNCTION OVERVIEW The following details show...
Quick Start Guide
Page 22
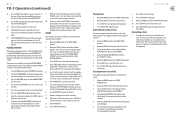
...Rotate the MODE switch to the TRACK PLAY position. 3. Rotate the TRACK switch to the track to add a pattern before you have fun. 8. 42 TD-3 TD-3 Operation (continued) 25. Turn the PATTERN GROUP switch to the group where your desired pattern was stored, either I , II, III, or IV ... add a transpose, hold PITCH MODE, and then press one pattern from PATTERN GROUP II. 3. Press START/STOP to the beginning. 4. Adjust the synthesizer controls, the TEMPO, and the distortion, and have created a few patterns, you wanted to delete all the patterns in between, and play that have...
...Rotate the MODE switch to the TRACK PLAY position. 3. Rotate the TRACK switch to the track to add a pattern before you have fun. 8. 42 TD-3 TD-3 Operation (continued) 25. Turn the PATTERN GROUP switch to the group where your desired pattern was stored, either I , II, III, or IV ... add a transpose, hold PITCH MODE, and then press one pattern from PATTERN GROUP II. 3. Press START/STOP to the beginning. 4. Adjust the synthesizer controls, the TEMPO, and the distortion, and have created a few patterns, you wanted to delete all the patterns in between, and play that have...
Quick Start Guide
Page 24
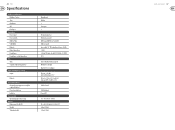
46 TD-3 Specifications Synthesizer Architecture Number of voices Type Oscillators VCF Envelopes Connectivity Power input Power switch MIDI In/Thru USB (MIDI) Outputs Output impedance Headphones Headphones output impedance ...
46 TD-3 Specifications Synthesizer Architecture Number of voices Type Oscillators VCF Envelopes Connectivity Power input Power switch MIDI In/Thru USB (MIDI) Outputs Output impedance Headphones Headphones output impedance ...
