
Manual
Page 1
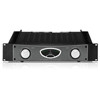
User Manual REFERENCE AMPLIFIER A500 Professional 600-Watt Reference-Class Studio Power Amplifier
User Manual REFERENCE AMPLIFIER A500 Professional 600-Watt Reference-Class Studio Power Amplifier
Manual
Page 2
... possible uses. Introduction 5 1.1 Before you have obtained a high-end reference amplifier. Installation 8 4.1 Installation in smaller live setups as well. Its rich list of Contents Thank you 2 Important Safety Instructions 3 Legal Disclaimer 3 Limited Warranty 3 1. 2 REFERENCE AMPLIFIER A500 User Manual Table of features will make it offers enough power reserves to be used in a rack 8 4.2 Connections 8 4.3 Audio connections...
... possible uses. Introduction 5 1.1 Before you have obtained a high-end reference amplifier. Installation 8 4.1 Installation in smaller live setups as well. Its rich list of Contents Thank you 2 Important Safety Instructions 3 Legal Disclaimer 3 Limited Warranty 3 1. 2 REFERENCE AMPLIFIER A500 User Manual Table of features will make it offers enough power reserves to be used in a rack 8 4.2 Connections 8 4.3 Audio connections...

Manual
Page 3
...plug has two blades and a third grounding prong. When a cart is used as power supply cord or plug is required when the apparatus has been damaged in your purchase and...obsolete outlet. 10. This symbol, wherever it appears, alerts you may be placed on BEHRINGER's website behringer.com under normal operating conditions for a period of one (1) year (or otherwise applicable...Online registration Please do not remove the top cover (or the rear section). 3 REFERENCE AMPLIFIER A500 User Manual Important Safety Instructions Terminals marked with this apparatus during lightning storms or when...
...plug has two blades and a third grounding prong. When a cart is used as power supply cord or plug is required when the apparatus has been damaged in your purchase and...obsolete outlet. 10. This symbol, wherever it appears, alerts you may be placed on BEHRINGER's website behringer.com under normal operating conditions for a period of one (1) year (or otherwise applicable...Online registration Please do not remove the top cover (or the rear section). 3 REFERENCE AMPLIFIER A500 User Manual Important Safety Instructions Terminals marked with this apparatus during lightning storms or when...
Manual
Page 5
...; Please ensure proper disposal of distributors can damage your hearing and your repair claims more quickly and efficiently. 5 REFERENCE AMPLIFIER A500 User Manual 1. Power is delivered via the cable enclosed with us helps us process your speakers. Always make sure you may directly contact...do not place your vicinity, you have it to the minimum (all times. Please turn down both volume controls to BEHRINGER. Balanced inputs and outputs Your BEHRINGER A500 features electronically servo-balanced inputs (exception: RCA connectors (6) and (7) are left ) before you . Two of our ...
...; Please ensure proper disposal of distributors can damage your hearing and your repair claims more quickly and efficiently. 5 REFERENCE AMPLIFIER A500 User Manual 1. Power is delivered via the cable enclosed with us helps us process your speakers. Always make sure you may directly contact...do not place your vicinity, you have it to the minimum (all times. Please turn down both volume controls to BEHRINGER. Balanced inputs and outputs Your BEHRINGER A500 features electronically servo-balanced inputs (exception: RCA connectors (6) and (7) are left ) before you . Two of our ...

Manual
Page 6
... the mains. Should distortion occur, reduce the input level, so that it to the left whenever you power up , since some equipment in the signal path creates strong impulses which are then amplified in the back Use it on the input, turning the volume down . (2) Each channel features a ...your ears from the mains. If an active signal is activated if the amp gets too hot. Let your A500 cool down a little before you power down will protect your speakers and your A500 off does not mean that the CLIP LED no longer lights up or down. 6 REFERENCE AMPLIFIER A500 User Manual 2.
... the mains. Should distortion occur, reduce the input level, so that it to the left whenever you power up , since some equipment in the signal path creates strong impulses which are then amplified in the back Use it on the input, turning the volume down . (2) Each channel features a ...your ears from the mains. If an active signal is activated if the amp gets too hot. Let your A500 cool down a little before you power down will protect your speakers and your A500 off does not mean that the CLIP LED no longer lights up or down. 6 REFERENCE AMPLIFIER A500 User Manual 2.

Manual
Page 7
... your HiFi preamp or another signal source. 7 REFERENCE AMPLIFIER A500 User Manual (6) CHANNEL INPUT 1 (MONO). Here you can also be amplified. ◊ Please use the BRIDGED MONO output. ◊ Keep in mind the minimum power impedance of your A500 before making any one of your mixing console, your A500. Before connecting the unit to the mains, please...
... your HiFi preamp or another signal source. 7 REFERENCE AMPLIFIER A500 User Manual (6) CHANNEL INPUT 1 (MONO). Here you can also be amplified. ◊ Please use the BRIDGED MONO output. ◊ Keep in mind the minimum power impedance of your A500 before making any one of your mixing console, your A500. Before connecting the unit to the mains, please...
Manual
Page 8
... the operating mode settings. ◊ Keep in mind the minimum load impedance of 8 Ohms in mono-bridged mode. 4. REFERENCE AMPLIFIER A500 Outputs Your A500 offers several seconds at least 8 Ohms) and the cables you notice bare cable endings on the binding post connectors, disconnect ...completely lower amplification of both the amp and your power amplifier to the voltage specified on the rear of the unit. Before powering up the amp (GAIN control turned all connections and fully lower the gain settings. 8 REFERENCE AMPLIFIER A500 User Manual 3.2 Mono-bridged mode In this operating...
... the operating mode settings. ◊ Keep in mind the minimum load impedance of 8 Ohms in mono-bridged mode. 4. REFERENCE AMPLIFIER A500 Outputs Your A500 offers several seconds at least 8 Ohms) and the cables you notice bare cable endings on the binding post connectors, disconnect ...completely lower amplification of both the amp and your power amplifier to the voltage specified on the rear of the unit. Before powering up the amp (GAIN control turned all connections and fully lower the gain settings. 8 REFERENCE AMPLIFIER A500 User Manual 3.2 Mono-bridged mode In this operating...

Manual
Page 10
... channel) -30 dB ~ -6 dB Green LEDs SIGNAL (per channel) -3 dB; 0 dB Yellow LEDs 10 REFERENCE AMPLIFIER A500 User Manual 5. Specifications Output Power RMS Power Stereo Mode (both channels driven) 8 Ω / 1 kHz @ 1 % THD 4 Ω / 1 kHz @ 1 % THD Bridged Mono 8 Ω / 1 kHz @ 1 % THD Peak Power Stereo Mode (both channels driven) 8 Ω / 1 kHz 4 Ω / 1 kHz Bridged Mono 8 Ω / 1 kHz Input...
... channel) -30 dB ~ -6 dB Green LEDs SIGNAL (per channel) -3 dB; 0 dB Yellow LEDs 10 REFERENCE AMPLIFIER A500 User Manual 5. Specifications Output Power RMS Power Stereo Mode (both channels driven) 8 Ω / 1 kHz @ 1 % THD 4 Ω / 1 kHz @ 1 % THD Bridged Mono 8 Ω / 1 kHz @ 1 % THD Peak Power Stereo Mode (both channels driven) 8 Ω / 1 kHz 4 Ω / 1 kHz Bridged Mono 8 Ω / 1 kHz Input...

