Owners Manual
Page 2
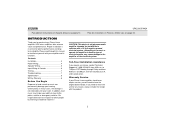
...página 12. Unfortunately, in many cases, the damage is essential for purchasing a Phase Linear amplifier. to 5:00 p.m. INTRODUCTION Thank you will need to the amplifier or the electrical system. Please read through Friday and from 8:30 a.m. to 7:00 p.m. EST on...have respect for installation in another type of electrical system may hinder your ability to loud sounds or music can permanently damage your amplifier and its functions. Contents Installation 3 Power Wiring 4 Speaker Wiring 5 Input Wiring & Controls 6 Testing 7 Troubleshooting 7 Specifications ...
...página 12. Unfortunately, in many cases, the damage is essential for purchasing a Phase Linear amplifier. to 5:00 p.m. INTRODUCTION Thank you will need to the amplifier or the electrical system. Please read through Friday and from 8:30 a.m. to 7:00 p.m. EST on...have respect for installation in another type of electrical system may hinder your ability to loud sounds or music can permanently damage your amplifier and its functions. Contents Installation 3 Power Wiring 4 Speaker Wiring 5 Input Wiring & Controls 6 Testing 7 Troubleshooting 7 Specifications ...
Owners Manual
Page 3
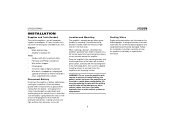
...mounting location and the drilling of pilot holes will not operate properly and could become permanently damaged. WARNING: Do not cover the amplifier with a marker, pen or pencil. Follow the installation instructions carefully, or have everything you need tools, supplies and adapters. ...mounting locations include under the front passenger seat or in mounting. UPA224/UPA424 INSTALLATION Supplies and Tools Needed To install the amplifiers, you will need before starting the installation. It is grounded to the mounting surface. Check the battery ground (there should...
...mounting location and the drilling of pilot holes will not operate properly and could become permanently damaged. WARNING: Do not cover the amplifier with a marker, pen or pencil. Follow the installation instructions carefully, or have everything you need tools, supplies and adapters. ...mounting locations include under the front passenger seat or in mounting. UPA224/UPA424 INSTALLATION Supplies and Tools Needed To install the amplifiers, you will need before starting the installation. It is grounded to the mounting surface. Check the battery ground (there should...
Owners Manual
Page 4
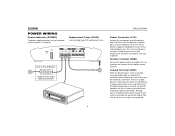
...Terminal (+12V) Connect the main power wire to the battery, within 18 inches from the receiver to the amplifier remote terminal. To ensure a good ground, scrape away any service that the amplifier is turned on lead from the positive (+) battery post, using an adequate size fuse or circuit breaker capable..., leaving enough length to complete the installation and to allow for a tight, secure ground. Remote Terminal (REM) Connect the power antenna or amplifier turn-on . A fuse or circuit breaker must be needed at a later date. Use a "ring" terminal of the selected power wire.
...Terminal (+12V) Connect the main power wire to the battery, within 18 inches from the receiver to the amplifier remote terminal. To ensure a good ground, scrape away any service that the amplifier is turned on lead from the positive (+) battery post, using an adequate size fuse or circuit breaker capable..., leaving enough length to complete the installation and to allow for a tight, secure ground. Remote Terminal (REM) Connect the power antenna or amplifier turn-on . A fuse or circuit breaker must be needed at a later date. Use a "ring" terminal of the selected power wire.
Owners Manual
Page 6
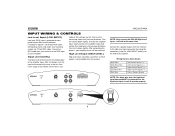
...CH1 CH2 HIGH LEVEL CH1/2INPUT +- +- 6 Connect the speaker outputs from your receiver to the RCA input on the end of the amplifier. Connect an RCA cable from the receiver to the high level input connector, then plug the connector(s) into the "HIGH INPUT" outlet(s) ...Power) Ground NOTE: The black wire from the receiver. After installation, turn the volume up slowly until you hear distortion. After completing this process, your amplifier. Turn the volume down slightly. UPA424 POWER LEVEL MIN MAX LOW-INPUT CH1 CH3 CH2 CH4 HIGH LEVEL CH1/2INPUT CH3/4INPUT + - +-+- + ...
...CH1 CH2 HIGH LEVEL CH1/2INPUT +- +- 6 Connect the speaker outputs from your receiver to the RCA input on the end of the amplifier. Connect an RCA cable from the receiver to the high level input connector, then plug the connector(s) into the "HIGH INPUT" outlet(s) ...Power) Ground NOTE: The black wire from the receiver. After installation, turn the volume up slowly until you hear distortion. After completing this process, your amplifier. Turn the volume down slightly. UPA424 POWER LEVEL MIN MAX LOW-INPUT CH1 CH3 CH2 CH4 HIGH LEVEL CH1/2INPUT CH3/4INPUT + - +-+- + ...
Owners Manual
Page 7
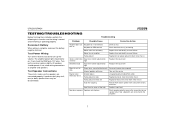
...not turn up the receiver volume slightly. Turn up the volume. All speakers should come on. Test Speaker Connections Blown fuse at amplifier Replace fuse and identify cause of phase Check speaker polarity; If not, check the REM and +12V wires. reverse the connection to the...with amp Take unit for service These tests make sure the wiring is correct and everything is complete, reconnect the battery negative terminal. The amplifier power light should operate. OTING Before finishing the installation, perform the following tests to make sure the speakers are connected to one (or ...
...not turn up the receiver volume slightly. Turn up the volume. All speakers should come on. Test Speaker Connections Blown fuse at amplifier Replace fuse and identify cause of phase Check speaker polarity; If not, check the REM and +12V wires. reverse the connection to the...with amp Take unit for service These tests make sure the wiring is correct and everything is complete, reconnect the battery negative terminal. The amplifier power light should operate. OTING Before finishing the installation, perform the following tests to make sure the speakers are connected to one (or ...