User Manual
Page 11
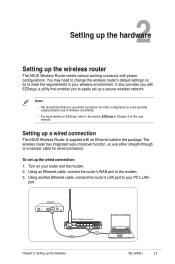
...cable for initial configuration to avoid possible setup problems due to meet the requirements in Chapter 4 of this user manual. To set up a wired connection The ASUS Wireless Router is supplied with proper configurations. The wireless router has integrated auto-crossover function, so use...1. Turn on EZSetup, refer to easily set up the hardware WL-520GU 11 You may need to change the wireless router's default settings so as to wireless uncertainty. • For more details on your wireless environment. It also provides you with EZSetup, a utility that...
...cable for initial configuration to avoid possible setup problems due to meet the requirements in Chapter 4 of this user manual. To set up a wired connection The ASUS Wireless Router is supplied with proper configurations. The wireless router has integrated auto-crossover function, so use...1. Turn on EZSetup, refer to easily set up the hardware WL-520GU 11 You may need to change the wireless router's default settings so as to wireless uncertainty. • For more details on your wireless environment. It also provides you with EZSetup, a utility that...

User Manual
Page 15
Otherwise, click Specify an IP address, then key in the IP address and Subnet Mask. Select TCP/IP then click Properties. 3. Click Start > Control Panel > Network to automatically obtain an IP address, click Obtain an IP address automatically then click OK. If you want your computer to display the Network setup window. 2. Chapter 3: Configuring the clients WL-520GU 15 Windows® 9x/ME 1.
Otherwise, click Specify an IP address, then key in the IP address and Subnet Mask. Select TCP/IP then click Properties. 3. Click Start > Control Panel > Network to automatically obtain an IP address, click Obtain an IP address automatically then click OK. If you want your computer to display the Network setup window. 2. Chapter 3: Configuring the clients WL-520GU 15 Windows® 9x/ME 1.

User Manual
Page 17
Go to Control Panel > Network to assign IP address automatically. • Manually set up the IP address, subnet mask, and default gateway. Chapter 3: Configuring the clients WL-520GU 17 Select TCP/IP Protocol from the Network Protocols list then click Properties. 3. From the IP Address tab of the Microsoft TCP/IP Properties windows, you can: • Select the type of network adapter installed in your system. • Set the router to display the Network setup window then select the Protocols tab. 2. Windows® NT4.0 1.
Go to Control Panel > Network to assign IP address automatically. • Manually set up the IP address, subnet mask, and default gateway. Chapter 3: Configuring the clients WL-520GU 17 Select TCP/IP Protocol from the Network Protocols list then click Properties. 3. From the IP Address tab of the Microsoft TCP/IP Properties windows, you can: • Select the type of network adapter installed in your system. • Set the router to display the Network setup window then select the Protocols tab. 2. Windows® NT4.0 1.

User Manual
Page 22
...Network (WAN) using the Quick Internet Setup (QIS) on any of the ASUS Wireless Router. Using the Network Map Network Map allows you to quickly set up WAN using the Quick Internet Setup (QIS) feature, or to display information on the SSID, authentication method, WEP encryption, LAN IP, PIN code,... MAC address, or turn the wireless radio on EZSetup, refer to view the status and configure the connection settings of this icon to quickly set up your network. Launch the EZSetup function from the System status screen. 22 WL-520GU ...
...Network (WAN) using the Quick Internet Setup (QIS) on any of the ASUS Wireless Router. Using the Network Map Network Map allows you to quickly set up WAN using the Quick Internet Setup (QIS) feature, or to display information on the SSID, authentication method, WEP encryption, LAN IP, PIN code,... MAC address, or turn the wireless radio on EZSetup, refer to view the status and configure the connection settings of this icon to quickly set up your network. Launch the EZSetup function from the System status screen. 22 WL-520GU ...

User Manual
Page 23
.../unblock a client. Chapter 4: Configuring via the web GUI WL-520GU 23 Setting up your WAN using the Quick Internet Setup (QIS) The Quick Internet Setup (QIS) function automatically detects the Internet connection type. Select your... connection type from these types of ISP services: Automatic IP, PPPoE, PPTP, L2TP, and Static IP. 3. Click Apply all settings to save the settings. USB printer status Click this icon to display information about the USB printer connected to the wireless router...
.../unblock a client. Chapter 4: Configuring via the web GUI WL-520GU 23 Setting up your WAN using the Quick Internet Setup (QIS) The Quick Internet Setup (QIS) function automatically detects the Internet connection type. Select your... connection type from these types of ISP services: Automatic IP, PPPoE, PPTP, L2TP, and Static IP. 3. Click Apply all settings to save the settings. USB printer status Click this icon to display information about the USB printer connected to the wireless router...

User Manual
Page 27
Click Next. Click Install...Utilities. 2. To install the utilities: 1. If Autorun is disabled, run setup.exe from the root directory of the support CD. Chapter 5: Installing the utilities WL-520GU 27 5 Installing the utilities Installing the utilities The support CD contains the utilities for configuring the ASUS Wireless Router. To install the ASUS WLAN Utilities in Microsoft® Windows, insert the support CD in the CD drive.
Click Next. Click Install...Utilities. 2. To install the utilities: 1. If Autorun is disabled, run setup.exe from the root directory of the support CD. Chapter 5: Installing the utilities WL-520GU 27 5 Installing the utilities Installing the utilities The support CD contains the utilities for configuring the ASUS Wireless Router. To install the ASUS WLAN Utilities in Microsoft® Windows, insert the support CD in the CD drive.

User Manual
Page 28
Click Finish when setup is complete. 28 WL-520GU Chapter 5: Installing the utilities 3. Click Next to accept the default destination folder or click Browse to accept the default program folder or enter another path. 4. Click Next to specify another name. 5.
Click Finish when setup is complete. 28 WL-520GU Chapter 5: Installing the utilities 3. Click Next to accept the default destination folder or click Browse to accept the default program folder or enter another path. 4. Click Next to specify another name. 5.

User Manual
Page 30
... theEZSetup Wizard. 2. When done, click Next. 30 WL-520GU Chapter 5: Installing the utilities Click Start > All Programs > ASUS Utility > WLAN Card >EZSetup Wizard to set up your hardware. It allows you use a wireless LAN card with WPS (Wireless Protected Setup) function. • Windows® operating systems and wireless LAN cards/adapters that supports the Wi-Fi...
... theEZSetup Wizard. 2. When done, click Next. 30 WL-520GU Chapter 5: Installing the utilities Click Start > All Programs > ASUS Utility > WLAN Card >EZSetup Wizard to set up your hardware. It allows you use a wireless LAN card with WPS (Wireless Protected Setup) function. • Windows® operating systems and wireless LAN cards/adapters that supports the Wi-Fi...

User Manual
Page 33
Note: For more details on adding devices to the network using a USB flash drive on the next page. 7. Installation is completed. Chapter 5: Installing the utilities WL-520GU 33 Click Finish to the section Adding network devices using a USB flash drive, refer to close the EZSetup Wizard. Click Next to connect to configure the Internet settings, click Setup. If you want to the Internet. You have connected to the network. 6. Click Save or print settings for future reference or Save settings to a USB flash drive to add other devices to the wireless router.
Note: For more details on adding devices to the network using a USB flash drive on the next page. 7. Installation is completed. Chapter 5: Installing the utilities WL-520GU 33 Click Finish to the section Adding network devices using a USB flash drive, refer to close the EZSetup Wizard. Click Next to connect to configure the Internet settings, click Setup. If you want to the Internet. You have connected to the network. 6. Click Save or print settings for future reference or Save settings to a USB flash drive to add other devices to the wireless router.

User Manual
Page 35
Locate the SetupWireless.exe from this computer to the wireless network. 4. Click OK to run it. 3. Remove the USB flash drive from the USB drive, and double-click to exit the Wireless Network Setup Wizard. Chapter 5: Installing the utilities WL-520GU 35 Click Yes to add this computer, and then plug to the computer that you want to add to the wireless network. 5.
Locate the SetupWireless.exe from this computer to the wireless network. 4. Click OK to run it. 3. Remove the USB flash drive from the USB drive, and double-click to exit the Wireless Network Setup Wizard. Chapter 5: Installing the utilities WL-520GU 35 Click Yes to add this computer, and then plug to the computer that you want to add to the wireless network. 5.

User Manual
Page 36
... Next. 36 WL-520GU Chapter 5: Installing the utilities Follow the onscreen instructions to access the USB printer. Network Printer Setup Network Printer Setup is compatible with your USB Printer: 1. To set up a USB printer on your wireless router and allow clients in your network to set up your ASUS wireless router, visit the ASUS website at www.asus.com and...
... Next. 36 WL-520GU Chapter 5: Installing the utilities Follow the onscreen instructions to access the USB printer. Network Printer Setup Network Printer Setup is compatible with your USB Printer: 1. To set up a USB printer on your wireless router and allow clients in your network to set up your ASUS wireless router, visit the ASUS website at www.asus.com and...

User Manual
Page 37
3. Wait for a few minutes for the initial setup to complete the installation. Chapter 5: Installing the utilities WL-520GU 37 Click Next. 4. Click Finish to finish.
3. Wait for a few minutes for the initial setup to complete the installation. Chapter 5: Installing the utilities WL-520GU 37 Click Next. 4. Click Finish to finish.