User Manual
Page 3
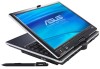
Using the Notebook PC Pointing Device 36 Using the Touchpad 36 Touchpad Usage Illustrations 37 Caring for the Touchpad 38 Automatic Touchpad Disabling 38 Storage Devices 39 Expansion Card ... models 49 Trusted Platform Module (TPM) (on selected models 34 4. Contents Table of Contents (Cont.) Status Indicators 32 Multimedia Control Keys (on selected models 50 Tablet PC Mode 51 Tablet PC Input Panel 53 Tablet PC Software 55 Fingerprint Scanner 58 Appendix Optional Accessories Optional Connections Operating System and Software Notebook...
Using the Notebook PC Pointing Device 36 Using the Touchpad 36 Touchpad Usage Illustrations 37 Caring for the Touchpad 38 Automatic Touchpad Disabling 38 Storage Devices 39 Expansion Card ... models 49 Trusted Platform Module (TPM) (on selected models 34 4. Contents Table of Contents (Cont.) Status Indicators 32 Multimedia Control Keys (on selected models 50 Tablet PC Mode 51 Tablet PC Input Panel 53 Tablet PC Software 55 Fingerprint Scanner 58 Appendix Optional Accessories Optional Connections Operating System and Software Notebook...
User Manual
Page 13
...any radiation or flickering, so it is a pointing device that provides the same functions as your identification key. 10 Instant Keys (Tablet PC) Instant keys allow you to hear audio without additional attachments. Audio features are described in section 3. 7 Keyboard The keyboard provides full...latch must be depressed) and palm rest for video conferencing, voice narrations, or simple audio recordings. 3 Display Panel The Notebook PC uses an active matrix TFT LCD, which provides excellent viewing like that produces rich, vibrant sound (results improved with its buttons ...
...any radiation or flickering, so it is a pointing device that provides the same functions as your identification key. 10 Instant Keys (Tablet PC) Instant keys allow you to hear audio without additional attachments. Audio features are described in section 3. 7 Keyboard The keyboard provides full...latch must be depressed) and palm rest for video conferencing, voice narrations, or simple audio recordings. 3 Display Panel The Notebook PC uses an active matrix TFT LCD, which provides excellent viewing like that produces rich, vibrant sound (results improved with its buttons ...

User Manual
Page 20
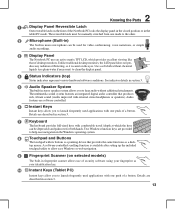
... other. 20 The reversible latch must be manually switched from one mode to the table or else the hinges may break! Never lift the Notebook PC by the display panel! 3 Display Panel Reversible Latch One reversible latch on the front of the pen used on this side of the Notebook...
... other. 20 The reversible latch must be manually switched from one mode to the table or else the hinges may break! Never lift the Notebook PC by the display panel! 3 Display Panel Reversible Latch One reversible latch on the front of the pen used on this side of the Notebook...

User Manual
Page 31
... switch the system between various power saving modes. Windows software settings are accidentally pressed while using the tablet PC pen on the display. 31 Press once to use with tablet PC mode. Applying or removing the power adapter will light. Used for logging into Windows. Wireless Switch ...DEL Key Pressing this key here is shown on the display panel. The power saving modes control many aspects of the Notebook PC to maximize performance versus battery time. Rotate Screen Key For use the wireless LAN or Bluetooth. Power4Gear eXtreme Key The Power4Gear ...
... switch the system between various power saving modes. Windows software settings are accidentally pressed while using the tablet PC pen on the display. 31 Press once to use with tablet PC mode. Applying or removing the power adapter will light. Used for logging into Windows. Wireless Switch ...DEL Key Pressing this key here is shown on the display panel. The power saving modes control many aspects of the Notebook PC to maximize performance versus battery time. Rotate Screen Key For use the wireless LAN or Bluetooth. Power4Gear eXtreme Key The Power4Gear ...

User Manual
Page 51
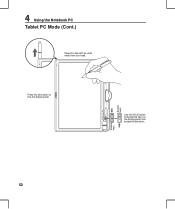
When the display is rotated into the tablet PC mode, the latch must be reversed in order to activate the writing function. Use the tip of the display panel from rocking. POWER CTRL.ALT.DEL ESC HOLD ON OFF 2 1 Rotate the display panel vertically using the tablet PC function. You can also use your finger or other pen-like pointing device to support the sides of the tablet PC pen to lock the display panel. 51 4 Using the Notebook PC Tablet PC Mode The following are illustrations for using both hands to activate the writing function.
When the display is rotated into the tablet PC mode, the latch must be reversed in order to activate the writing function. Use the tip of the display panel from rocking. POWER CTRL.ALT.DEL ESC HOLD ON OFF 2 1 Rotate the display panel vertically using the tablet PC function. You can also use your finger or other pen-like pointing device to support the sides of the tablet PC pen to lock the display panel. 51 4 Using the Notebook PC Tablet PC Mode The following are illustrations for using both hands to activate the writing function.
User Manual
Page 52
Disable keys. 52 Use the HOLD switch to lock the display panel. Press this side with air vents away from accidental activation. 4 Using the Notebook PC Tablet PC Mode (Cont.) Keep this latch down to disable the keys on the display panel from your body. Enable keys.
Disable keys. 52 Use the HOLD switch to lock the display panel. Press this side with air vents away from accidental activation. 4 Using the Notebook PC Tablet PC Mode (Cont.) Keep this latch down to disable the keys on the display panel from your body. Enable keys.
User Manual
Page 53
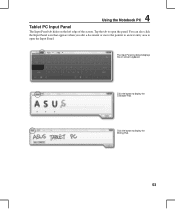
Tap the tab to open the panel. The Input Panel by default displays the on the left edge of the screen. You can also click the Input Panel icon that appears when you edit a document or move the pointer to an text entry area to open the Input Panel. Click the button to display the Writing Pad. 53 Click the button to display the Character Pad. 4 Using the Notebook PC Tablet PC Input Panel The Input Panel tab hides on -screen keyboard.
Tap the tab to open the panel. The Input Panel by default displays the on the left edge of the screen. You can also click the Input Panel icon that appears when you edit a document or move the pointer to an text entry area to open the Input Panel. Click the button to display the Writing Pad. 53 Click the button to display the Character Pad. 4 Using the Notebook PC Tablet PC Input Panel The Input Panel tab hides on -screen keyboard.

User Manual
Page 54
4 Using the Notebook PC Tablet PC Input Panel (cont.) Click Tools to personalize the Input Panel settings. Select Options for advanced configurations. Click Help if you have problem using the Input Panel. 54 Customize all the settings in Options if needed.
4 Using the Notebook PC Tablet PC Input Panel (cont.) Click Tools to personalize the Input Panel settings. Select Options for advanced configurations. Click Help if you have problem using the Input Panel. 54 Customize all the settings in Options if needed.

User Manual
Page 55
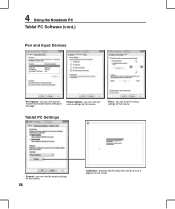
If you use "Classic View," you can make settings for Pen and Input Devices. Run Tablet PC Pen Training to learn about Tablet PC features and differences compared to Tablet PC Pen Training. The "Control Panel" provides a link to "Mobile PC" settings where you start Windows, the Welcome Center will provide a link to that of a standard PC. 4 Using the Notebook PC Tablet PC Software Windows provides integrated tablet PC support when it detects tablet PC functions during installation. When you can find Pen and Input Devices near the center. 55
If you use "Classic View," you can make settings for Pen and Input Devices. Run Tablet PC Pen Training to learn about Tablet PC features and differences compared to Tablet PC Pen Training. The "Control Panel" provides a link to "Mobile PC" settings where you start Windows, the Welcome Center will provide a link to that of a standard PC. 4 Using the Notebook PC Tablet PC Software Windows provides integrated tablet PC support when it detects tablet PC functions during installation. When you can find Pen and Input Devices near the center. 55
User Manual
Page 56
Flicks - Tablet PC Settings General - precisely tap the cross-hairs one-by-one as it appears on this feature. Pointer Options - you can view the various settings for this page. you can view the various settings for this feature. you can view the various settings for this feature. 56 Calibration - 4 Using the Notebook PC Tablet PC Software (cont.) Pen and Input Devices Pen Options - you can view and set the pen tap and pen button settings on the screen.
Flicks - Tablet PC Settings General - precisely tap the cross-hairs one-by-one as it appears on this feature. Pointer Options - you can view the various settings for this page. you can view the various settings for this feature. you can view the various settings for this feature. 56 Calibration - 4 Using the Notebook PC Tablet PC Software (cont.) Pen and Input Devices Pen Options - you can view and set the pen tap and pen button settings on the screen.

User Manual
Page 57
Enable/disable this function and/or with automatic learning on this page. Other - These are just links to the same configuration pages shown here. 57 Display - Tablet PC Software (cont.) Tablet PC Settings (cont.) 4 Using the Notebook PC Handwriting Recognition - Change screen orientation settings on this page.
Enable/disable this function and/or with automatic learning on this page. Other - These are just links to the same configuration pages shown here. 57 Display - Tablet PC Software (cont.) Tablet PC Settings (cont.) 4 Using the Notebook PC Handwriting Recognition - Change screen orientation settings on this page.


