
Software Reference Guide English Version E1496
Page 1
Graphics Card Software Reference
Graphics Card Software Reference
Software Reference Guide English Version E1496
Page 2
... FOR INFORMATIONAL USE ONLY, AND ARE SUBJECT TO CHANGE AT ANY TIME WITHOUT NOTICE, AND SHOULD NOT BE CONSTRUED AS A COMMITMENT BY ASUS. Microsoft, Windows, Windows 98, windows 98SE, Windows ME, Windows 2000, Windows NT and Windows XP are registered trademarks of ATI Technologies... © 2003 ASUSTeK COMPUTER INC. Product warranty or service will not be trademarks or registered trademarks of ASUSTeK COMPUTER INC. ("ASUS"). IN NO EVENT SHALL ASUS, ITS DIRECTORS, OFFICERS, EMPLOYEES OR AGENTS BE LIABLE FOR ANY INDIRECT, SPECIAL, INCIDENTAL, OR CONSEQUENTIAL DAMAGES (INCLUDING DAMAGES FOR ...
... FOR INFORMATIONAL USE ONLY, AND ARE SUBJECT TO CHANGE AT ANY TIME WITHOUT NOTICE, AND SHOULD NOT BE CONSTRUED AS A COMMITMENT BY ASUS. Microsoft, Windows, Windows 98, windows 98SE, Windows ME, Windows 2000, Windows NT and Windows XP are registered trademarks of ATI Technologies... © 2003 ASUSTeK COMPUTER INC. Product warranty or service will not be trademarks or registered trademarks of ASUSTeK COMPUTER INC. ("ASUS"). IN NO EVENT SHALL ASUS, ITS DIRECTORS, OFFICERS, EMPLOYEES OR AGENTS BE LIABLE FOR ANY INDIRECT, SPECIAL, INCIDENTAL, OR CONSEQUENTIAL DAMAGES (INCLUDING DAMAGES FOR ...
Software Reference Guide English Version E1496
Page 3
... playback mode 22 3.4 Tools 23 3.5 Using GameFace 28 3.6 Using the GameFace TV Tuner 29 4. ASUS SmartDoctor 36 5.1 Functions 36 5.2 Launching ASUS SmartDoctor 36 5.3 Using ASUS SmartDoctor 37 5.4 Advanced setup features 40 6. Multi-monitor feature 44 6.1 ATI® Radeon graphics card...44 6.2 NVIDIA® graphics card series 48 iii ASUS Control Panel 1 1.1 NVIDIA® graphics card series 1 1.2 ATI® Radeon graphics card series 8 2. ASUS Digital VCR 30 4.1 Launching ASUS Digital VCR 30 4.2 Using ASUS Digital VCR 31 5. Contents Notices iv Safety information v...
... playback mode 22 3.4 Tools 23 3.5 Using GameFace 28 3.6 Using the GameFace TV Tuner 29 4. ASUS SmartDoctor 36 5.1 Functions 36 5.2 Launching ASUS SmartDoctor 36 5.3 Using ASUS SmartDoctor 37 5.4 Advanced setup features 40 6. Multi-monitor feature 44 6.1 ATI® Radeon graphics card...44 6.2 NVIDIA® graphics card series 48 iii ASUS Control Panel 1 1.1 NVIDIA® graphics card series 1 1.2 ATI® Radeon graphics card series 8 2. ASUS Digital VCR 30 4.1 Launching ASUS Digital VCR 30 4.2 Using ASUS Digital VCR 31 5. Contents Notices iv Safety information v...
Software Reference Guide English Version E1496
Page 4
iv Operation is subject to the following measures: • Reorient or relocate the receiving antenna. • Increase the separation between the equipment and receiver. • Connect the equipment to an outlet on , the user is encouraged to try to correct the interference by the party responsible for connection of the monitor to the graphics card is required to assure compliance with the limits for radio noise emissions from that to operate this equipment. This equipment generates, uses and can be determined by turning the equipment off and on a circuit different from ...
iv Operation is subject to the following measures: • Reorient or relocate the receiving antenna. • Increase the separation between the equipment and receiver. • Connect the equipment to an outlet on , the user is encouraged to try to correct the interference by the party responsible for connection of the monitor to the graphics card is required to assure compliance with the limits for radio noise emissions from that to operate this equipment. This equipment generates, uses and can be determined by turning the equipment off and on a circuit different from ...
Software Reference Guide English Version E1496
Page 5
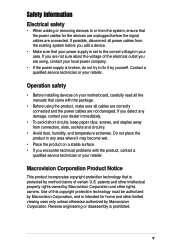
Contact a qualified service technician or your local power company. • If the power supply is broken, do not try to fix it may become wet. • Place the product on your dealer immediately. • To avoid short circuits, keep paper clips, screws, and staples away from connectors, slots, sockets and circuitry. • Avoid dust, humidity, and temperature extremes. v Do not place the product in your retailer. Macrovision Corporation Product Notice This product incorporates copyright protection technology that came with the product, contact a qualified service technician ...
Contact a qualified service technician or your local power company. • If the power supply is broken, do not try to fix it may become wet. • Place the product on your dealer immediately. • To avoid short circuits, keep paper clips, screws, and staples away from connectors, slots, sockets and circuitry. • Avoid dust, humidity, and temperature extremes. v Do not place the product in your retailer. Macrovision Corporation Product Notice This product incorporates copyright protection technology that came with the product, contact a qualified service technician ...
Software Reference Guide English Version E1496
Page 6
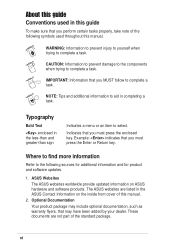
...additional information to aid in the less-than and greater-than sign Indicates a menu or an item to complete a task. ASUS Websites The ASUS websites worldwide provide updated information on the inside front cover of the following sources for additional information and for product and software updates... Information to prevent injury to yourself when trying to complete a task. vi About this guide Conventions used in the ASUS Contact Information on ASUS hardware and software products. Where to find more information Refer to the following symbols used throughout this guide To make...
...additional information to aid in the less-than and greater-than sign Indicates a menu or an item to complete a task. ASUS Websites The ASUS websites worldwide provide updated information on the inside front cover of the following sources for additional information and for product and software updates... Information to prevent injury to yourself when trying to complete a task. vi About this guide Conventions used in the ASUS Contact Information on ASUS hardware and software products. Where to find more information Refer to the following symbols used throughout this guide To make...

Software Reference Guide English Version E1496
Page 7
ASUS Control Panel icon Windows Taskbar ASUS Control Panel icon 1 The ASUS Control Panel contains a menu of shortcuts for commonly used tasks and utilities. To launch the ASUS Control Panel, click the ASUS Control Panel icon on the Windows taskbar. ASUS Control Panel The ASUS Control Panel is a program that allows you to adjust certain features on your computer environment like the desktop color, screen resolution and refresh rates. 1.1 NVIDIA® graphics card series After installing the display drivers, locate the ASUS Control Panel icon on the Windows taskbar. 1.
ASUS Control Panel icon Windows Taskbar ASUS Control Panel icon 1 The ASUS Control Panel contains a menu of shortcuts for commonly used tasks and utilities. To launch the ASUS Control Panel, click the ASUS Control Panel icon on the Windows taskbar. ASUS Control Panel The ASUS Control Panel is a program that allows you to adjust certain features on your computer environment like the desktop color, screen resolution and refresh rates. 1.1 NVIDIA® graphics card series After installing the display drivers, locate the ASUS Control Panel icon on the Windows taskbar. 1.

Software Reference Guide English Version E1496
Page 8
From the ASUS Control Panel menu, click one of shortcuts for easy screen resolution setting. When prompted, click OK to apply settings or Cancel to the new setting. 2. The setting does not take effect if the progress bar elapses. 2 To change the screen resolution: 1. 1.1.1 Setting screen resolution The ASUS Control panel menu includes a list of the available screen resolutions. Screen resolution setting shortcut ASUS Control Panel icon Your computer screen may flicker while adjusting to abort.
From the ASUS Control Panel menu, click one of shortcuts for easy screen resolution setting. When prompted, click OK to apply settings or Cancel to the new setting. 2. The setting does not take effect if the progress bar elapses. 2 To change the screen resolution: 1. 1.1.1 Setting screen resolution The ASUS Control panel menu includes a list of the available screen resolutions. Screen resolution setting shortcut ASUS Control Panel icon Your computer screen may flicker while adjusting to abort.
Software Reference Guide English Version E1496
Page 9
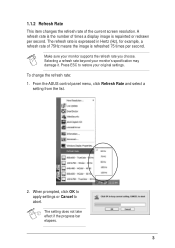
Make sure your monitor's specification may damage it. From the ASUS control panel menu, click Refresh Rate and select a setting from the list. 2. When prompted, click OK to apply settings or Cancel to restore your original ...
Make sure your monitor's specification may damage it. From the ASUS control panel menu, click Refresh Rate and select a setting from the list. 2. When prompted, click OK to apply settings or Cancel to restore your original ...
Software Reference Guide English Version E1496
Page 10
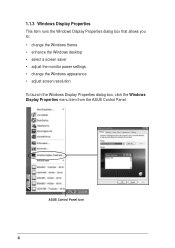
ASUS Control Panel icon 4 1.1.3 Windows Display Properties This item runs the Windows Display Properties dialog box that allows you to: • change the Windows theme • enhance the Windows desktop • select a screen saver • adjust the monitor power settings • change the Windows appearance • adjust screen resolution To launch the Windows Display Properties dialog box, click the Windows Display Properties menu item from the ASUS Control Panel.
ASUS Control Panel icon 4 1.1.3 Windows Display Properties This item runs the Windows Display Properties dialog box that allows you to: • change the Windows theme • enhance the Windows desktop • select a screen saver • adjust the monitor power settings • change the Windows appearance • adjust screen resolution To launch the Windows Display Properties dialog box, click the Windows Display Properties menu item from the ASUS Control Panel.
Software Reference Guide English Version E1496
Page 11
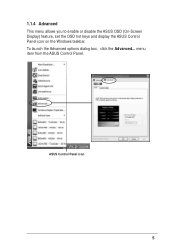
menu item from the ASUS Control Panel. ASUS Control Panel icon 5 1.1.4 Advanced This menu allows you to enable or disable the ASUS OSD (On-Screen Display) feature, set the OSD hot keys and display the ASUS Control Panel icon on the Windows taskbar. To launch the Advanced options dialog box, click the Advanced...
menu item from the ASUS Control Panel. ASUS Control Panel icon 5 1.1.4 Advanced This menu allows you to enable or disable the ASUS OSD (On-Screen Display) feature, set the OSD hot keys and display the ASUS Control Panel icon on the Windows taskbar. To launch the Advanced options dialog box, click the Advanced...
Software Reference Guide English Version E1496
Page 12
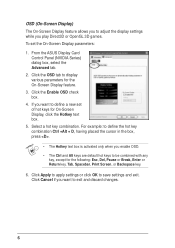
... (On-Screen Display) The On-Screen Display feature allows you to adjust the display settings while you want to exit and discard changes. 6 From the ASUS Display Card Control Panel (NVIDIA Series) dialog box, select the Advanced tab. 2. If you play Direct3D or OpenGL 3D games. Click the Enable OSD check...
... (On-Screen Display) The On-Screen Display feature allows you to adjust the display settings while you want to exit and discard changes. 6 From the ASUS Display Card Control Panel (NVIDIA Series) dialog box, select the Advanced tab. 2. If you play Direct3D or OpenGL 3D games. Click the Enable OSD check...
Software Reference Guide English Version E1496
Page 13
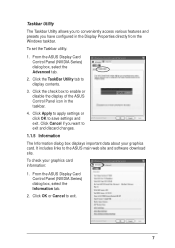
...exit. 7 To check your graphics card. Click OK or Cancel to the ASUS main web site and software download site. From the ASUS Display Card Control Panel (NVIDIA Series) dialog box, select the Advanced tab. 2. From the ASUS Display Card Control Panel (NVIDIA Series) dialog box, select the Information tab...and exit. Click Cancel if you have configured in the taskbar. 4. Click the check box to enable or disable the display of the ASUS Control Panel icon in the Display Properties directly from the Windows taskbar. To set the Taskbar utility: 1. Taskbar Utility The Taskbar Utility ...
...exit. 7 To check your graphics card. Click OK or Cancel to the ASUS main web site and software download site. From the ASUS Display Card Control Panel (NVIDIA Series) dialog box, select the Advanced tab. 2. From the ASUS Display Card Control Panel (NVIDIA Series) dialog box, select the Information tab...and exit. Click Cancel if you have configured in the taskbar. 4. Click the check box to enable or disable the display of the ASUS Control Panel icon in the Display Properties directly from the Windows taskbar. To set the Taskbar utility: 1. Taskbar Utility The Taskbar Utility ...

Software Reference Guide English Version E1496
Page 14
ASUS Control Panel icon Windows taskbar ASUS Control Panel icon 8 To launch the ASUS Control Panel, click the ASUS Control Panel icon on the Windows taskbar. 1.2 ATI® Radeon graphics card series After installing the display drivers, locate the ASUS Control Panel icon on the Windows taskbar. The ASUS Control Panel is a menu of shortcuts for the screen resolution and color settings.
ASUS Control Panel icon Windows taskbar ASUS Control Panel icon 8 To launch the ASUS Control Panel, click the ASUS Control Panel icon on the Windows taskbar. 1.2 ATI® Radeon graphics card series After installing the display drivers, locate the ASUS Control Panel icon on the Windows taskbar. The ASUS Control Panel is a menu of shortcuts for the screen resolution and color settings.

Software Reference Guide English Version E1496
Page 15
... to the new setting. 2. The setting does not take effect if the timer elapses. 9 From the ASUS Control Panel menu, click one of the available screen resolutions. Screen color setting shortcut Screen resolution setting shortcut ASUS Control Panel icon Your computer screen may flicker while adjusting to select refresh rate. 3. Click Apply... to effect your selected display settings or Cancel to abort. When prompted, click Yes to apply settings or No to abort. 4. Setting screen resolution The ASUS Control Panel menu includes shortcuts for easy screen resolution setting.
... to the new setting. 2. The setting does not take effect if the timer elapses. 9 From the ASUS Control Panel menu, click one of the available screen resolutions. Screen color setting shortcut Screen resolution setting shortcut ASUS Control Panel icon Your computer screen may flicker while adjusting to select refresh rate. 3. Click Apply... to effect your selected display settings or Cancel to abort. When prompted, click Yes to apply settings or No to abort. 4. Setting screen resolution The ASUS Control Panel menu includes shortcuts for easy screen resolution setting.

Software Reference Guide English Version E1496
Page 16
... connection. • If you want to the user via email or phone. 2.1 Limitations Differences in detecting a surveillance region. ASUS VideoSecurity The ASUS VideoSecurity is a deviation in a specified surveillance region. 2. Important notes • Temperature changes can distort the captured image of ...background can result in a false scan. • A USB camera cannot capture fast moving objects clearly. • ASUS VideoSecurity can affect the consistency of the ASUS VideoSecurity utility in hardware sensitivity can only process the following pixel formats: UYVY, YUY2, and I420.
... connection. • If you want to the user via email or phone. 2.1 Limitations Differences in detecting a surveillance region. ASUS VideoSecurity The ASUS VideoSecurity is a deviation in a specified surveillance region. 2. Important notes • Temperature changes can distort the captured image of ...background can result in a false scan. • A USB camera cannot capture fast moving objects clearly. • ASUS VideoSecurity can affect the consistency of the ASUS VideoSecurity utility in hardware sensitivity can only process the following pixel formats: UYVY, YUY2, and I420.
Software Reference Guide English Version E1496
Page 17
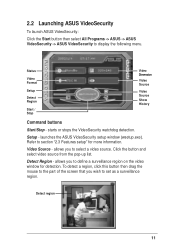
.... allows you to section "2.3 Features setup" for detection. allows you wish to set as a surveillance region. launches the ASUS VideoSecurity setup window (wsetup.exe). Detect region 11 Status Video Format Setup Detect Region Start / Stop Video Dimension Video Source ... Start/Stop - Setup - starts or stops the VideoSecurity watchdog detection. 2.2 Launching ASUS VideoSecurity To launch ASUS VideoSecurity: Click the Start button then select All Programs -> ASUS -> ASUS VideoSecurity -> ASUS VideoSecurity to define a surveillance region on the video window for more information. To ...
.... allows you to section "2.3 Features setup" for detection. allows you wish to set as a surveillance region. launches the ASUS VideoSecurity setup window (wsetup.exe). Detect region 11 Status Video Format Setup Detect Region Start / Stop Video Dimension Video Source ... Start/Stop - Setup - starts or stops the VideoSecurity watchdog detection. 2.2 Launching ASUS VideoSecurity To launch ASUS VideoSecurity: Click the Start button then select All Programs -> ASUS -> ASUS VideoSecurity -> ASUS VideoSecurity to define a surveillance region on the video window for more information. To ...

Software Reference Guide English Version E1496
Page 18
Click the Delete All button to preview recorded image or video. Click the Image or video image to delete all recorded conditions in the current folder. A B C D E A. Click the History folder list box to select other recorded files in the surveillance region. E. displays or hides the history panel, which contains a list of information recorded when a motion is detected in your hard disk. B. C. Click the Delete button to search other folders containing recorded files. D. Hide History - Click the Explore button to delete recorded condition. 12
Click the Delete All button to preview recorded image or video. Click the Image or video image to delete all recorded conditions in the current folder. A B C D E A. Click the History folder list box to select other recorded files in the surveillance region. E. displays or hides the history panel, which contains a list of information recorded when a motion is detected in your hard disk. B. C. Click the Delete button to search other folders containing recorded files. D. Hide History - Click the Explore button to delete recorded condition. 12
Software Reference Guide English Version E1496
Page 19
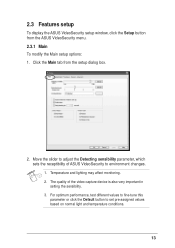
... to set pre-assigned values based on normal light and temperature conditions. 13 Click the Main tab from the ASUS VideoSecurity menu. 2.3.1 Main To modify the Main setup options: 1. Move the slider to adjust the Detecting sensibility parameter, which sets the receptibility of the video ... values to fine-tune this parameter or click the Default button to environment changes. 1. Temperature and lighting may affect monitoring. 2. 2.3 Features setup To display the ASUS VideoSecurity setup window, click the Setup button from the setup dialog box. 2.
... to set pre-assigned values based on normal light and temperature conditions. 13 Click the Main tab from the ASUS VideoSecurity menu. 2.3.1 Main To modify the Main setup options: 1. Move the slider to adjust the Detecting sensibility parameter, which sets the receptibility of the video ... values to fine-tune this parameter or click the Default button to environment changes. 1. Temperature and lighting may affect monitoring. 2. 2.3 Features setup To display the ASUS VideoSecurity setup window, click the Setup button from the setup dialog box. 2.
Software Reference Guide English Version E1496
Page 20
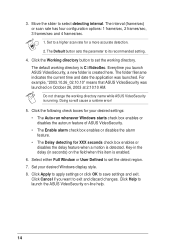
...indicates the current time and date the application was launched on -line help. 14 For example, "2003.10.26_02.10.10" means that ASUS VideoSecurity was launched. Key-in the delay (in seconds) on the field when this item is created here. Click Apply to apply settings or..., 2003 at 2:10:10 AM. Set your desired settings: • The Auto-run whenever Windows starts check box enables or disables the autorun feature of ASUS VideoSecurity. • The Enable alarm check box enables or disables the alarm feature. • The Delay detecting for a more accurate detection. 2. 3. Move...
...indicates the current time and date the application was launched on -line help. 14 For example, "2003.10.26_02.10.10" means that ASUS VideoSecurity was launched. Key-in the delay (in seconds) on the field when this item is created here. Click Apply to apply settings or..., 2003 at 2:10:10 AM. Set your desired settings: • The Auto-run whenever Windows starts check box enables or disables the autorun feature of ASUS VideoSecurity. • The Enable alarm check box enables or disables the alarm feature. • The Delay detecting for a more accurate detection. 2. 3. Move...
