User Guide
Page 6
...the ASUS VENTO 3600 chassis kit. How this guide This user guide contains the general information and installation instructions for experienced users and integrators with hardware knowledge of personal computers. The chapter lists the system features and introduces the front and rear panels, and... gives a general description of the standard package. Where to find more information Refer to the ASUS contact information. 2. These documents are not part of the ASUS VENTO 3600 chassis kit. This guide is organized This manual contains the following sources for additional information and for...
...the ASUS VENTO 3600 chassis kit. How this guide This user guide contains the general information and installation instructions for experienced users and integrators with hardware knowledge of personal computers. The chapter lists the system features and introduces the front and rear panels, and... gives a general description of the standard package. Where to find more information Refer to the ASUS contact information. 2. These documents are not part of the ASUS VENTO 3600 chassis kit. This guide is organized This manual contains the following sources for additional information and for...
User Guide
Page 9
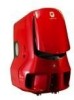
The chapter lists the system features and introduces the front and rear panels, and the internal components. Product introduction Chapter 1 This chapter gives a general description of the ASUS VENTO 3600 chassis kit. ASUS VENTO 3600
The chapter lists the system features and introduces the front and rear panels, and the internal components. Product introduction Chapter 1 This chapter gives a general description of the ASUS VENTO 3600 chassis kit. ASUS VENTO 3600
User Guide
Page 10
... design for add-on the rear and front panels ensure cool air to reach the CPU and internal components directly for optimum thermal performance. The ASUS VENTO 3600 blends efficient functionality with an air duct, as well as fans on cards, optical drives, hard disk drives, and ... cube-shaped machines and transport yourself into the virtual future. To prevent the hassle of tangled cables, the ASUS VENTO 3600 comes with the ASUS VENTO 3600. 1.2 Package contents Check your ASUS VENTO 3600 for the following items. System fan Accessories Documentation Optional item 1 x 80 mm fan for the front...
... design for add-on the rear and front panels ensure cool air to reach the CPU and internal components directly for optimum thermal performance. The ASUS VENTO 3600 blends efficient functionality with an air duct, as well as fans on cards, optical drives, hard disk drives, and ... cube-shaped machines and transport yourself into the virtual future. To prevent the hassle of tangled cables, the ASUS VENTO 3600 comes with the ASUS VENTO 3600. 1.2 Package contents Check your ASUS VENTO 3600 for the following items. System fan Accessories Documentation Optional item 1 x 80 mm fan for the front...

User Guide
Page 13
Front panel (external) Top panel Magic Mask® Power button USB 2.0 ports Microphone port Headphone port Front panel (internal) 5.25" Drive bay covers 3.5" Floppy disk drive bay cover ASUS VENTO 3600 1-5 1.5 Front panel features The VENTO 3600 chassis displays a stylish front panel. The power button, LEDs, USB ports, and audio ports are located on the front panel. Flip the Magic Mask® to access the optical drive/s and floppy disk drive/s.
Front panel (external) Top panel Magic Mask® Power button USB 2.0 ports Microphone port Headphone port Front panel (internal) 5.25" Drive bay covers 3.5" Floppy disk drive bay cover ASUS VENTO 3600 1-5 1.5 Front panel features The VENTO 3600 chassis displays a stylish front panel. The power button, LEDs, USB ports, and audio ports are located on the front panel. Flip the Magic Mask® to access the optical drive/s and floppy disk drive/s.

User Guide
Page 15
Detachable HDD cage 9. 80 mm Auxiliary fan (hidden) ASUS VENTO 3600 1-7 Chassis intrusion sensor 6. 5.25-inch drive bays 7. 3.5-inch FDD bay 8. Expansion slot covers 5. Motherboard mounting panel 4. 1.8 Internal features The VENTO 3600 chassis includes the basic components as shown. 1 6 2 3 7 4 8 5 9 1. Power supply slot 2. 120 mm system fan vent 3.
Detachable HDD cage 9. 80 mm Auxiliary fan (hidden) ASUS VENTO 3600 1-7 Chassis intrusion sensor 6. 5.25-inch drive bays 7. 3.5-inch FDD bay 8. Expansion slot covers 5. Motherboard mounting panel 4. 1.8 Internal features The VENTO 3600 chassis includes the basic components as shown. 1 6 2 3 7 4 8 5 9 1. Power supply slot 2. 120 mm system fan vent 3.

User Guide
Page 18
.... 2-2 Chapter 2: Basic installation Motherboard 2. Pull up the cable management kit to install some system components. 2.2 Removing the side panel To remove the side panel: 1. Remove the cable management kit by pushing 1 downward to the VENTO 3600 chassis kit. 1. 2.1 Preparation Basic components to install You need a Phillips (cross) screw driver to release the bottom tabs...
.... 2-2 Chapter 2: Basic installation Motherboard 2. Pull up the cable management kit to install some system components. 2.2 Removing the side panel To remove the side panel: 1. Remove the cable management kit by pushing 1 downward to the VENTO 3600 chassis kit. 1. 2.1 Preparation Basic components to install You need a Phillips (cross) screw driver to release the bottom tabs...

User Guide
Page 19
Turn the side swivel to about 45º clockwise to the chassis. 3. Tilt the side panel, then lift and set aside. Keep the screw for later use. 4. ASUS VENTO 3600 2-3 Locate and remove three screws that secure the left side cover to release the side panel. 5. Push the side panel to the direction of the arrow. 4 5 6.
Turn the side swivel to about 45º clockwise to the chassis. 3. Tilt the side panel, then lift and set aside. Keep the screw for later use. 4. ASUS VENTO 3600 2-3 Locate and remove three screws that secure the left side cover to release the side panel. 5. Push the side panel to the direction of the arrow. 4 5 6.
User Guide
Page 21
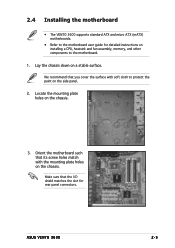
...to the motherboard user guide for rear panel connectors. Locate the mounting plate holes on a stable surface. Lay the chassis down on the chassis. 3. We recommend that its screw holes match with soft cloth to the motherboard. 1. ASUS VENTO 3600 2-5 Orient the motherboard such that you... cover the surface with the mounting plate holes on the side panel. 2. Make sure that the I/O shield matches the slot for detailed instructions on ...
...to the motherboard user guide for rear panel connectors. Locate the mounting plate holes on a stable surface. Lay the chassis down on the chassis. 3. We recommend that its screw holes match with soft cloth to the motherboard. 1. ASUS VENTO 3600 2-5 Orient the motherboard such that you... cover the surface with the mounting plate holes on the side panel. 2. Make sure that the I/O shield matches the slot for detailed instructions on ...
User Guide
Page 27
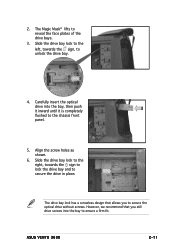
... drive bay lock to the right, towards the sign, to the chassis front panel. 5. The drive bay lock has a screwless design that you to ensure a firm fit. The Magic Mask® lifts to secure the drive in place. ASUS VENTO 3600 2-11 However, we recommend that allows you still drive screws into the bay...
... drive bay lock to the right, towards the sign, to the chassis front panel. 5. The drive bay lock has a screwless design that you to ensure a firm fit. The Magic Mask® lifts to secure the drive in place. ASUS VENTO 3600 2-11 However, we recommend that allows you still drive screws into the bay...
User Guide
Page 29
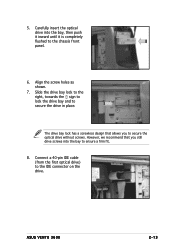
... 7. Slide the drive bay lock to the right, towards the sign to lock the drive bay and to the IDE connector on the drive. ASUS VENTO 3600 2-13 The drive bay lock has a screwless design that you to secure the optical drive without screws. Carefully insert the optical drive into the ...bay to the chassis front panel. 6. Connect a 40-pin IDE cable (from the first optical drive) to secure the drive in place. 5. However, we recommend that allows you ...
... 7. Slide the drive bay lock to the right, towards the sign to lock the drive bay and to the IDE connector on the drive. ASUS VENTO 3600 2-13 The drive bay lock has a screwless design that you to secure the optical drive without screws. Carefully insert the optical drive into the ...bay to the chassis front panel. 6. Connect a 40-pin IDE cable (from the first optical drive) to secure the drive in place. 5. However, we recommend that allows you ...
User Guide
Page 31
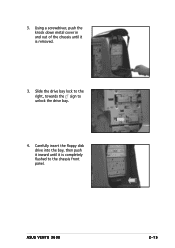
ASUS VENTO 3600 2-15 Carefully insert the floppy disk drive into the bay, then push it inward until it is removed. 3. Slide the drive bay lock to the right, towards the sign to the chassis front panel. Using a screwdriver, push the knock down metal cover in and out of the chassis until it is completely flushed to unlock the drive bay. 4. 3.
ASUS VENTO 3600 2-15 Carefully insert the floppy disk drive into the bay, then push it inward until it is removed. 3. Slide the drive bay lock to the right, towards the sign to the chassis front panel. Using a screwdriver, push the knock down metal cover in and out of the chassis until it is completely flushed to unlock the drive bay. 4. 3.

User Guide
Page 35
Match the side panel hooks to the chassis rail edge. 2. Slide the cover toward the chassis until it fits. Fit the side panel toward the front until it snaps in place. Side panel hooks ASUS VENTO 3600 2-19 Chassis side rail 3. 2.9 Replacing the side cover After installing all components and connecting the necessary cables, replace the side cover by following these instructions. To replace the side cover: 1.
Match the side panel hooks to the chassis rail edge. 2. Slide the cover toward the chassis until it fits. Fit the side panel toward the front until it snaps in place. Side panel hooks ASUS VENTO 3600 2-19 Chassis side rail 3. 2.9 Replacing the side cover After installing all components and connecting the necessary cables, replace the side cover by following these instructions. To replace the side cover: 1.
