

User manual Use & Care Guide EN
Page 3
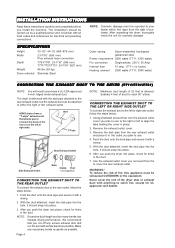
... and the condenser unit are designed with an overheat protection switch that will not be cleaned on an ASKO dryer ends with three different drying systems: Sensidry™ Models T731, T761 and T781 have these issues checked out. ENERGY SAVING TIPS ♦ Dry consecutive loads to ...that ensures different fabrics always dry thoroughly. COOL-DOWN Every program on a regular basis. Type Plate (Type and Serial Number) Power Button Control Panel Lint Filter Lint Filter Holder Cleanable Fan (behind panel) Condenser Unit (behind panel) (T721 & T781 only) DRYING SYSTEMS...
... and the condenser unit are designed with an overheat protection switch that will not be cleaned on an ASKO dryer ends with three different drying systems: Sensidry™ Models T731, T761 and T781 have these issues checked out. ENERGY SAVING TIPS ♦ Dry consecutive loads to ...that ensures different fabrics always dry thoroughly. COOL-DOWN Every program on a regular basis. Type Plate (Type and Serial Number) Power Button Control Panel Lint Filter Lint Filter Holder Cleanable Fan (behind panel) Condenser Unit (behind panel) (T721 & T781 only) DRYING SYSTEMS...
User manual Use & Care Guide EN
Page 4
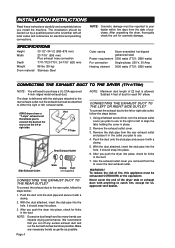
... the right or left or right side outlet, follow the steps below : 1. To reduce the risk of duct for kinks in the duct. 7. ASKO dryers have a "T-style" exhaust vent that you install the machine. Push the duct onto the stub pipe and secure it with as few bends as... mm) Plus exhaust hose connection Depth T761/T781: 23-7/16" (595 mm) T711/T721/T731: 24-7/16" (620 mm) Weight 86 lbs (39 kg) Drum material Stainless Steel Outer casing Stove-enamelled hot-dipped galvanized steel Power requirement 2800 watts (T711: 3300 watts) For connection Single-phase, 230 V, 30 Amp Internal...
... the right or left or right side outlet, follow the steps below : 1. To reduce the risk of duct for kinks in the duct. 7. ASKO dryers have a "T-style" exhaust vent that you install the machine. Push the duct onto the stub pipe and secure it with as few bends as... mm) Plus exhaust hose connection Depth T761/T781: 23-7/16" (595 mm) T711/T721/T731: 24-7/16" (620 mm) Weight 86 lbs (39 kg) Drum material Stainless Steel Outer casing Stove-enamelled hot-dipped galvanized steel Power requirement 2800 watts (T711: 3300 watts) For connection Single-phase, 230 V, 30 Amp Internal...

User manual Use & Care Guide EN
Page 6
...12 mm) on the left, right or rear of 15 A each. The power supply cord must also be available for the exhaust hose on all around the machine, including between the ...tight to eliminate vibration noise. If the machine is essential that the hole measurements are to accommodate ASKO washers ONLY (rated 208-240 V.) To use the ready-fitted plug supplied with the washing machine... must use this receptacle, you will need a drain outlet behind the unit. BUILT-IN INSTALLATION ASKO dryers can be properly grounded. The opening width must be placed next to the "Important Safety Instructions...
...12 mm) on the left, right or rear of 15 A each. The power supply cord must also be available for the exhaust hose on all around the machine, including between the ...tight to eliminate vibration noise. If the machine is essential that the hole measurements are to accommodate ASKO washers ONLY (rated 208-240 V.) To use the ready-fitted plug supplied with the washing machine... must use this receptacle, you will need a drain outlet behind the unit. BUILT-IN INSTALLATION ASKO dryers can be properly grounded. The opening width must be placed next to the "Important Safety Instructions...

User manual Use & Care Guide EN
Page 7
... 4 5. Connect neutral (white) wire of cord under center, silver-colored terminal block screw. 7 6. Before starting this procedure, be sure the power is turned off at the breaker/fuse box. 2. The fourth wire must be identified with three No. 10 copper wires and a matching 3-wire ...1. Replace terminal box cover on back of NEMA Type 10-30R, as illustrated below the terminal block opening . 4. To connect a 3-wire power cord to the dryer, follow the steps below correlate to outer screws. 9. Fasten under center screw of cord to the center, silver- 5 ...
... 4 5. Connect neutral (white) wire of cord under center, silver-colored terminal block screw. 7 6. Before starting this procedure, be sure the power is turned off at the breaker/fuse box. 2. The fourth wire must be identified with three No. 10 copper wires and a matching 3-wire ...1. Replace terminal box cover on back of NEMA Type 10-30R, as illustrated below the terminal block opening . 4. To connect a 3-wire power cord to the dryer, follow the steps below correlate to outer screws. 9. Fasten under center screw of cord to the center, silver- 5 ...
User manual Use & Care Guide EN
Page 9
...are reversible. Remove the cover plate on the opposite side of the dryer casing. 7. 32 ENGLISH REVERSING THE DOOR HINGES The door hinges on ASKO dryers are ready to mount the door on the right side. Holding the door at an angle (as you can remove the magnetic door catch... it out from the top. 10. Page 9 Remove the hinge pin at right (a, b, c). 16. To reverse them in place. 12. Switch off the main power supply before you will have a condenser dryer, you start this procedure. 1. Hinge pin 4. Remove the magnetic catch by removing the three screws holding the bracket...
...are reversible. Remove the cover plate on the opposite side of the dryer casing. 7. 32 ENGLISH REVERSING THE DOOR HINGES The door hinges on ASKO dryers are ready to mount the door on the right side. Holding the door at an angle (as you can remove the magnetic door catch... it out from the top. 10. Page 9 Remove the hinge pin at right (a, b, c). 16. To reverse them in place. 12. Switch off the main power supply before you will have a condenser dryer, you start this procedure. 1. Hinge pin 4. Remove the magnetic catch by removing the three screws holding the bracket...

User manual Use & Care Guide EN
Page 12
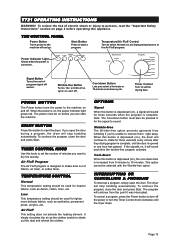
...cotton, linen, etc. Note: The Cool-down cycle. Wrinkle-free Button Turns the wrinkle-free cycle on and off and on . POWER BUTTON The Power button turns the power to remove them . for heavy items, such as synthetics, permanent press, acrylics, etc. Page 12 Low This temperature setting should be ...you can set the Temperature Control knob to Normal or Low. The program will continue to the machine off . THE CONTROL PANEL Power Button Turns power to rotate for three seconds when the program is opened or one hour has passed. If you must set the Program Control ...
...cotton, linen, etc. Note: The Cool-down cycle. Wrinkle-free Button Turns the wrinkle-free cycle on and off and on . POWER BUTTON The Power button turns the power to remove them . for heavy items, such as synthetics, permanent press, acrylics, etc. Page 12 Low This temperature setting should be ...you can set the Temperature Control knob to Normal or Low. The program will continue to the machine off . THE CONTROL PANEL Power Button Turns power to rotate for three seconds when the program is opened or one hour has passed. If you must set the Program Control ...
User manual Use & Care Guide EN
Page 13
...acrylics, etc. Wrinkle-free The Wrinkle-free option prevents garments from 9 minutes to persons, read the "Important Safety Instructions" section on , the power indicator light glows red. The dryer will sound each time the wrinkle-free program activates. To reduce the risk of fabrics, air them, or ...BUTTON Press this appliance. Note: The Cool-down When this button is designed to sound. Start Button Press to start a program. The power must also be selected with the Wrinkle-free option. Cool-down button must be used for lighter, more delicate fabrics, such as the ...
...acrylics, etc. Wrinkle-free The Wrinkle-free option prevents garments from 9 minutes to persons, read the "Important Safety Instructions" section on , the power indicator light glows red. The dryer will sound each time the wrinkle-free program activates. To reduce the risk of fabrics, air them, or ...BUTTON Press this appliance. Note: The Cool-down When this button is designed to sound. Start Button Press to start a program. The power must also be selected with the Wrinkle-free option. Cool-down button must be used for lighter, more delicate fabrics, such as the ...
User manual Use & Care Guide EN
Page 14
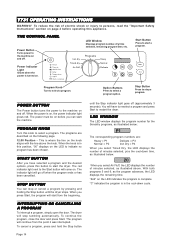
...To reduce the risk of minutes selected, as illustrated above the knob. Option Buttons Press to select a program. POWER BUTTON The Power button turns the power to indicate no program has been chosen. The indicator light will stop tumbling automatically. To continue the program, close ... When the knob is complete. You will start the dryer. "End" on and off (approximately 3 seconds). T731 OPERATING INSTRUCTIONS WARNING! THE CONTROL PANEL Power Button Turns power to stop or cancel a program by pressing and holding the Stop button until the Stop indicator light goes off...
...To reduce the risk of minutes selected, as illustrated above the knob. Option Buttons Press to select a program. POWER BUTTON The Power button turns the power to indicate no program has been chosen. The indicator light will stop tumbling automatically. To continue the program, close ... When the knob is complete. You will start the dryer. "End" on and off (approximately 3 seconds). T731 OPERATING INSTRUCTIONS WARNING! THE CONTROL PANEL Power Button Turns power to stop or cancel a program by pressing and holding the Stop button until the Stop indicator light goes off...

User manual Use & Care Guide EN
Page 16
... message still displays after you select Normal these options will stay lit when Quick is programmed to prevent children from the beginning. Try turning the power off then on again. ("00" should show on again. Try opening the door. If the message remains, call a service technician. The table ..., a 2-hour anti-crease, and Quick cool-down, next time you press the Wrinkle-free button.) T731 ERROR MESSAGES Error messages will stay lit when this error. If you have been a power outage. QUICK COOL-DOWN Every program, except Air Fluff, ends with a cool-down the Stop button ...
... message still displays after you select Normal these options will stay lit when Quick is programmed to prevent children from the beginning. Try turning the power off then on again. ("00" should show on again. Try opening the door. If the message remains, call a service technician. The table ..., a 2-hour anti-crease, and Quick cool-down, next time you press the Wrinkle-free button.) T731 ERROR MESSAGES Error messages will stay lit when this error. If you have been a power outage. QUICK COOL-DOWN Every program, except Air Fluff, ends with a cool-down the Stop button ...

User manual Use & Care Guide EN
Page 17
.... To continue the program, close the door and press Start. To restart the dryer, you start the dryer. Program When you press the Power button, the display toggles between minutes (e.g., 23) and hours (e.g., 1h). Stop Indicates that the program has ended or that you customize the ...program. Page 17 To reduce the risk of these buttons to start a program, the total time the program runs is turned on , the power indicator light glows red. LCD Window Displays the program, temperature settings, and program run time. Program Selection Controls These buttons allow you stop ...
.... To continue the program, close the door and press Start. To restart the dryer, you start the dryer. Program When you press the Power button, the display toggles between minutes (e.g., 23) and hours (e.g., 1h). Stop Indicates that the program has ended or that you customize the ...program. Page 17 To reduce the risk of these buttons to start a program, the total time the program runs is turned on , the power indicator light glows red. LCD Window Displays the program, temperature settings, and program run time. Program Selection Controls These buttons allow you stop ...

User manual Use & Care Guide EN
Page 19
The program you select will display in the lower left corner of changing a program, press the Power button to the previous setting. 5. The LCD will retain the change. Remember, the first step to customizing a preset program is to press the ...how to navigate through the program choices (Extra Dry, Dry, Normal Dry, etc.) 3. You can make temporary (one load), START. If you switch the power back on, the program will revert to select a program time. When you want to customize (P1-P4). If you want to change displays (e.g., Programs, Temperature...
The program you select will display in the lower left corner of changing a program, press the Power button to the previous setting. 5. The LCD will retain the change. Remember, the first step to customizing a preset program is to press the ...how to navigate through the program choices (Extra Dry, Dry, Normal Dry, etc.) 3. You can make temporary (one load), START. If you switch the power back on, the program will revert to select a program time. When you want to customize (P1-P4). If you want to change displays (e.g., Programs, Temperature...

User manual Use & Care Guide EN
Page 21
... : 1. ERROR MESSAGE Maximum program time Overflow (T781) Sensor Thermistor SOLUTION Make sure both fuses are intact. Clear message by opening the door or turning the power off then on . If draining into a drain pipe, make sure the black rubber hose is empty. Cancel the error message by turning the...
... : 1. ERROR MESSAGE Maximum program time Overflow (T781) Sensor Thermistor SOLUTION Make sure both fuses are intact. Clear message by opening the door or turning the power off then on . If draining into a drain pipe, make sure the black rubber hose is empty. Cancel the error message by turning the...
User manual Use & Care Guide EN
Page 23
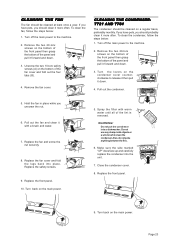
...Pull out the condenser. 5. Also, do not poke anything between the fins. 6. Unscrew the two 10-torx safety screws (A) on the main power. 5. Remove the two 20-torx screws on the bottom of the front panel then grasp the bottom of the lint is removed. Pull out... four tabs (B). B A B B B A 4. Remove the fan cover. To clean the condenser, follow the steps below : 1. Turn the levers on the main power. Replace the fan cover and fold the lugs back into a dishwasher. Replace the safety screws. 9. WARNING! Make sure the side marked UPP UP OBEN "UP...
...Pull out the condenser. 5. Also, do not poke anything between the fins. 6. Unscrew the two 10-torx safety screws (A) on the main power. 5. Remove the two 20-torx screws on the bottom of the front panel then grasp the bottom of the lint is removed. Pull out... four tabs (B). B A B B B A 4. Remove the fan cover. To clean the condenser, follow the steps below : 1. Turn the levers on the main power. Replace the fan cover and fold the lugs back into a dishwasher. Replace the safety screws. 9. WARNING! Make sure the side marked UPP UP OBEN "UP...

User manual Use & Care Guide EN
Page 24
...9830; Make sure the outside vent exhaust is not caused by defective product workmanship or materials, you call a serviceman. If it stops when I release the power button. ♦ The overheating protection has probably activated. Call a servicer. The machine starts but the drum isn't turning. ♦ This usually means ...sure the condensation tank is empty. (See page 22). ♦ Make sure the Power is turned on. ♦ Check that the lint filter is securely in the upper left front of the ASKO washer. If you're still not sure, contact the AM Advisory Center before you will...
...9830; Make sure the outside vent exhaust is not caused by defective product workmanship or materials, you call a serviceman. If it stops when I release the power button. ♦ The overheating protection has probably activated. Call a servicer. The machine starts but the drum isn't turning. ♦ This usually means ...sure the condensation tank is empty. (See page 22). ♦ Make sure the Power is turned on. ♦ Check that the lint filter is securely in the upper left front of the ASKO washer. If you're still not sure, contact the AM Advisory Center before you will...

User manual Use & Care Guide EN
Page 26
... Laundry tips LCD window (T761/T781) LED window (T731) Lint filter Load sizes, recommended M Magnetic door lock Menus, programming (T761/T781) O Operating instructions T711 T721 T731 T761/T781 Overheat protection P Power cord connection Preset programs (T761/T781) customizing restoring Problem...-solving Program menu (T761/T781) Programs and program options T711 T721 T731 T761/T781 R Remaining time indication Restoring a ...
... Laundry tips LCD window (T761/T781) LED window (T731) Lint filter Load sizes, recommended M Magnetic door lock Menus, programming (T761/T781) O Operating instructions T711 T721 T731 T761/T781 Overheat protection P Power cord connection Preset programs (T761/T781) customizing restoring Problem...-solving Program menu (T761/T781) Programs and program options T711 T721 T731 T761/T781 R Remaining time indication Restoring a ...

User manual 80 768 12 generell tork EN
Page 3
...T711 has a thermostat that will automatically turn itself off if the temperature gets too high. Model T731 has timer-controlled drying in which it has cooled down sufficiently. OVERHEAT PROTECTION ASKO dryers are designed with a cool-down cycle to reduce wrinkling. ♦ Dry like fabrics together ...the parts and features of lint. Type Plate (Type and Serial Number) Power Button Control Panel Lint Filter Lint Filter Holder Cleanable Fan (behind panel) Condenser Unit (behind panel) (T721 only) DRYING SYSTEMS ASKO dryers come with warm, soapy water and a soft brush a few more...
...T711 has a thermostat that will automatically turn itself off if the temperature gets too high. Model T731 has timer-controlled drying in which it has cooled down sufficiently. OVERHEAT PROTECTION ASKO dryers are designed with a cool-down cycle to reduce wrinkling. ♦ Dry like fabrics together ...the parts and features of lint. Type Plate (Type and Serial Number) Power Button Control Panel Lint Filter Lint Filter Holder Cleanable Fan (behind panel) Condenser Unit (behind panel) (T721 only) DRYING SYSTEMS ASKO dryers come with warm, soapy water and a soft brush a few more...
User manual 80 768 12 generell tork EN
Page 4
... mm) Width 23-7/16" (595 mm) Plus exhaust hose connection Depth T711/T721/T731: 24-7/16" (620 mm) Weight 86 lbs (39 kg) Drum material Stainless Steel Outer casing Stove-enamelled hot-dipped galvanized steel Power requirement 3300 watts (T721: 2800 watts) For connection Single-phase, 230 V, 30 ...cover the end of purchase. INSTALLATION INSTRUCTIONS Read these instructions carefully and completely before you removed from the to cover the rear exhaust outlet. ASKO dryers have a "T-style" exhaust vent that you to connect the duct on the rear or on the left or right side outlet, ...
... mm) Width 23-7/16" (595 mm) Plus exhaust hose connection Depth T711/T721/T731: 24-7/16" (620 mm) Weight 86 lbs (39 kg) Drum material Stainless Steel Outer casing Stove-enamelled hot-dipped galvanized steel Power requirement 3300 watts (T721: 2800 watts) For connection Single-phase, 230 V, 30 ...cover the end of purchase. INSTALLATION INSTRUCTIONS Read these instructions carefully and completely before you removed from the to cover the rear exhaust outlet. ASKO dryers have a "T-style" exhaust vent that you to connect the duct on the rear or on the left or right side outlet, ...

User manual 80 768 12 generell tork EN
Page 6
... don't recommend they have two internal fuses of hole. Connection to eliminate vibration noise. Hole measurements are from center of 15 A each. BUILT-IN INSTALLATION ASKO dryers can be at least 1/2" (12 mm) on the left, right or rear of the hole. There must be placed next to be used in... a wet area, the supply must be grounded. Space must be made only by a residual current device. The power supply cord must also be available for the dryer is to the washing machine.
... don't recommend they have two internal fuses of hole. Connection to eliminate vibration noise. Hole measurements are from center of 15 A each. BUILT-IN INSTALLATION ASKO dryers can be at least 1/2" (12 mm) on the left, right or rear of the hole. There must be placed next to be used in... a wet area, the supply must be grounded. Space must be made only by a residual current device. The power supply cord must also be available for the dryer is to the washing machine.

User manual 80 768 12 generell tork EN
Page 7
... the other wires to outer screws. 7. Remove center terminal block screw. 5 4 5. Loosen or remove 4 center terminal block screw. 5. Turn power on back of NEMA Type 14-30R, as illustrated below . Replace terminal box cover on at the breaker/fuse box. 2. Fasten under center screw... of NEMA Type 10-30R, as illustrated below : CONNECTING A 4-WIRE POWER CORD WARNING! Remove ground wire 6 (green with a green cover and the neutral conductor by a white cover. Before starting this procedure, be ...
... the other wires to outer screws. 7. Remove center terminal block screw. 5 4 5. Loosen or remove 4 center terminal block screw. 5. Turn power on back of NEMA Type 14-30R, as illustrated below . Replace terminal box cover on at the breaker/fuse box. 2. Fasten under center screw... of NEMA Type 10-30R, as illustrated below : CONNECTING A 4-WIRE POWER CORD WARNING! Remove ground wire 6 (green with a green cover and the neutral conductor by a white cover. Before starting this procedure, be ...

User manual 80 768 12 generell tork EN
Page 9
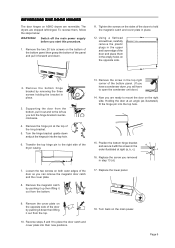
...in the top right corner of the door and place them , follow the steps below: WARNING! Switch off the main power supply before you will have a condenser dryer, you start this procedure. 1. Using a flathead screwdriver, carefully remove the ...upside down and put the hinge pin into their new positions. 18. Turn back on the main power. Replace the screw you turn the hinge bracket counterclockwise. Replace the lower panel. 9. Tighten the screws...REVERSING THE DOOR HINGES The door hinges on ASKO dryers are shipped left as illustrated), fit the hinge pin into the top hole. 15.
...in the top right corner of the door and place them , follow the steps below: WARNING! Switch off the main power supply before you will have a condenser dryer, you start this procedure. 1. Using a flathead screwdriver, carefully remove the ...upside down and put the hinge pin into their new positions. 18. Turn back on the main power. Replace the screw you turn the hinge bracket counterclockwise. Replace the lower panel. 9. Tighten the screws...REVERSING THE DOOR HINGES The door hinges on ASKO dryers are shipped left as illustrated), fit the hinge pin into the top hole. 15.


