
User manual 427000433 ASKO DC7181 EN
Page 13
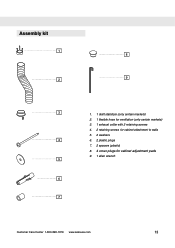
Assembly kit 1 8 9 2 3 1. 1 draft stabilizer (only certain markets) 2. 1 flexible hose for ventilation (only certain markets) 3. 1 exhaust collar with 2 retaining screws 4. 2 retaining screws for cabinet attachment to walls 5. 2 washers 4 6. 2 plastic plugs 7. 2 spacers (plastic) 8. 4 cover plugs for cabinet adjustment pads 9. 1 allen wrench 5 6 7 Customer Care Center 1-800-898-1879 www.askousa.com 13
Assembly kit 1 8 9 2 3 1. 1 draft stabilizer (only certain markets) 2. 1 flexible hose for ventilation (only certain markets) 3. 1 exhaust collar with 2 retaining screws 4. 2 retaining screws for cabinet attachment to walls 5. 2 washers 4 6. 2 plastic plugs 7. 2 spacers (plastic) 8. 4 cover plugs for cabinet adjustment pads 9. 1 allen wrench 5 6 7 Customer Care Center 1-800-898-1879 www.askousa.com 13
User manual 427000433 ASKO DC7181 EN
Page 15
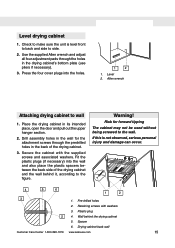
...back side of the drying cabinet. 3. Place the drying cabinet in the drying cabinet's bottom plate (use pliers if necessary). 3. Secure the cabinet with washers 3. Risk for the attachment screws through the holes in its intended place, open the door and pull out the upper hanger section. 2. Pre-drilled holes... cabinet 5. Warning! If this is level front to back and side to the figure. Retaining screws with the supplied screws and associated washers. Drill assembly holes in the wall for forward tipping The cabinet may not be used without being screwed to wall 1.
...back side of the drying cabinet. 3. Place the drying cabinet in the drying cabinet's bottom plate (use pliers if necessary). 3. Secure the cabinet with washers 3. Risk for the attachment screws through the holes in its intended place, open the door and pull out the upper hanger section. 2. Pre-drilled holes... cabinet 5. Warning! If this is level front to back and side to the figure. Retaining screws with the supplied screws and associated washers. Drill assembly holes in the wall for forward tipping The cabinet may not be used without being screwed to wall 1.

User manual 427000433 ASKO DC7181 EN
Page 17
... cabinet's mounting holes. Push the drying cabinet back into the custom cabinetry. 9. Fastening screws 2. Wood shims Custom cabinetry with the supplied screws and associated washers. 1 3 4 2 ~6" (15 cm) 1. 8. Remove the tape that holds the door closed and check that the drying cabinet's front section &#...the predrilled holes in the delivery. 5. Retaining screws with the back of the drying cabinet. 11. The wood shims are aligned with washers 5 6 Customer Care Center 1-800-898-1879 www.askousa.com 17 Also check that the shims are not included in the rear drying...
... cabinet's mounting holes. Push the drying cabinet back into the custom cabinetry. 9. Fastening screws 2. Wood shims Custom cabinetry with the supplied screws and associated washers. 1 3 4 2 ~6" (15 cm) 1. 8. Remove the tape that holds the door closed and check that the drying cabinet's front section &#...the predrilled holes in the delivery. 5. Retaining screws with the back of the drying cabinet. 11. The wood shims are aligned with washers 5 6 Customer Care Center 1-800-898-1879 www.askousa.com 17 Also check that the shims are not included in the rear drying...
