
User manual Use & Care Guide ASKO DC7171 EN
Page 1
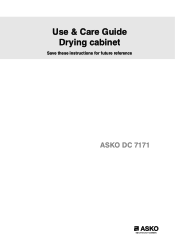
Use & Care Guide Drying cabinet Save these instructions for future reference ASKO DC 7171
Use & Care Guide Drying cabinet Save these instructions for future reference ASKO DC 7171
User manual Use & Care Guide ASKO DC7171 EN
Page 2
...! Congratulations on your excellent product choice and welcome to get from it. In order to the Asko family. Good appliances should include all about. And this machine are just as high as the outside, and that the inside is all of time, ... from Scandinavia and the people at Asko. When you buy an ASKO product, we want you to feel assured that the ethics and morals on nature and in Scandinavia. Best regards from your home), user-friendliness, low consumption of these. A global family with its roots in your drying cabinet, please read this manual before...
...! Congratulations on your excellent product choice and welcome to get from it. In order to the Asko family. Good appliances should include all about. And this machine are just as high as the outside, and that the inside is all of time, ... from Scandinavia and the people at Asko. When you buy an ASKO product, we want you to feel assured that the ethics and morals on nature and in Scandinavia. Best regards from your home), user-friendliness, low consumption of these. A global family with its roots in your drying cabinet, please read this manual before...
User manual Use & Care Guide ASKO DC7171 EN
Page 3
... Ventilation connection 18 Electrical connection 18 Final inspection 19 Operation instructions 20 Starting your drying cabinet . . . . . 20 Pausing or restarting 20 Stopping your drying cabinet . . . . 20 Loading 20 Cycle and drying tips 21 Cycles 22 Care 23 Cleaning the drying cabinet . . . . . 23 When the drying cabinet is not in use 23 Troubleshooting 24 Service and Warranty 25 Technical data...
... Ventilation connection 18 Electrical connection 18 Final inspection 19 Operation instructions 20 Starting your drying cabinet . . . . . 20 Pausing or restarting 20 Stopping your drying cabinet . . . . 20 Loading 20 Cycle and drying tips 21 Cycles 22 Care 23 Cleaning the drying cabinet . . . . . 23 When the drying cabinet is not in use 23 Troubleshooting 24 Service and Warranty 25 Technical data...
User manual Use & Care Guide ASKO DC7171 EN
Page 4
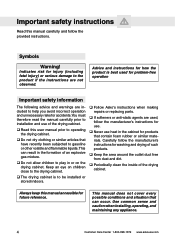
Advice and instructions for how the product is to be installed or stored indoors. Follow Asko's instructions when making repairs or replacing parts. If softeners or anti-static agents are used for problem-free operation ...can occur. This manual does not cover every possible conditions and situation that contain foam rubber or similar materials. Keep an eye on the drying cabinet. Symbols Warning! Always keep this manual accessible for future reference. Important safety instructions Read this manual carefully and follow the manufacturer's instructions for ...
Advice and instructions for how the product is to be installed or stored indoors. Follow Asko's instructions when making repairs or replacing parts. If softeners or anti-static agents are used for problem-free operation ...can occur. This manual does not cover every possible conditions and situation that contain foam rubber or similar materials. Keep an eye on the drying cabinet. Symbols Warning! Always keep this manual accessible for future reference. Important safety instructions Read this manual carefully and follow the manufacturer's instructions for ...
User manual Use & Care Guide ASKO DC7171 EN
Page 5
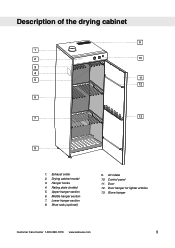
Drying cabinet model 3. Glove hanger Customer Care Center 1-800-898-1879 www.askousa.com 5 Exhaust collar 2. Hanger hooks 4. Middle hanger section 7. Lower hanger section 8. Door 12. Rating plate (inside) 5. Description of the drying cabinet 9 1 2 DC XXXX 10 3 4 11 5 12 6 7 13 8 1. Shoe rack (optional) 9. Control panel 11. Air intake 10. Door hanger for lighter articles 13. Upper hanger section 6.
Drying cabinet model 3. Glove hanger Customer Care Center 1-800-898-1879 www.askousa.com 5 Exhaust collar 2. Hanger hooks 4. Middle hanger section 7. Lower hanger section 8. Door 12. Rating plate (inside) 5. Description of the drying cabinet 9 1 2 DC XXXX 10 3 4 11 5 12 6 7 13 8 1. Shoe rack (optional) 9. Control panel 11. Air intake 10. Door hanger for lighter articles 13. Upper hanger section 6.
User manual Use & Care Guide ASKO DC7171 EN
Page 7
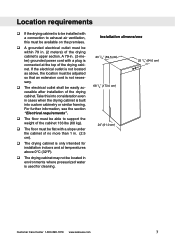
... installation indoors and at temperatures above , the location must be adjusted so that an extension cord is connected at the top of the drying cabinet. For further information, see the section "Electrical requirements". The floor must be able to exhaust air ventilation, this... into consideration even in cases when the drying cabinet is built into custom cabinetry or similar framing. Take this must be available on the premises. A grounded electrical outlet must be...
... installation indoors and at temperatures above , the location must be adjusted so that an extension cord is connected at the top of the drying cabinet. For further information, see the section "Electrical requirements". The floor must be able to exhaust air ventilation, this... into consideration even in cases when the drying cabinet is built into custom cabinetry or similar framing. Take this must be available on the premises. A grounded electrical outlet must be...
User manual Use & Care Guide ASKO DC7171 EN
Page 8
... the outlet, have a proper outlet installed by providing a path of the user to a 120 V, single-phase, 60 Hz grounded wall outlet. The drying cabinet is delivered ready for serious injury or fire. If it will reduce the risk of electric shock by a qualified electrician. 8 Customer Care... in compliance with the data on the rating plate and that the power source is in compliance with this user manual. Check with the drying cabinet. Do not modify the plug provided with a qualified electrician or service representative or personnel if you are in doubt as speci...
... the outlet, have a proper outlet installed by providing a path of the user to a 120 V, single-phase, 60 Hz grounded wall outlet. The drying cabinet is delivered ready for serious injury or fire. If it will reduce the risk of electric shock by a qualified electrician. 8 Customer Care... in compliance with the data on the rating plate and that the power source is in compliance with this user manual. Check with the drying cabinet. Do not modify the plug provided with a qualified electrician or service representative or personnel if you are in doubt as speci...
User manual Use & Care Guide ASKO DC7171 EN
Page 9
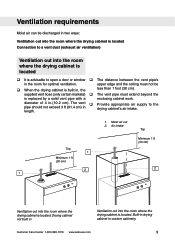
...supply to open a door or window The distance between the vent pipe's in the room for optimal ventilation. Drying cabinet not built in Ventilation out into the room where the drying cabinet is located. Moist air out 2. Air intake Top Top 1 Minimum 1 ft (30 cm) 2 1 Minimum 1... ft (30 cm) 2 Ventilation out into the room where the drying cabinet is located. Built-in drying cabinet in custom cabinetry Customer Care Center 1-800-898-1879 www.askousa.com 9 supplied vent hose (only certain markets) The vent ...
...supply to open a door or window The distance between the vent pipe's in the room for optimal ventilation. Drying cabinet not built in Ventilation out into the room where the drying cabinet is located. Moist air out 2. Air intake Top Top 1 Minimum 1 ft (30 cm) 2 1 Minimum 1... ft (30 cm) 2 Ventilation out into the room where the drying cabinet is located. Built-in drying cabinet in custom cabinetry Customer Care Center 1-800-898-1879 www.askousa.com 9 supplied vent hose (only certain markets) The vent ...
User manual Use & Care Guide ASKO DC7171 EN
Page 10
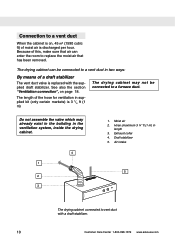
Hose (maximum 3 ¼" ft (1 m) in the ventilation system, inside the drying cabinet. 4 1 2 3 1. Air intake 5 The drying cabinet connected to vent duct with the supplied draft stabilizer. See also the section "Ventilation connection", on , 45 m³ (1590 cubic ft) of... ways: By means of the hose for ventilation in supplied kit (only certain markets) is 3 1/4 ft (1 m) The drying cabinet may already exist in the building in length 3. The drying cabinet can enter the room to replace the moist air that has been removed. Moist air 2. The length of a draft stabilizer ...
Hose (maximum 3 ¼" ft (1 m) in the ventilation system, inside the drying cabinet. 4 1 2 3 1. Air intake 5 The drying cabinet connected to vent duct with the supplied draft stabilizer. See also the section "Ventilation connection", on , 45 m³ (1590 cubic ft) of... ways: By means of the hose for ventilation in supplied kit (only certain markets) is 3 1/4 ft (1 m) The drying cabinet may already exist in the building in length 3. The drying cabinet can enter the room to replace the moist air that has been removed. Moist air 2. The length of a draft stabilizer ...
User manual Use & Care Guide ASKO DC7171 EN
Page 11
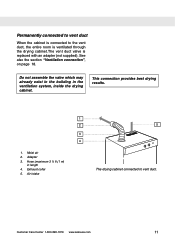
.... 1 2 5 3 4 1. Hose (maximum 3 ¼ ft (1 m) in the ventilation system, inside the drying cabinet. Air intake The drying cabinet connected to the vent duct, the entire room is ventilated through the drying cabinet.The vent duct valve is connected to vent duct. See also the section "Ventilation connection", on page 18. Exhaust collar 5. Customer Care Center 1-800-...11 Adapter 3. Moist air 2. Do not assemble the valve which may already exist in the building in length 4. Permanently connected to vent duct When the cabinet is replaced with an adapter (not supplied).
.... 1 2 5 3 4 1. Hose (maximum 3 ¼ ft (1 m) in the ventilation system, inside the drying cabinet. Air intake The drying cabinet connected to the vent duct, the entire room is ventilated through the drying cabinet.The vent duct valve is connected to vent duct. See also the section "Ventilation connection", on page 18. Exhaust collar 5. Customer Care Center 1-800-...11 Adapter 3. Moist air 2. Do not assemble the valve which may already exist in the building in length 4. Permanently connected to vent duct When the cabinet is replaced with an adapter (not supplied).
User manual Use & Care Guide ASKO DC7171 EN
Page 12
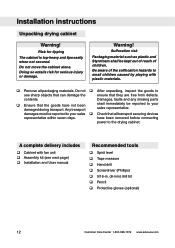
... plastic materials. Remove all transport securing devices representative within seven days. Doing so entails risk for tipping The cabinet is top-heavy and tips easily when not secured. Do not After unpacking, inspect the goods to use ...askousa.com Suffocation risk Packaging material such as plastic and Styrofoam shall be reported to the drying cabinet. Installation instructions Unpacking drying cabinet Warning! Risk for serious injury or damage. Do not move the cabinet alone. Be aware of children. Any transport shall immediately be kept out of reach of...
... plastic materials. Remove all transport securing devices representative within seven days. Doing so entails risk for tipping The cabinet is top-heavy and tips easily when not secured. Do not After unpacking, inspect the goods to use ...askousa.com Suffocation risk Packaging material such as plastic and Styrofoam shall be reported to the drying cabinet. Installation instructions Unpacking drying cabinet Warning! Risk for serious injury or damage. Do not move the cabinet alone. Be aware of children. Any transport shall immediately be kept out of reach of...
User manual Use & Care Guide ASKO DC7171 EN
Page 14
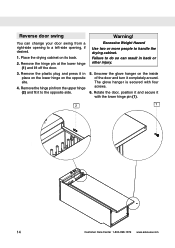
... and secure it to a left-side opening to the opposite side. Remove the hinge pin from a right-side opening , if desired. 1. Failure to handle the drying cabinet. Place the drying cabinet on the opposite site. 4. Reverse door swing You can result in place on the lower hinge on its back. 2.
... and secure it to a left-side opening to the opposite side. Remove the hinge pin from a right-side opening , if desired. 1. Failure to handle the drying cabinet. Place the drying cabinet on the opposite site. 4. Reverse door swing You can result in place on the lower hinge on its back. 2.
User manual Use & Care Guide ASKO DC7171 EN
Page 15
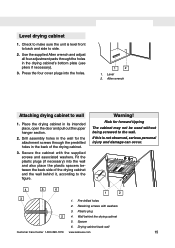
... level front to back and side to side. 2. Secure the cabinet with washers 3. Plastic plug 2 4. Level drying cabinet 1. Check to the wall. Place the drying cabinet in the drying cabinet's bottom plate (use pliers if necessary). 3. Drying cabinet back wall Customer Care Center 1-800-898-1879 www.askousa.com... washers. Spacer 6. Wall behind it, according to wall 1. Drill assembly holes in the back of the drying cabinet and the wall behind the drying cabinet 5. Press the four cover plugs into the wall and also place the plastic spacers between the back side ...
... level front to back and side to side. 2. Secure the cabinet with washers 3. Plastic plug 2 4. Level drying cabinet 1. Check to the wall. Place the drying cabinet in the drying cabinet's bottom plate (use pliers if necessary). 3. Drying cabinet back wall Customer Care Center 1-800-898-1879 www.askousa.com... washers. Spacer 6. Wall behind it, according to wall 1. Drill assembly holes in the back of the drying cabinet and the wall behind the drying cabinet 5. Press the four cover plugs into the wall and also place the plastic spacers between the back side ...
User manual Use & Care Guide ASKO DC7171 EN
Page 16
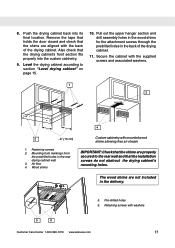
...easily unplugged without moving the unit. 3. The shim must be ½" (13 mm). 2. Rear drying cabinet wall 5. See dimension "A" in . (15 cm) each to the wall behind the drying cabinet so that it covers the marked holes according to the electrical outlet, making sure that the cord ...is not crimped and that it closed until the cabinet is flush and centered with appropriate length. 1. Pull out the entire drying cabinet. 6. Plug in the top and between the drying cabinet's rear wall and the wall behind drying cabinet 16 2 A 3 5 4 Customer Care Center 1-800-...
...easily unplugged without moving the unit. 3. The shim must be ½" (13 mm). 2. Rear drying cabinet wall 5. See dimension "A" in . (15 cm) each to the wall behind the drying cabinet so that it covers the marked holes according to the electrical outlet, making sure that the cord ...is not crimped and that it closed until the cabinet is flush and centered with appropriate length. 1. Pull out the entire drying cabinet. 6. Plug in the top and between the drying cabinet's rear wall and the wall behind drying cabinet 16 2 A 3 5 4 Customer Care Center 1-800-...
User manual Use & Care Guide ASKO DC7171 EN
Page 17
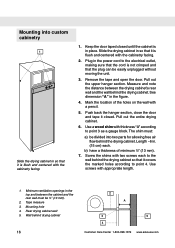
...askousa.com 17 Mounting hole markings from the predrilled holes in the delivery. 5. Air flow 4. Retaining screws with the back of the drying cabinet. 11. Wood shims Custom cabinetry with the supplied screws and associated washers. 1 3 4 2 ~6" (15 cm) 1. Pre-drilled holes 6....wood shims are properly secured to section "Level drying cabinet" on page 15. 10. Push the drying cabinet back into the custom cabinetry. 9. Also check that the shims are not included in the rear drying cabinet wall. 3. Secure the cabinet with mounted wood shims allowing free air stream...
...askousa.com 17 Mounting hole markings from the predrilled holes in the delivery. 5. Air flow 4. Retaining screws with the back of the drying cabinet. 11. Wood shims Custom cabinetry with the supplied screws and associated washers. 1 3 4 2 ~6" (15 cm) 1. Pre-drilled holes 6....wood shims are properly secured to section "Level drying cabinet" on page 15. 10. Push the drying cabinet back into the custom cabinetry. 9. Also check that the shims are not included in the rear drying cabinet wall. 3. Secure the cabinet with mounted wood shims allowing free air stream...
User manual Use & Care Guide ASKO DC7171 EN
Page 18
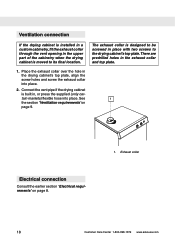
... connection Consult the earlier section 'Electrical requirements' on page 9. Ventilation connection If the drying cabinet is installed in a custom cabinetry, fit the exhaust collar through the vent opening in the drying cabinet's top plate, align the screw holes and screw the exhaust collar into place. Place... the exhaust collar over the hole in the upper part of the cabinetry when the drying cabinet is moved to the drying cabinet's top plate.There are predrilled holes in , or press the supplied (only cer- Exhaust collar 18 Customer Care...
... connection Consult the earlier section 'Electrical requirements' on page 9. Ventilation connection If the drying cabinet is installed in a custom cabinetry, fit the exhaust collar through the vent opening in the drying cabinet's top plate, align the screw holes and screw the exhaust collar into place. Place... the exhaust collar over the hole in the upper part of the cabinetry when the drying cabinet is moved to the drying cabinet's top plate.There are predrilled holes in , or press the supplied (only cer- Exhaust collar 18 Customer Care...
User manual Use & Care Guide ASKO DC7171 EN
Page 19
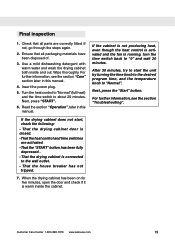
...desired program time, and the temperature knob to "Normal". Next, press the "Start" button. Next, press "START". 6. When the drying cabinet has been on for five minutes, open the door and check if it is running, turn the time switch back to about 20... "START" button has been fully depressed . - Ensure that all packaging materials have been disposed of. 3. Insert the power plug. 5. That the drying cabinet door is connected to start , check the following: - For further information, see the section "Troubleshooting". For further information, see the section "Care"...
...desired program time, and the temperature knob to "Normal". Next, press the "Start" button. Next, press "START". 6. When the drying cabinet has been on for five minutes, open the door and check if it is running, turn the time switch back to about 20... "START" button has been fully depressed . - Ensure that all packaging materials have been disposed of. 3. Insert the power plug. 5. That the drying cabinet door is connected to start , check the following: - For further information, see the section "Troubleshooting". For further information, see the section "Care"...
User manual Use & Care Guide ASKO DC7171 EN
Page 20
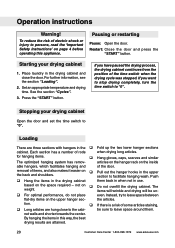
...has remov- section to leave space around them back in when not in the drying cabinet and close to leave space between flat-dry items on page 4 before operating this way, the best drying results are three sections with hangers in the Fold up the two ...Restart: Close the door and press the "START" button. Starting your drying cabinet Open the door and set the time switch to "0". If you have paused the drying process, the drying cabinet continues from the position of rods when drying long articles. Loading There are attained. 20 Customer Care Center 1-800-...
...has remov- section to leave space around them back in when not in the drying cabinet and close to leave space between flat-dry items on page 4 before operating this way, the best drying results are three sections with hangers in the Fold up the two ...Restart: Close the door and press the "START" button. Starting your drying cabinet Open the door and set the time switch to "0". If you have paused the drying process, the drying cabinet continues from the position of rods when drying long articles. Loading There are attained. 20 Customer Care Center 1-800-...
User manual Use & Care Guide ASKO DC7171 EN
Page 21
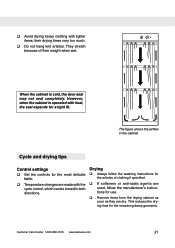
.... Customer Care Center 1-800-898-1879 www.askousa.com 21 their weight when wet. Drying Always follow the manufacturer's instructions for use. Remove items from the drying cabinet as soon as they are used, follow the washing instructions for the remaining damp garments.... When the cabinet is operated with the cycle control, which can be turned in the cabinet Cycle and drying tips Control settings Set the...
.... Customer Care Center 1-800-898-1879 www.askousa.com 21 their weight when wet. Drying Always follow the manufacturer's instructions for use. Remove items from the drying cabinet as soon as they are used, follow the washing instructions for the remaining damp garments.... When the cabinet is operated with the cycle control, which can be turned in the cabinet Cycle and drying tips Control settings Set the...
User manual Use & Care Guide ASKO DC7171 EN
Page 23
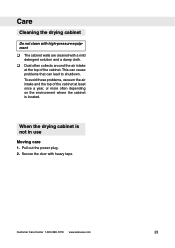
... depending on the environment where the cabinet is not in use Moving care 1. To avoid these problems, vacuum the air intake and the top of the cabinet at the top of the cabinet. This can cause problems that can lead to shutdown. Care Cleaning the drying cabinet Do not clean with high-pressure... equipment The cabinet walls are cleaned with heavy tape.
... depending on the environment where the cabinet is not in use Moving care 1. To avoid these problems, vacuum the air intake and the top of the cabinet at the top of the cabinet. This can cause problems that can lead to shutdown. Care Cleaning the drying cabinet Do not clean with high-pressure... equipment The cabinet walls are cleaned with heavy tape.

