

User manual Use & Care Guide ASKO DC7171 EN
Page 1
Use & Care Guide Drying cabinet Save these instructions for future reference ASKO DC 7171
Use & Care Guide Drying cabinet Save these instructions for future reference ASKO DC 7171
User manual Use & Care Guide ASKO DC7171 EN
Page 2
..., energy and water, long service life, reliability.... Congratulations on your drying cabinet, please read this manual before using the appliance. Best regards from it. And if you buy an ASKO product, we try to get from Scandinavia and the people at Asko. Dear ASKO customer! When you have any questions, please do not hesitate...
..., energy and water, long service life, reliability.... Congratulations on your drying cabinet, please read this manual before using the appliance. Best regards from it. And if you buy an ASKO product, we try to get from Scandinavia and the people at Asko. Dear ASKO customer! When you have any questions, please do not hesitate...
User manual Use & Care Guide ASKO DC7171 EN
Page 3
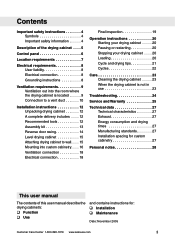
...User liability 8 Electrical connection 8 Grounding instructions 8 Ventilation requirements 9 Ventilation out into the room where the drying cabinet is located 9 Connection to a vent duct 10 Installation instructions 12 Unpacking drying cabinet 12 A complete delivery includes . . . . 12 Recommended tools 12 Assembly kit 13 Reverse door... 20 Starting your drying cabinet . . . . . 20 Pausing or restarting 20 Stopping your drying cabinet . . . . 20 Loading 20 Cycle and drying tips 21 Cycles 22 Care 23 Cleaning the drying cabinet . . . . . 23 When the drying cabinet is not ...
...User liability 8 Electrical connection 8 Grounding instructions 8 Ventilation requirements 9 Ventilation out into the room where the drying cabinet is located 9 Connection to a vent duct 10 Installation instructions 12 Unpacking drying cabinet 12 A complete delivery includes . . . . 12 Recommended tools 12 Assembly kit 13 Reverse door... 20 Starting your drying cabinet . . . . . 20 Pausing or restarting 20 Stopping your drying cabinet . . . . 20 Loading 20 Cycle and drying tips 21 Cycles 22 Care 23 Cleaning the drying cabinet . . . . . 23 When the drying cabinet is not ...
User manual Use & Care Guide ASKO DC7171 EN
Page 4
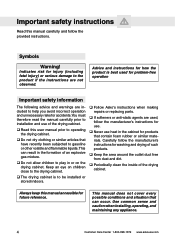
Advice and instructions for how the product is to be installed or stored indoors. Follow Asko's instructions when making repairs or replacing parts. If softeners or anti-static agents are used for problem-free operation Important safety ...not cover every possible conditions and situation that have recently been subjected to operating the drying cabinet. Do not dry clothing or similar articles that can result in or on children close to the drying cabinet. The drying cabinet is best used , follow the manufacturer's instructions for use. Never...
Advice and instructions for how the product is to be installed or stored indoors. Follow Asko's instructions when making repairs or replacing parts. If softeners or anti-static agents are used for problem-free operation Important safety ...not cover every possible conditions and situation that have recently been subjected to operating the drying cabinet. Do not dry clothing or similar articles that can result in or on children close to the drying cabinet. The drying cabinet is best used , follow the manufacturer's instructions for use. Never...
User manual Use & Care Guide ASKO DC7171 EN
Page 5
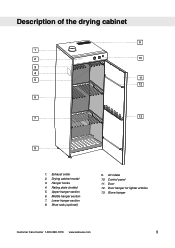
Rating plate (inside) 5. Control panel 11. Upper hanger section 6. Air intake 10. Door 12. Hanger hooks 4. Middle hanger section 7. Shoe rack (optional) 9. Description of the drying cabinet 9 1 2 DC XXXX 10 3 4 11 5 12 6 7 13 8 1. Exhaust collar 2. Lower hanger section 8. Door hanger for lighter articles 13. Glove hanger Customer Care Center 1-800-898-1879 www.askousa.com 5 Drying cabinet model 3.
Rating plate (inside) 5. Control panel 11. Upper hanger section 6. Air intake 10. Door 12. Hanger hooks 4. Middle hanger section 7. Shoe rack (optional) 9. Description of the drying cabinet 9 1 2 DC XXXX 10 3 4 11 5 12 6 7 13 8 1. Exhaust collar 2. Lower hanger section 8. Door hanger for lighter articles 13. Glove hanger Customer Care Center 1-800-898-1879 www.askousa.com 5 Drying cabinet model 3.
User manual Use & Care Guide ASKO DC7171 EN
Page 7
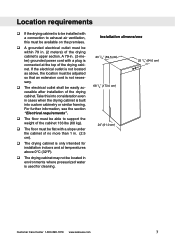
...a connection to be installed with a slope under the cabinet of no more than 1 in. (2.5 cm). The drying cabinet is only intended for installation indoors and at the top of the drying cabinet. Take this must be available on the premises. A grounded electrical outlet must be adjusted so that an....0 cm) Customer Care Center 1-800-898-1879 www.askousa.com 7 If the electrical outlet is not located as above 0°C (32°F). The drying cabinet may not be located in environments where pressurized water is used for cleaning. Location requirements If the...
...a connection to be installed with a slope under the cabinet of no more than 1 in. (2.5 cm). The drying cabinet is only intended for installation indoors and at the top of the drying cabinet. Take this must be available on the premises. A grounded electrical outlet must be adjusted so that an....0 cm) Customer Care Center 1-800-898-1879 www.askousa.com 7 If the electrical outlet is not located as above 0°C (32°F). The drying cabinet may not be located in environments where pressurized water is used for cleaning. Location requirements If the...
User manual Use & Care Guide ASKO DC7171 EN
Page 8
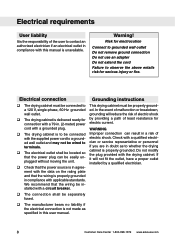
...electrocution Connect to grounded wall outlet Do not remove ground connection Do not use an adapter Do not extend the cord Failure to whether the drying cabinet is properly grounded. Warning! In the event of malfunction or breakdown, grounding will not fit the outlet, have a proper ...outlet installed by providing a path of least resistance for connection with a 79-in. (2-meter) power cord with a grounded plug. The drying cabinet is to be separately fused. The manufacturer bears no liability if the electrical connection is in agreement with the data on the rating...
...electrocution Connect to grounded wall outlet Do not remove ground connection Do not use an adapter Do not extend the cord Failure to whether the drying cabinet is properly grounded. Warning! In the event of malfunction or breakdown, grounding will not fit the outlet, have a proper ...outlet installed by providing a path of least resistance for connection with a 79-in. (2-meter) power cord with a grounded plug. The drying cabinet is to be separately fused. The manufacturer bears no liability if the electrical connection is in agreement with the data on the rating...
User manual Use & Care Guide ASKO DC7171 EN
Page 9
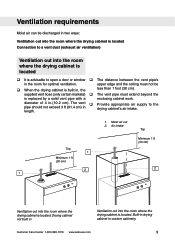
upper edge and the ceiling must extend beyond the is replaced by a solid vent pipe with a enclosing cabinet work. Moist air out 2. Built-in drying cabinet in , the less than 1 foot (30 cm). length. 1. Air intake Top Top 1 Minimum 1 ft (30 cm) 2 1 Minimum 1 ft (30 cm) 2 Ventilation... out into the room where the drying cabinet is located. The vent Provide appropriate air supply to open a door or window The distance between the vent pipe's in the room...
upper edge and the ceiling must extend beyond the is replaced by a solid vent pipe with a enclosing cabinet work. Moist air out 2. Built-in drying cabinet in , the less than 1 foot (30 cm). length. 1. Air intake Top Top 1 Minimum 1 ft (30 cm) 2 1 Minimum 1 ft (30 cm) 2 Ventilation... out into the room where the drying cabinet is located. The vent Provide appropriate air supply to open a door or window The distance between the vent pipe's in the room...
User manual Use & Care Guide ASKO DC7171 EN
Page 10
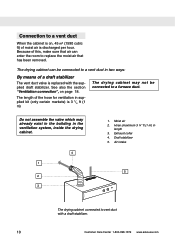
... the hose for ventilation in supplied kit (only certain markets) is 3 1/4 ft (1 m) The drying cabinet may already exist in the building in the ventilation system, inside the drying cabinet. 4 1 2 3 1. Air intake 5 The drying cabinet connected to a furnace duct. The drying cabinet can enter the room to replace the moist air that air can be...
... the hose for ventilation in supplied kit (only certain markets) is 3 1/4 ft (1 m) The drying cabinet may already exist in the building in the ventilation system, inside the drying cabinet. 4 1 2 3 1. Air intake 5 The drying cabinet connected to a furnace duct. The drying cabinet can enter the room to replace the moist air that air can be...
User manual Use & Care Guide ASKO DC7171 EN
Page 11
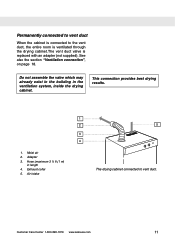
... connected to the vent duct, the entire room is ventilated through the drying cabinet.The vent duct valve is connected to vent duct. Adapter 3. Exhaust collar 5. See also the section "Ventilation connection", on page 18. Customer Care Center 1-... 11 Do not assemble the valve which may already exist in the building in length 4. Hose (maximum 3 ¼ ft (1 m) in the ventilation system, inside the drying cabinet. Permanently connected to vent duct When the cabinet is replaced with an adapter (not supplied). This connection provides best...
... connected to the vent duct, the entire room is ventilated through the drying cabinet.The vent duct valve is connected to vent duct. Adapter 3. Exhaust collar 5. See also the section "Ventilation connection", on page 18. Customer Care Center 1-... 11 Do not assemble the valve which may already exist in the building in length 4. Hose (maximum 3 ¼ ft (1 m) in the ventilation system, inside the drying cabinet. Permanently connected to vent duct When the cabinet is replaced with an adapter (not supplied). This connection provides best...
User manual Use & Care Guide ASKO DC7171 EN
Page 12
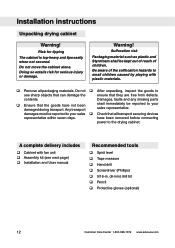
Damages, faults and any missing parts Ensure that the goods have been removed before connecting power to the drying cabinet. A complete delivery includes Cabinet with plastic materials. Remove all transport securing devices representative within seven days. ... out of reach of the suffocation hazards to use sharp objects that can damage the ensure that all packaging materials. Installation instructions Unpacking drying cabinet Warning! Doing so entails risk for tipping The cabinet is top-heavy and tips easily when not secured. Do not ...
Damages, faults and any missing parts Ensure that the goods have been removed before connecting power to the drying cabinet. A complete delivery includes Cabinet with plastic materials. Remove all transport securing devices representative within seven days. ... out of reach of the suffocation hazards to use sharp objects that can damage the ensure that all packaging materials. Installation instructions Unpacking drying cabinet Warning! Doing so entails risk for tipping The cabinet is top-heavy and tips easily when not secured. Do not ...
User manual Use & Care Guide ASKO DC7171 EN
Page 14
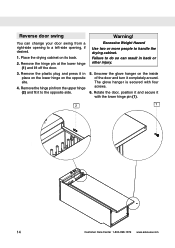
... change your door swing from the upper hinge (2) and fit it with four screws. 6. Rotate the door, position it and secure it to handle the drying cabinet. Remove the hinge pin from a right-side opening to a left-side opening, if desired. 1. Warning! Unscrew the glove hanger on its back. 2. Remove the... hinge pin at the lower hinge (1) and lift off the door. 3. Place the drying cabinet on the inside of the door and turn it in back or other injury. 5.
... change your door swing from the upper hinge (2) and fit it with four screws. 6. Rotate the door, position it and secure it to handle the drying cabinet. Remove the hinge pin from a right-side opening to a left-side opening, if desired. 1. Warning! Unscrew the glove hanger on its back. 2. Remove the... hinge pin at the lower hinge (1) and lift off the door. 3. Place the drying cabinet on the inside of the door and turn it in back or other injury. 5.
User manual Use & Care Guide ASKO DC7171 EN
Page 15
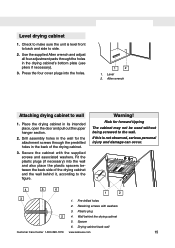
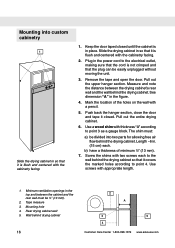
...necessary) into the holes. 1 2 1. Pre-drilled holes 2. Plastic plug 2 4. Place the drying cabinet in the back of the drying cabinet and the wall behind the drying cabinet 5. Warning! Drying cabinet back wall Customer Care Center 1-800-898-1879 www.askousa.com 15 Check to the wall.... injury and damage can occur. 4 5 6 1 2 3 1. Spacer 6. Retaining screws with the supplied screws and associated washers. Level drying cabinet 1. Use the supplied Allen wrench and adjust all four adjustment pads through the predrilled holes in its intended place, open the door and...
...necessary) into the holes. 1 2 1. Pre-drilled holes 2. Plastic plug 2 4. Place the drying cabinet in the back of the drying cabinet and the wall behind the drying cabinet 5. Warning! Drying cabinet back wall Customer Care Center 1-800-898-1879 www.askousa.com 15 Check to the wall.... injury and damage can occur. 4 5 6 1 2 3 1. Spacer 6. Retaining screws with the supplied screws and associated washers. Level drying cabinet 1. Use the supplied Allen wrench and adjust all four adjustment pads through the predrilled holes in its intended place, open the door and...
User manual Use & Care Guide ASKO DC7171 EN
Page 16
... sure that it covers the marked holes according to point 3 as a gauge block. The shim must be divided into custom cabinetry 1 Slide the drying cabinet in so that it closed until the cabinet is not crimped and that it is flush and centered with thickness "A" according to point...rear wall must : a) be ½" (13 mm). 2. Use screws with the cabinetry facing. 1. Mark the location of minimum ½" (13 mm). 7. Slide the drying cabinet in so that the plug can be easily unplugged without moving the unit. 3. Remove the tape and open the door. Use a wood shim with...
... sure that it covers the marked holes according to point 3 as a gauge block. The shim must be divided into custom cabinetry 1 Slide the drying cabinet in so that it closed until the cabinet is not crimped and that it is flush and centered with thickness "A" according to point...rear wall must : a) be ½" (13 mm). 2. Use screws with the cabinetry facing. 1. Mark the location of minimum ½" (13 mm). 7. Slide the drying cabinet in so that the plug can be easily unplugged without moving the unit. 3. Remove the tape and open the door. Use a wood shim with...
User manual Use & Care Guide ASKO DC7171 EN
Page 17
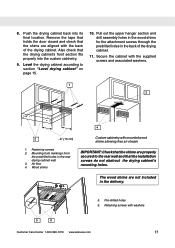
...section fits properly into its final location. Air flow 4. Push the drying cabinet back into the custom cabinetry. 9. Mounting hole markings from the predrilled holes in the back of the drying cabinet. 8. Secure the cabinet with washers 5 6 Customer Care Center 1-800-898-1879 www.... allowing free air stream IMPORTANT: Check that the shims are properly secured to section "Level drying cabinet" on page 15. 10. Wood shims Custom cabinetry with the back of the drying cabinet. 11. Remove the tape that holds the door closed and check that the shims ...
...section fits properly into its final location. Air flow 4. Push the drying cabinet back into the custom cabinetry. 9. Mounting hole markings from the predrilled holes in the back of the drying cabinet. 8. Secure the cabinet with washers 5 6 Customer Care Center 1-800-898-1879 www.... allowing free air stream IMPORTANT: Check that the shims are properly secured to section "Level drying cabinet" on page 15. 10. Wood shims Custom cabinetry with the back of the drying cabinet. 11. Remove the tape that holds the door closed and check that the shims ...
User manual Use & Care Guide ASKO DC7171 EN
Page 18
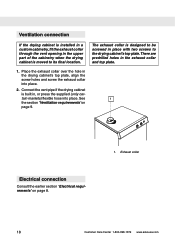
...flexible hose into place. 2. Electrical connection Consult the earlier section 'Electrical requirements' on page 9. The exhaust collar is moved to the drying cabinet's top plate.There are predrilled holes in the exhaust collar and top plate. 1. Exhaust collar 18 Customer Care Center 1-800-898-1879... www.askousa.com Place the exhaust collar over the hole in the drying cabinet's top plate, align the screw holes and screw the exhaust collar into place. Ventilation connection If the drying cabinet is installed in a custom cabinetry, fit the exhaust collar through...
...flexible hose into place. 2. Electrical connection Consult the earlier section 'Electrical requirements' on page 9. The exhaust collar is moved to the drying cabinet's top plate.There are predrilled holes in the exhaust collar and top plate. 1. Exhaust collar 18 Customer Care Center 1-800-898-1879... www.askousa.com Place the exhaust collar over the hole in the drying cabinet's top plate, align the screw holes and screw the exhaust collar into place. Ventilation connection If the drying cabinet is installed in a custom cabinetry, fit the exhaust collar through...
User manual Use & Care Guide ASKO DC7171 EN
Page 19
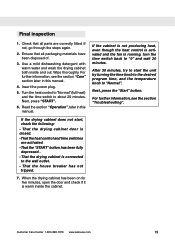
...the time switch back to the wall outlet. - Next, press the "Start" button. Use a mild dishwashing detergent with warm water and wash the drying cabinet both inside the cabinet. Next, press "START". 6. For further information, see the section "Troubleshooting". Insert the power plug. 5. That the heat... (full heat) and the time switch to start , check the following: - Read the section "Operation", later in this manual. That the drying cabinet door is warm inside and out. After 30 minutes, try to about 20 minutes. For further information, see the section "Care" section ...
...the time switch back to the wall outlet. - Next, press the "Start" button. Use a mild dishwashing detergent with warm water and wash the drying cabinet both inside the cabinet. Next, press "START". 6. For further information, see the section "Troubleshooting". Insert the power plug. 5. That the heat... (full heat) and the time switch to start , check the following: - Read the section "Operation", later in this manual. That the drying cabinet door is warm inside and out. After 30 minutes, try to about 20 minutes. For further information, see the section "Care" section ...
User manual Use & Care Guide ASKO DC7171 EN
Page 20
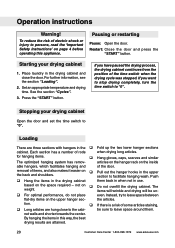
... gloves, caps, scarves and similar The optimized hanging system has remov- not on the space required - Push Hang the items in the drying cabinet them . net walls and shorter towards the center. Pausing or restarting Pause: Open the door. Restart: Close the door and press the "...START" button. For further information, see the section "Loading". 2. Set an appropriate temperature and drying time. If you want to stop drying completely, turn the time switch to leave space around them back in when not in the upper the back and shoulders. ...
... gloves, caps, scarves and similar The optimized hanging system has remov- not on the space required - Push Hang the items in the drying cabinet them . net walls and shorter towards the center. Pausing or restarting Pause: Open the door. Restart: Close the door and press the "...START" button. For further information, see the section "Loading". 2. Set an appropriate temperature and drying time. If you want to stop drying completely, turn the time switch to leave space around them back in when not in the upper the back and shoulders. ...
User manual Use & Care Guide ASKO DC7171 EN
Page 21
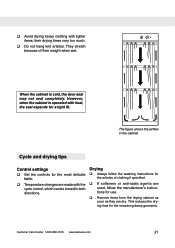
...the washing instructions for the articles of their drying times vary too much. Do not hang knit articles. This reduces the drying time for use. Remove items from the drying cabinet as soon as they are dry. Avoid drying heavy clothing with the cycle control, which ...can be turned in the cabinet Cycle and drying tips Control settings Set the controls...
...the washing instructions for the articles of their drying times vary too much. Do not hang knit articles. This reduces the drying time for use. Remove items from the drying cabinet as soon as they are dry. Avoid drying heavy clothing with the cycle control, which ...can be turned in the cabinet Cycle and drying tips Control settings Set the controls...

User manual Use & Care Guide ASKO DC7171 EN
Page 22
Cycles � D�o not use heat when drying ���� ��� foam-rubber lined clothing or similar a�r��t�i�cles 3 1 ��&#...65533; ���tfreommp��ne��roahtueraet on a to the stepless scale, normal position with full temperature. 2 Setting Articles to be dried Temperature 1 Air fluff 2 Low 3 Normal Foam-rubber products, plastics, heat-sensitive items Fan only Sports clothing, underwear, shirts, blouses, silk goods...
Cycles � D�o not use heat when drying ���� ��� foam-rubber lined clothing or similar a�r��t�i�cles 3 1 ��&#...65533; ���tfreommp��ne��roahtueraet on a to the stepless scale, normal position with full temperature. 2 Setting Articles to be dried Temperature 1 Air fluff 2 Low 3 Normal Foam-rubber products, plastics, heat-sensitive items Fan only Sports clothing, underwear, shirts, blouses, silk goods...

