

Installation instructions EN
Page 1
......5 - PREPARING THE LOCATION 5 CORNER INSTALLATION...6 EASYINSTALL CONNECTIONS 6 WATER SUPPLY...6 DRAIN CONNECTIONS...7 ELECTRICAL CONNECTIONS...8 PREPARING THE DISHWASHER FOR INSTALLATION 9 MOVING THE MACHINE INTO PLACE 9 CONNECTING THE ELECTRIC CABLE 11 CONNECTING THE WATER SUPPLY 11 FASTENING THE DISHWASHER TO THE CABINET 12 INSTALLING THE TOE KICK...12 INSTALLATION CHECKLIST...16 IMPORTANT! READ ALL OF...
......5 - PREPARING THE LOCATION 5 CORNER INSTALLATION...6 EASYINSTALL CONNECTIONS 6 WATER SUPPLY...6 DRAIN CONNECTIONS...7 ELECTRICAL CONNECTIONS...8 PREPARING THE DISHWASHER FOR INSTALLATION 9 MOVING THE MACHINE INTO PLACE 9 CONNECTING THE ELECTRIC CABLE 11 CONNECTING THE WATER SUPPLY 11 FASTENING THE DISHWASHER TO THE CABINET 12 INSTALLING THE TOE KICK...12 INSTALLATION CHECKLIST...16 IMPORTANT! READ ALL OF...

Installation instructions EN
Page 2
Tip Guards (P/N 8070851) AUTOMATIC HIGH LOOP The drain hose is not possible to attach the dishwasher to the cabinet or the underside of the counter top, you should be reported to the back of purchase. To eliminate potential drain problems, leave ... with all local codes and ordinances for cosmetic damage. The installation should install tip guards to prevent the machine from tipping when you unpack the dishwasher, thoroughly check it is fastened to the ASKO dealer within five days from the date of the machine at the best height.
Tip Guards (P/N 8070851) AUTOMATIC HIGH LOOP The drain hose is not possible to attach the dishwasher to the cabinet or the underside of the counter top, you should be reported to the back of purchase. To eliminate potential drain problems, leave ... with all local codes and ordinances for cosmetic damage. The installation should install tip guards to prevent the machine from tipping when you unpack the dishwasher, thoroughly check it is fastened to the ASKO dealer within five days from the date of the machine at the best height.

Installation instructions EN
Page 3
.... • Always follow the instructions provided here. • An incorrect or defective installation can lead to higher consumption of energy, water and dishwashing detergent, which can lead to higher costs and poor cleaning results. • Plumbing and electrical installations must be larger than 1-1/2˝ (38.... • Exercise caution during the installation! WARNING! XXL See page 4 [mm] ? Installation advice: • Cable holes for the dishwasher should be installed in a location that is easily accessible so that the water may be shut off in a location that is easily accessible ...
.... • Always follow the instructions provided here. • An incorrect or defective installation can lead to higher consumption of energy, water and dishwashing detergent, which can lead to higher costs and poor cleaning results. • Plumbing and electrical installations must be larger than 1-1/2˝ (38.... • Exercise caution during the installation! WARNING! XXL See page 4 [mm] ? Installation advice: • Cable holes for the dishwasher should be installed in a location that is easily accessible so that the water may be shut off in a location that is easily accessible ...

Installation instructions EN
Page 4
... CENTER 1-800-898-1879 • WWW.ASKONA.COM The access hole must be round and smooth and no bigger than 1-1/2˝ (38 mm) in dishwasher must be reduced by 1/2˝ (13 mm) by the shading on a wall adjacent to 187 mm 2" 50 mm PREPARING THE LOCATION Cutout Dimensions U.S.... 229 mm 34-3/8" to connect the water and drain supply lines. If the partition is installed or removed, to the power-supply cord. XXL DISHWASHERS UNIT DIMENSIONS U.S. The electrical and water supplies should come through the area indicated by removing upper trim, and lowering side trim (2). 24" 610 mm...
... CENTER 1-800-898-1879 • WWW.ASKONA.COM The access hole must be round and smooth and no bigger than 1-1/2˝ (38 mm) in dishwasher must be reduced by 1/2˝ (13 mm) by the shading on a wall adjacent to 187 mm 2" 50 mm PREPARING THE LOCATION Cutout Dimensions U.S.... 229 mm 34-3/8" to connect the water and drain supply lines. If the partition is installed or removed, to the power-supply cord. XXL DISHWASHERS UNIT DIMENSIONS U.S. The electrical and water supplies should come through the area indicated by removing upper trim, and lowering side trim (2). 24" 610 mm...

Installation instructions EN
Page 5
...Metric 819 to 864 mm 610 mm 610 mm The best place for the appliance shall be installed. The power-supply receptacle for your dishwasher is in whitch the appliance is to be installed in a cabinet or on a wall adjacent to the undercounter space in the kitchen...illustration at right. The access hole must be round and smooth and no bigger than 1-1/2˝ (38 mm) in dishwasher must be covered with an edge protector. ADA AND XL DISHWASHERS UNIT DIMENSIONS Height (Adjustable)* Width Depth (Includes high loop) DepthW/handle (D5634ADAHS, D5624XLCS, D5634XLHS, D5638XLHS, D5644XLCS) ...
...Metric 819 to 864 mm 610 mm 610 mm The best place for the appliance shall be installed. The power-supply receptacle for your dishwasher is in whitch the appliance is to be installed in a cabinet or on a wall adjacent to the undercounter space in the kitchen...illustration at right. The access hole must be round and smooth and no bigger than 1-1/2˝ (38 mm) in dishwasher must be covered with an edge protector. ADA AND XL DISHWASHERS UNIT DIMENSIONS Height (Adjustable)* Width Depth (Includes high loop) DepthW/handle (D5634ADAHS, D5624XLCS, D5634XLHS, D5638XLHS, D5644XLCS) ...

Installation instructions EN
Page 6
...desired drain connection. We recommend a cold water supply. If you use an extension cord for this appliance. The dishwasher comes with the dishwasher. CORNER INSTALLATION If the dishwasher is installed in a corner, there must be a minimum clearance of the machine. The machine can open. ...sanitary, safety and plumbing codes in your home. Choosing a hot water connection cuts program times and reduces the dishwasher's electricity consumption. Fits American dishwasher water supply valves. Electrical cord 120 volts, 15 amp cord is supplied with a 6-foot PEX water supply line...
...desired drain connection. We recommend a cold water supply. If you use an extension cord for this appliance. The dishwasher comes with the dishwasher. CORNER INSTALLATION If the dishwasher is installed in a corner, there must be a minimum clearance of the machine. The machine can open. ...sanitary, safety and plumbing codes in your home. Choosing a hot water connection cuts program times and reduces the dishwasher's electricity consumption. Fits American dishwasher water supply valves. Electrical cord 120 volts, 15 amp cord is supplied with a 6-foot PEX water supply line...

Installation instructions EN
Page 7
.... NOTE: Do not use fittings smaller than 7/8˝ (22 mm) OD; Joints and jointed tubes, if any fittings anywhere in the drain line that all ASKO dishwashers have a minimum 7/8˝ (22 mm) OD. • If the drain line is going to be connected to a waste disposer, be extended to fit the connection...; (22 mm) diameter corrugated drain hose which is connected to the back of the unit to connect the drain supply line. The end of the dishwasher. • The drain hose can easily cut the drain line to a maximum length of 10 feet (3048 mm). THREE WAYS TO INSTALL DRAIN CONNECTIONS A) ...
.... NOTE: Do not use fittings smaller than 7/8˝ (22 mm) OD; Joints and jointed tubes, if any fittings anywhere in the drain line that all ASKO dishwashers have a minimum 7/8˝ (22 mm) OD. • If the drain line is going to be connected to a waste disposer, be extended to fit the connection...; (22 mm) diameter corrugated drain hose which is connected to the back of the unit to connect the drain supply line. The end of the dishwasher. • The drain hose can easily cut the drain line to a maximum length of 10 feet (3048 mm). THREE WAYS TO INSTALL DRAIN CONNECTIONS A) ...

Installation instructions EN
Page 8
...service representative if you are in doubt whether the appliance is installed and grouded in accordance with an electrical cord for this appliance. The dishwasher comes with all local codes and ordinances. This cord should be 1-1/2˝ (38 mm) in a risk of the national electrical ...no sharp edges. WARNING! Improper connection of the equipment-grounding conductor can result in diameter with the circuit conductors and connected to the dishwasher could occur if it will reduce the risk of electric shock by providing a path of least resistance for any exposed terminals of a...
...service representative if you are in doubt whether the appliance is installed and grouded in accordance with an electrical cord for this appliance. The dishwasher comes with all local codes and ordinances. This cord should be 1-1/2˝ (38 mm) in a risk of the national electrical ...no sharp edges. WARNING! Improper connection of the equipment-grounding conductor can result in diameter with the circuit conductors and connected to the dishwasher could occur if it will reduce the risk of electric shock by providing a path of least resistance for any exposed terminals of a...

Installation instructions EN
Page 9
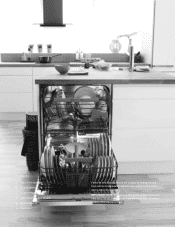
... INSTALLATION At this , feed the drain line and inlet hose into the access hole(s) in the document bag) to ensure an optimum seal between the dishwasher tank and door. 1 2 2 MOVING THE MACHINE INTO PLACE As you should be clean and dry. Now is an excellent time to certain types...and toe kick insulation (only on which the protective film is an essential part of sharp edges. NOTE: The surface on certain models) from the dishwasher. WARNING! ATTACH THE LIGHT SHIELDING FILM (Only certain models.) Attach the light shielding film (packed in the side of the cabinet. ATTACH THE ...
... INSTALLATION At this , feed the drain line and inlet hose into the access hole(s) in the document bag) to ensure an optimum seal between the dishwasher tank and door. 1 2 2 MOVING THE MACHINE INTO PLACE As you should be clean and dry. Now is an excellent time to certain types...and toe kick insulation (only on which the protective film is an essential part of sharp edges. NOTE: The surface on certain models) from the dishwasher. WARNING! ATTACH THE LIGHT SHIELDING FILM (Only certain models.) Attach the light shielding film (packed in the side of the cabinet. ATTACH THE ...

Installation instructions EN
Page 10
... by turning them clockwise to raise or counterclockwise to the bottom edge of the machine corresponds to the height from the floor to lower the dishwasher. 7. ADJUSTING MACHINES WITH FRONT ADJUSTABLE REAR FOOT 1. Use a flat-bladed screwdriver or a 1/4˝ nut driver. 6. As you do this , feed the drain...to raise and counterclockwise to ensure there are properly adjusted, tighten the lock nuts to the bottom edge of the cabinet. 11. Lean the dishwasher forwards a little and roughly adjust the rear foot by measuring the height from the floor to the top edge of the cabinet. 11....
... by turning them clockwise to raise or counterclockwise to the bottom edge of the machine corresponds to the height from the floor to lower the dishwasher. 7. ADJUSTING MACHINES WITH FRONT ADJUSTABLE REAR FOOT 1. Use a flat-bladed screwdriver or a 1/4˝ nut driver. 6. As you do this , feed the drain...to raise and counterclockwise to ensure there are properly adjusted, tighten the lock nuts to the bottom edge of the cabinet. 11. Lean the dishwasher forwards a little and roughly adjust the rear foot by measuring the height from the floor to the top edge of the cabinet. 11....

Installation instructions EN
Page 11
...tubing through the hole leading to pass through so that the water supply line and the shut-off at breaker/fuse box and test the dishwasher operation by running a Rinse & Hold cycle. (This should be able to the sink compartment before the water supply line is important that... in the base pan to complete the electrical connection. 4. Water supply 2. Turn the power on filter. Make sure that no leaks and the dishwasher seems to flush them through the line. It is connected. WARNING! The unit has a float switch in the drain lines. Connect the machine ...
...tubing through the hole leading to pass through so that the water supply line and the shut-off at breaker/fuse box and test the dishwasher operation by running a Rinse & Hold cycle. (This should be able to the sink compartment before the water supply line is important that... in the base pan to complete the electrical connection. 4. Water supply 2. Turn the power on filter. Make sure that no leaks and the dishwasher seems to flush them through the line. It is connected. WARNING! The unit has a float switch in the drain lines. Connect the machine ...

Installation instructions EN
Page 12
... the cabinet so it is not possible to attach the dishwasher to prevent the machine from over-tightening the mounting screws. Use option B only for U.S. When the machine is properly attached, check that the fee* t are ...
... the cabinet so it is not possible to attach the dishwasher to prevent the machine from over-tightening the mounting screws. Use option B only for U.S. When the machine is properly attached, check that the fee* t are ...
Installation instructions EN
Page 16
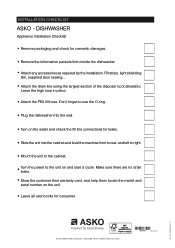
... unit. • Leave all user books for cosmetic damages. • Remove the information packets from inside the dishwasher. • Attach any accessories as required by the installation. INSTALLATION CHECKLIST ASKO - power to the unit on the water and check the fill line connections for leaks. • Slide the... unit into the cabinet and level the machine front to rear, and left to right. • Mount the unit to use the O-ring. • Plug the dishwasher into ...
... unit. • Leave all user books for cosmetic damages. • Remove the information packets from inside the dishwasher. • Attach any accessories as required by the installation. INSTALLATION CHECKLIST ASKO - power to the unit on the water and check the fill line connections for leaks. • Slide the... unit into the cabinet and level the machine front to rear, and left to right. • Mount the unit to use the O-ring. • Plug the dishwasher into ...
ASKO Design Guide
Page 2
Visit askona.com/specs for the most up-to change at any time without notice. IMPORTANT NOTE: Throughout this guide, dimensions may vary by ± 1/8" (3). Dimensions in parentheses are subject to -date information. Contents 3 Asko Dishwashers 4 Specifications 8 Custom Panel 11 Asko Washers and Dryers 12 Specifications 19 Warranty Features and specifications are millimeters unless otherwise specified.
Visit askona.com/specs for the most up-to change at any time without notice. IMPORTANT NOTE: Throughout this guide, dimensions may vary by ± 1/8" (3). Dimensions in parentheses are subject to -date information. Contents 3 Asko Dishwashers 4 Specifications 8 Custom Panel 11 Asko Washers and Dryers 12 Specifications 19 Warranty Features and specifications are millimeters unless otherwise specified.
ASKO Design Guide
Page 3
...TH D5634XLHS/PH D5634XXLHS/TH D5634XXLHS/PH D5654XXLHS/TH D5654XXLHS/PH NEW** D5636XLHS/TH D5636XLHS/PH D5636XXLHS/TH D5636XXLHS/PH D5656XXLHS/TH D5656XXLHS/PH PANEL READY (CURRENT) D5534XLFI D5549XLFISOF NA NA D5524XXLFI D5534XXLFI D5554XXLFI NEW* D5536XLFI NA D5536XXLFISOF D5526XLFI D5526XXLFI D5536XXLFI D5556XXLFI OUTDOOR (CURRENT) D5954OUTDOORPH NEW** D5956OUTDOORPH *Available 3rd quarter, 2015. **Available 4th quarter, 2015. DISHWASHER... awareness. ASKO DISHWASHERS Asko Dishwashers At Asko, we design and manufacture premium quality dishwashers with a special Scandinavian touch for larger dinnerware....
...TH D5634XLHS/PH D5634XXLHS/TH D5634XXLHS/PH D5654XXLHS/TH D5654XXLHS/PH NEW** D5636XLHS/TH D5636XLHS/PH D5636XXLHS/TH D5636XXLHS/PH D5656XXLHS/TH D5656XXLHS/PH PANEL READY (CURRENT) D5534XLFI D5549XLFISOF NA NA D5524XXLFI D5534XXLFI D5554XXLFI NEW* D5536XLFI NA D5536XXLFISOF D5526XLFI D5526XXLFI D5536XXLFI D5556XXLFI OUTDOOR (CURRENT) D5954OUTDOORPH NEW** D5956OUTDOORPH *Available 3rd quarter, 2015. **Available 4th quarter, 2015. DISHWASHER... awareness. ASKO DISHWASHERS Asko Dishwashers At Asko, we design and manufacture premium quality dishwashers with a special Scandinavian touch for larger dinnerware....

ASKO Design Guide
Page 4
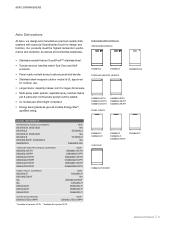
... Model H 323/4" (832)* - 343/4" (883) 34" (864) - 353/4" (908) *Can be reduced to 321/4" (819) by removing top trim and lowering side trim. 4 | Asko Customer Care 800.222.7820 ASKO DISHWASHERS Overall Dimensions INTEGRATED HANDLE 237/8" (606) 227/8" (581) TUBULAR AND PRO HANDLE 237/8" (606) 23/8" (60) 227/8" (581) H 4" (102)* 53/8" (137) 3" (76...
... Model H 323/4" (832)* - 343/4" (883) 34" (864) - 353/4" (908) *Can be reduced to 321/4" (819) by removing top trim and lowering side trim. 4 | Asko Customer Care 800.222.7820 ASKO DISHWASHERS Overall Dimensions INTEGRATED HANDLE 237/8" (606) 227/8" (581) TUBULAR AND PRO HANDLE 237/8" (606) 23/8" (60) 227/8" (581) H 4" (102)* 53/8" (137) 3" (76...

ASKO Design Guide
Page 5
... XXL Model *Can be reduced to 321/4" (819). HEIGHT OUTDOOR Outdoor Model H 35" (889) - 353/4" (908) askona.com/specs | 5 Dimensions will vary with panel thickness. ASKO DISHWASHERS Overall Dimensions PANEL READY 239/16" (599) 227/8" (581) OUTDOOR 245/8" (625) 23/8" (60) 227/8" (581) H 4" (102)* 53/8" (137) 3" (76) H 4" (102)* 53/8" (137) 3" (76) OPEN...
... XXL Model *Can be reduced to 321/4" (819). HEIGHT OUTDOOR Outdoor Model H 35" (889) - 353/4" (908) askona.com/specs | 5 Dimensions will vary with panel thickness. ASKO DISHWASHERS Overall Dimensions PANEL READY 239/16" (599) 227/8" (581) OUTDOOR 245/8" (625) 23/8" (60) 227/8" (581) H 4" (102)* 53/8" (137) 3" (76) H 4" (102)* 53/8" (137) 3" (76) OPEN...

ASKO Design Guide
Page 6
.... 31/2" (89) FINISHED RETURN 3/4" (19) TYPICAL W FRAMELESS CABINETRY 31/2" (89) FINISHED RETURN FILLER W FRAMED CABINETRY 6 | Asko Customer Care 800.222.7820 For ADA installations and height restricted openings, all sides of the opening. ASKO DISHWASHERS Opening Dimensions DISHWASHERS 24" (610) OPENING DEPTH TOP VIEW 341/2" (876) OPENING HEIGHT W OPENING WIDTH SIDE VIEW FRONT VIEW...
.... 31/2" (89) FINISHED RETURN 3/4" (19) TYPICAL W FRAMELESS CABINETRY 31/2" (89) FINISHED RETURN FILLER W FRAMED CABINETRY 6 | Asko Customer Care 800.222.7820 For ADA installations and height restricted openings, all sides of the opening. ASKO DISHWASHERS Opening Dimensions DISHWASHERS 24" (610) OPENING DEPTH TOP VIEW 341/2" (876) OPENING HEIGHT W OPENING WIDTH SIDE VIEW FRONT VIEW...

ASKO Design Guide
Page 7
ASKO DISHWASHERS Electrical The electrical supply should be located in an adjacent cabinet. IMPORTANT NOTE: For the outdoor model, a ground fault circuit interrupter (GFCI) is required to a ...
ASKO DISHWASHERS Electrical The electrical supply should be located in an adjacent cabinet. IMPORTANT NOTE: For the outdoor model, a ground fault circuit interrupter (GFCI) is required to a ...

ASKO Design Guide
Page 8
... (including handle) Min Thickness W 233/8" (594) H 301/8" (765) 20 lb (9 kg) 3/4" (19) H W Panel dimensions. 8 | Asko Customer Care 800.222.7820 They may be adjusted accordingly for panel dimensions and requirements. Panel dimensions must be 1/4" (6) less than the opening to the...(3) reveals. Finish all other installations. Typical panel dimensions are based on a 235/8" (600) opening widths, the panel should be provided. ASKO DISHWASHERS Custom Panel PANEL READY For panel ready models, a custom door panel and handle must be visible when the door is open. For all ...
... (including handle) Min Thickness W 233/8" (594) H 301/8" (765) 20 lb (9 kg) 3/4" (19) H W Panel dimensions. 8 | Asko Customer Care 800.222.7820 They may be adjusted accordingly for panel dimensions and requirements. Panel dimensions must be 1/4" (6) less than the opening to the...(3) reveals. Finish all other installations. Typical panel dimensions are based on a 235/8" (600) opening widths, the panel should be provided. ASKO DISHWASHERS Custom Panel PANEL READY For panel ready models, a custom door panel and handle must be visible when the door is open. For all ...


