Replacement Guide
Page 1
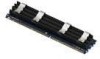
...installed in this procedure. You can add DIMMs, provided they are required for this sheet carefully. Power Mac G5 Memory Replacement Instructions Follow the instructions in the two DIMM slots marked "1." A diagram on the logic board near the DIMM slots ...Dual Inline Memory Module (DIMM) slots. Each slot accepts 400 Mhz Double-Data-Rate (DDR) Synchronous Dynamic RandomAccess Memory (SDRAM) devices. Failure to follow these instructions could damage your equipment and void its warranty. Note: Online instructions are available at http://www.info.apple.com/installparts...
...installed in this procedure. You can add DIMMs, provided they are required for this sheet carefully. Power Mac G5 Memory Replacement Instructions Follow the instructions in the two DIMM slots marked "1." A diagram on the logic board near the DIMM slots ...Dual Inline Memory Module (DIMM) slots. Each slot accepts 400 Mhz Double-Data-Rate (DDR) Synchronous Dynamic RandomAccess Memory (SDRAM) devices. Failure to follow these instructions could damage your equipment and void its warranty. Note: Online instructions are available at http://www.info.apple.com/installparts...
Replacement Guide
Page 2
.... You must fit these specifications: • 400 MHz DDR • 2.5 volt • 184-pin module • Maximum number of memory devices on DDR SDRAM:16. • Nonparity • No error correcting codes (ECC) • Unbuffered (registered or buffered DDR SDRAM cannot be very hot...computer or attempt to install items inside the computer. Unplug all external cables from the computer except the power cord. 4. Power Mac G5 Memory - 2 Warning: Always shut down the computer before opening it to avoid damaging its internal components or the components you touch any parts...
.... You must fit these specifications: • 400 MHz DDR • 2.5 volt • 184-pin module • Maximum number of memory devices on DDR SDRAM:16. • Nonparity • No error correcting codes (ECC) • Unbuffered (registered or buffered DDR SDRAM cannot be very hot...computer or attempt to install items inside the computer. Unplug all external cables from the computer except the power cord. 4. Power Mac G5 Memory - 2 Warning: Always shut down the computer before opening it to avoid damaging its internal components or the components you touch any parts...

Replacement Guide
Page 3
Hold the side access panel and lift the latch on a flat surface covered by a soft, clean cloth. Figure 2 Power Mac G5 Memory - 3 Remove the access panel and place it on the back of the computer. (Figure 2) Warning: The edges of the access panel and the enclosure can be sharp. Be very careful when handling them. 7. Unplug the power cord. 6. Figure 1 5.
Hold the side access panel and lift the latch on a flat surface covered by a soft, clean cloth. Figure 2 Power Mac G5 Memory - 3 Remove the access panel and place it on the back of the computer. (Figure 2) Warning: The edges of the access panel and the enclosure can be sharp. Be very careful when handling them. 7. Unplug the power cord. 6. Figure 1 5.

Replacement Guide
Page 4
Remove the air deflector and place it on a soft, clean cloth. (Figure 3) Figure 3 Important: Always remember to replace the air deflector after you have finished working inside your computer. The Power Mac G5 computer will not function properly if the air deflector is not replaced. Power Mac G5 Memory - 4 8.
Remove the air deflector and place it on a soft, clean cloth. (Figure 3) Figure 3 Important: Always remember to replace the air deflector after you have finished working inside your computer. The Power Mac G5 computer will not function properly if the air deflector is not replaced. Power Mac G5 Memory - 4 8.
Replacement Guide
Page 5
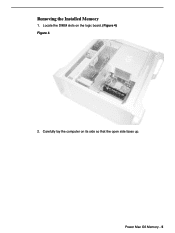
Locate the DIMM slots on its side so that the open side faces up. Removing the Installed Memory 1. Power Mac G5 Memory - 5 Carefully lay the computer on the logic board. (Figure 4) Figure 4 2.
Locate the DIMM slots on its side so that the open side faces up. Removing the Installed Memory 1. Power Mac G5 Memory - 5 Carefully lay the computer on the logic board. (Figure 4) Figure 4 2.
Replacement Guide
Page 6
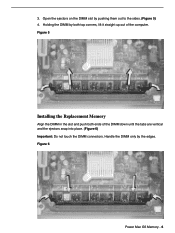
Holding the DIMM by both ends of the computer. Figure 6 Power Mac G5 Memory - 6 Handle the DIMM only by pushing them out to the sides. (Figure 5) 4. Figure 5 Installing the Replacement Memory Align the DIMM in the slot and push both top corners, lift it straight up out of the DIMM down until the tabs are vertical and the ejectors snap into place. (Figure 6) Important: Do not touch the DIMM connectors. 3. Open the ejectors on the DIMM slot by the edges.
Holding the DIMM by both ends of the computer. Figure 6 Power Mac G5 Memory - 6 Handle the DIMM only by pushing them out to the sides. (Figure 5) 4. Figure 5 Installing the Replacement Memory Align the DIMM in the slot and push both top corners, lift it straight up out of the DIMM down until the tabs are vertical and the ejectors snap into place. (Figure 6) Important: Do not touch the DIMM connectors. 3. Open the ejectors on the DIMM slot by the edges.
Replacement Guide
Page 7
...parts are trademarks of the enclosure. Power Mac G5 Memory - 7 If the latch is protected under U.S. All rights reserved. Apple Computer, Inc. 1 Infinite Loop Cupertino, CA 95014-2084 USA + 1 408 996 1010 http://www.apple.com Apple, the Apple logo, Mac, Macintosh, and the Mac logo ...not installed, the computer will not seat correctly in any form without written permission from Apple. If the air deflector is in place and it or cause injury. Apple Computer, Inc. © 2004 Apple Computer, Inc. Push the latch down , the access panel will not function properly...
...parts are trademarks of the enclosure. Power Mac G5 Memory - 7 If the latch is protected under U.S. All rights reserved. Apple Computer, Inc. 1 Infinite Loop Cupertino, CA 95014-2084 USA + 1 408 996 1010 http://www.apple.com Apple, the Apple logo, Mac, Macintosh, and the Mac logo ...not installed, the computer will not seat correctly in any form without written permission from Apple. If the air deflector is in place and it or cause injury. Apple Computer, Inc. © 2004 Apple Computer, Inc. Push the latch down , the access panel will not function properly...