Installation Instructions
Page 1
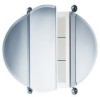
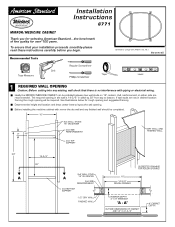
To ensure that there is 14-3/8" in width by Installation Instructions 6771 MIRROR/MEDICINE CABINET Thank you begin. Determine the height and location and draw center lines to comply with ANSI A112.18.1 M968408D 10' Tape Measure...the wall is no interference with mirror the dry wall and any existing wall check that your installation proceeds smoothly--please read these instructions carefully before you for selecting American-Standard...the benchmark of fine quality for rough opening will be required. Before installing the medicine cabinet with piping or electrical wiring. ...
To ensure that there is 14-3/8" in width by Installation Instructions 6771 MIRROR/MEDICINE CABINET Thank you begin. Determine the height and location and draw center lines to comply with ANSI A112.18.1 M968408D 10' Tape Measure...the wall is no interference with mirror the dry wall and any existing wall check that your installation proceeds smoothly--please read these instructions carefully before you for selecting American-Standard...the benchmark of fine quality for rough opening will be required. Before installing the medicine cabinet with piping or electrical wiring. ...

Installation Instructions
Page 2
To use TEMPLATES (A & B), to center measurements are needed. See FIGURE B below. Install MIRROR/MEDICINE CABINET into drywall while turning the anchor clockwise until it is seated flush with a level that the center to... Measure as illustrated. For installations on drywall without reinforcement studs, If TILE ANCHORS (4) and SCREWS (3) are level. INSTALL MIRROR/MEDICINE CABINET Note: Cabinet can be installed either right hand or left corner of cabinet frame. Use TEMPLATE (A) for corners 1 & 3 and TEMPLATE (B) for SCREWS (3). Drill small pilot holes for corners 2...
To use TEMPLATES (A & B), to center measurements are needed. See FIGURE B below. Install MIRROR/MEDICINE CABINET into drywall while turning the anchor clockwise until it is seated flush with a level that the center to... Measure as illustrated. For installations on drywall without reinforcement studs, If TILE ANCHORS (4) and SCREWS (3) are level. INSTALL MIRROR/MEDICINE CABINET Note: Cabinet can be installed either right hand or left corner of cabinet frame. Use TEMPLATE (A) for corners 1 & 3 and TEMPLATE (B) for SCREWS (3). Drill small pilot holes for corners 2...
Installation Instructions
Page 3
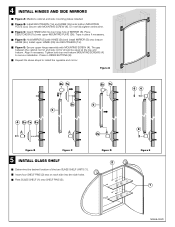
...four SHELF PINS (2) two on each side into top hinge hole of the two GLASS SHELF UNITS (1). " INSTALL HINGES AND SIDE MIRRORS Figure A: Medicine cabinet and side mounting plates installed. Secure with MOUNTING SCREW (4). Figure C: Insert HINGE (2b) into the side holes. Tape in INDEX... Repeat the above steps to secure installation. Figure D 2 64 6 Figure E 1 M968408D Figure D: Hold MIRROR (5) with HINGE (2b) and install MIRROR (5) onto bottom HINGE (2a). The gap between the cabinet mirror and side mirror should be equal at this time. Figure A 2b 1b 2b 1b 3b 5 4 2a 1a 3a 5 2a...
...four SHELF PINS (2) two on each side into top hinge hole of the two GLASS SHELF UNITS (1). " INSTALL HINGES AND SIDE MIRRORS Figure A: Medicine cabinet and side mounting plates installed. Secure with MOUNTING SCREW (4). Figure C: Insert HINGE (2b) into the side holes. Tape in INDEX... Repeat the above steps to secure installation. Figure D 2 64 6 Figure E 1 M968408D Figure D: Hold MIRROR (5) with HINGE (2b) and install MIRROR (5) onto bottom HINGE (2a). The gap between the cabinet mirror and side mirror should be equal at this time. Figure A 2b 1b 2b 1b 3b 5 4 2a 1a 3a 5 2a...
