Use and Care
Page 2
... MICROWAVE OVEN SAFETY 3 INSTALLATION INSTRUCTIONS 5 Unpacking 5 Location Requirements 5 Electrical Requirements 5 PARTS AND FEATURES 6 Turntable 6 MICROWAVE OVEN CONTROL 6 Display 7 Start/Enter 7 Add 30 Seconds 7 Off/Cancel 7 Tones 7 Clock 7 Kitchen Timer 7 Control Lock 7 MICROWAVE OVEN USE 8 Food Characteristics 8 Cooking Guidelines 8 Cookware and Dinnerware 9 Aluminum Foil and Metal 9 Microwave Cooking Power 9 Manual Cooking 10 Cooking...
... MICROWAVE OVEN SAFETY 3 INSTALLATION INSTRUCTIONS 5 Unpacking 5 Location Requirements 5 Electrical Requirements 5 PARTS AND FEATURES 6 Turntable 6 MICROWAVE OVEN CONTROL 6 Display 7 Start/Enter 7 Add 30 Seconds 7 Off/Cancel 7 Tones 7 Clock 7 Kitchen Timer 7 Control Lock 7 MICROWAVE OVEN USE 8 Food Characteristics 8 Cooking Guidelines 8 Cookware and Dinnerware 9 Aluminum Foil and Metal 9 Microwave Cooking Power 9 Manual Cooking 10 Cooking...
Use and Care
Page 3
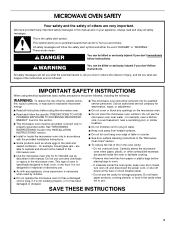
... 3 All safety messages will follow the specific "PRECAUTIONS TO AVOID POSSIBLE EXPOSURE TO EXCESSIVE MICROWAVE ENERGY" found in the "INSTALLATION INSTRUCTIONS" section. ■ Install or locate the microwave oven only in the oven cavity: - It is the safety alert symbol. If materials inside the... example, near a kitchen sink, in oven. - for storage purposes. Do not use . ■ As with the provided Installation Instructions. ■ Some products such as described in the manual. Always read and obey all instructions before placing bags in a wet basement, near water -
... 3 All safety messages will follow the specific "PRECAUTIONS TO AVOID POSSIBLE EXPOSURE TO EXCESSIVE MICROWAVE ENERGY" found in the "INSTALLATION INSTRUCTIONS" section. ■ Install or locate the microwave oven only in the oven cavity: - It is the safety alert symbol. If materials inside the... example, near a kitchen sink, in oven. - for storage purposes. Do not use . ■ As with the provided Installation Instructions. ■ Some products such as described in the manual. Always read and obey all instructions before placing bags in a wet basement, near water -
Use and Care
Page 6
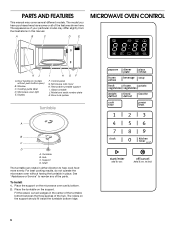
... Oz lbs K J A. Door handle (on the microwave oven cavity bottom. 2. Control panel G. Glass turntable J. Door lock system Turntable A B C D A. To Install: 1. Support D. Microwave inlet cover H. Shaft The turntable can rotate in either direction to reorder any of your particular model may cover several different models. Place...inside the turntable bottom ridge. 6 The rollers on the support. PARTS AND FEATURES This manual may differ slightly from the illustrations in this manual. The model you have purchased may have some or all of the hub. Window ...
... Oz lbs K J A. Door handle (on the microwave oven cavity bottom. 2. Control panel G. Glass turntable J. Door lock system Turntable A B C D A. To Install: 1. Support D. Microwave inlet cover H. Shaft The turntable can rotate in either direction to reorder any of your particular model may cover several different models. Place...inside the turntable bottom ridge. 6 The rollers on the support. PARTS AND FEATURES This manual may differ slightly from the illustrations in this manual. The model you have purchased may have some or all of the hub. Window ...

