
Installation Instruction
Page 2
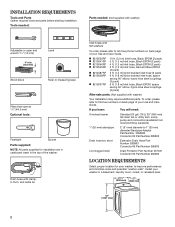
... numbers on back page of the washer. Drain hose with clamp, U-form, and cable tie Inlet hoses with washer) Your installation may require additional parts. If you have: You will need: Overhead sewer Standard 20 gal. (76 L) 39" (990 mm) tall drain tub or utility sink, ..., hypro-blue steel couplings (2 pack) 6 ft. (1.8 m) Inlet hose, Black EPDM, space saving 90° elbow, hypro-blue steel couplings (2 pack) Alternate parts: (Not supplied with flat washers To order, please refer to improve performance and minimize noise and possible "washer walk". Install your Use and Care Guide...
... numbers on back page of the washer. Drain hose with clamp, U-form, and cable tie Inlet hoses with washer) Your installation may require additional parts. If you have: You will need: Overhead sewer Standard 20 gal. (76 L) 39" (990 mm) tall drain tub or utility sink, ..., hypro-blue steel couplings (2 pack) 6 ft. (1.8 m) Inlet hose, Black EPDM, space saving 90° elbow, hypro-blue steel couplings (2 pack) Alternate parts: (Not supplied with flat washers To order, please refer to improve performance and minimize noise and possible "washer walk". Install your Use and Care Guide...
Installation Instruction
Page 3
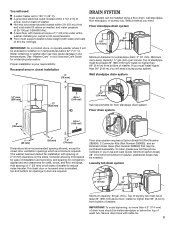
... be installed using a floor drain, wall standpipe, floor standpipe, or laundry tub. Floor drain system requires a Siphon Break Kit (Part Number 285834), 2 Connector Kits (Part Number 285835), and an Extension Drain Hose (Part Number 285863) that may cause damage in temperatures below the top of 20-100 psi (138-690 kPa). n A grounded electrical...
... be installed using a floor drain, wall standpipe, floor standpipe, or laundry tub. Floor drain system requires a Siphon Break Kit (Part Number 285834), 2 Connector Kits (Part Number 285835), and an Extension Drain Hose (Part Number 285863) that may cause damage in temperatures below the top of 20-100 psi (138-690 kPa). n A grounded electrical...
Installation Instruction
Page 5
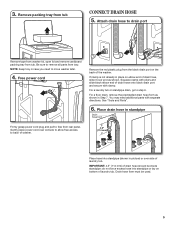
Attach drain hose to remove all parts from tub. Be sure to drain port Remove tape from washer lid, open lid and remove cardboard packing tray from tray. NOTE: Keep tray in ... of laundry tub. do not force excess hose into standpipe (shown in picture) or over end as shown in case you need additional parts with clamp. See "Tools and Parts". 6. Place drain hose in place on bottom of drain hose, slide it over side of drain hose should be used. 5 IMPORTANT: 4.5" (114...
Attach drain hose to remove all parts from tub. Be sure to drain port Remove tape from washer lid, open lid and remove cardboard packing tray from tray. NOTE: Keep tray in ... of laundry tub. do not force excess hose into standpipe (shown in picture) or over end as shown in case you need additional parts with clamp. See "Tools and Parts". 6. Place drain hose in place on bottom of drain hose, slide it over side of drain hose should be used. 5 IMPORTANT: 4.5" (114...
Installation Instruction
Page 6
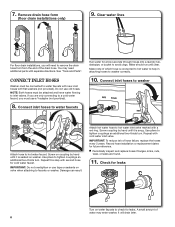
7. Remove drain hose form (floor drain installations only) 9. See "Tools and Parts". Screw on washer. Use pliers to washer correctly. 10. Attach hot water hose to inlet valves. A small amount of which hose is seated on coupling ... with a red ring. n Periodically inspect and replace hoses if bulges, kinks, cuts, wear, or leaks are only connecting to avoid clogs. It will need additional parts with separate directions.
7. Remove drain hose form (floor drain installations only) 9. See "Tools and Parts". Screw on washer. Use pliers to washer correctly. 10. Attach hot water hose to inlet valves. A small amount of which hose is seated on coupling ... with a red ring. n Periodically inspect and replace hoses if bulges, kinks, cuts, wear, or leaks are only connecting to avoid clogs. It will need additional parts with separate directions.
Installation Instruction
Page 8
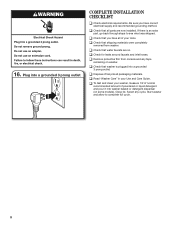
... supply and recommended grounding method. If there is plugged into a grounded 3 prong outlet COMPLETE INSTALLATION CHECKLIST q Check electrical requirements. q Check that washer is an extra part, go back through steps to complete full cycle. 8 q Check that water faucets are now installed. q Read "Washer Care" in your tools. Plug into a grounded... 3 prong outlet. 16. q Check that all packaging materials. q Check that you have all of /recycle all parts are on some models). q Dispose of your Use and Care Guide.
... supply and recommended grounding method. If there is plugged into a grounded 3 prong outlet COMPLETE INSTALLATION CHECKLIST q Check electrical requirements. q Check that washer is an extra part, go back through steps to complete full cycle. 8 q Check that water faucets are now installed. q Read "Washer Care" in your tools. Plug into a grounded... 3 prong outlet. 16. q Check that all packaging materials. q Check that you have all of /recycle all parts are on some models). q Dispose of your Use and Care Guide.
Use and Care
Page 14
... the installation of incidental or consequential damages, so these excluded circumstances shall be provided by a company designated by Whirlpool to service Amana, Admiral, Estate, Inglis, or Roper brand appliances. Pick up and delivery. You can be easily determined. Proof of original...this Warranty. The cost of the Use & Care Guide. ITEMS EXCLUDED FROM WARRANTY This limited warranty does not cover: 1. Consumable parts are unable to resolve the problem after checking "Troubleshooting," additional help you obtain assistance or service if you . DISCLAIMER OF REPRESENTATIONS ...
... the installation of incidental or consequential damages, so these excluded circumstances shall be provided by a company designated by Whirlpool to service Amana, Admiral, Estate, Inglis, or Roper brand appliances. Pick up and delivery. You can be easily determined. Proof of original...this Warranty. The cost of the Use & Care Guide. ITEMS EXCLUDED FROM WARRANTY This limited warranty does not cover: 1. Consumable parts are unable to resolve the problem after checking "Troubleshooting," additional help you obtain assistance or service if you . DISCLAIMER OF REPRESENTATIONS ...

Dimension Guide
Page 2
Wall standpipe drain system Floor drain system requires a Siphon Break Kit (Part Number 285834), 2 Connector Kits (Part Number 285835), and an Extension Drain Hose (Part Number 285863) that a separate circuit serving only this appliance be inside standpipe or below the top of laundry tub must be purchased separately. Top of ...
Wall standpipe drain system Floor drain system requires a Siphon Break Kit (Part Number 285834), 2 Connector Kits (Part Number 285835), and an Extension Drain Hose (Part Number 285863) that a separate circuit serving only this appliance be inside standpipe or below the top of laundry tub must be purchased separately. Top of ...

Warranty
Page 1
... does not cover: 1. The removal and reinstallation of this major appliance other than the representations contained in this Warranty. Replacement parts or repair labor on the duration of implied warranties of Whirlpool Corporation or Whirlpool Canada LP (hereafter "Whirlpool") will need repair... required to obtain service under these limitations and exclusions may not apply to you. Proof of purchase. 6. Service calls to service Amana, Admiral, Estate, Inglis, or Roper brand appliances. Cosmetic damage, including scratches, dents, chips or other rights that comes with this...
... does not cover: 1. The removal and reinstallation of this major appliance other than the representations contained in this Warranty. Replacement parts or repair labor on the duration of implied warranties of Whirlpool Corporation or Whirlpool Canada LP (hereafter "Whirlpool") will need repair... required to obtain service under these limitations and exclusions may not apply to you. Proof of purchase. 6. Service calls to service Amana, Admiral, Estate, Inglis, or Roper brand appliances. Cosmetic damage, including scratches, dents, chips or other rights that comes with this...

