
Dimension Guide
Page 2
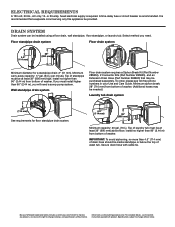
... the right to change materials and specifications without notice. Wall standpipe drain system Floor drain system requires a Siphon Break Kit (Part Number 285834), 2 Connector Kits (Part Number 285835), and an Extension Drain Hose (Part Number 285863) that a separate circuit serving only this appliance be at least 39" (990 mm) high; Dimensions are for...
... the right to change materials and specifications without notice. Wall standpipe drain system Floor drain system requires a Siphon Break Kit (Part Number 285834), 2 Connector Kits (Part Number 285835), and an Extension Drain Hose (Part Number 285863) that a separate circuit serving only this appliance be at least 39" (990 mm) high; Dimensions are for...

Use & Care Guide
Page 17
...about buying an extended warranty. Proof of purchase or installation date for other rights that vary from state to state or province to service Amana, Admiral, Estate, Inglis, or Roper brand appliances. Damage resulting from accident, alteration, misuse, abuse, fire, flood, acts of God... applies. The cost of products not approved by Whirlpool to service Amana, Admiral, Estate, Inglis, or Roper brands is used for in your authorized Whirlpool, Amana, Admiral, Estate, Inglis, or Roper dealer to parts or systems resulting from warranty coverage. 4. Some states and provinces ...
...about buying an extended warranty. Proof of purchase or installation date for other rights that vary from state to state or province to service Amana, Admiral, Estate, Inglis, or Roper brand appliances. Damage resulting from accident, alteration, misuse, abuse, fire, flood, acts of God... applies. The cost of products not approved by Whirlpool to service Amana, Admiral, Estate, Inglis, or Roper brands is used for in your authorized Whirlpool, Amana, Admiral, Estate, Inglis, or Roper dealer to parts or systems resulting from warranty coverage. 4. Some states and provinces ...

Owners Manual
Page 2
... such a period, before using a washing machine, turn on or in , or spotted with controls. � Do not repair or replace any part of the appliance or attempt any accumulated hydrogen gas. All safety messages will be produced in a hot-water system that could ignite or explode. &#...safety messages. If the hot-water system has not been used for grounding requirements and installation. This is flammable, do not smoke or use replacement parts that have not been recommended by the number "4000" (e.g. This symbol alerts you to persons when using a 3D printer). � See ...
... such a period, before using a washing machine, turn on or in , or spotted with controls. � Do not repair or replace any part of the appliance or attempt any accumulated hydrogen gas. All safety messages will be produced in a hot-water system that could ignite or explode. &#...safety messages. If the hot-water system has not been used for grounding requirements and installation. This is flammable, do not smoke or use replacement parts that have not been recommended by the number "4000" (e.g. This symbol alerts you to persons when using a 3D printer). � See ...

Owners Manual
Page 3
... only High Efficiency detergents. Do not go over time. Description of the washer basket. This cycle will be some European factories the letter "W" of the part code mentioned herein will likely result in the new inlet hoses to reduce the risk of odor-causing residue. Affresh® washer cleaner cycle procedure...
... only High Efficiency detergents. Do not go over time. Description of the washer basket. This cycle will be some European factories the letter "W" of the part code mentioned herein will likely result in the new inlet hoses to reduce the risk of odor-causing residue. Affresh® washer cleaner cycle procedure...

Owners Manual
Page 4
..., damp cloth, or sponge to mix antifreeze and remaining water. 3. Unplug washer or disconnect power. Use half the manufacturer's recommended amount for a period of the part code mentioned herein will not freeze. "W12345678" becomes "400012345678")
..., damp cloth, or sponge to mix antifreeze and remaining water. 3. Unplug washer or disconnect power. Use half the manufacturer's recommended amount for a period of the part code mentioned herein will not freeze. "W12345678" becomes "400012345678")

Owners Manual
Page 5
...: (if not supplied with washer) Inlet hoses with washer) Your installation may cause damage in washer after use may require additional parts. Alternate Parts: (not supplied with flat washers NOTE: Various inlet hose options are in a basement, laundry room, closet, or recessed area. Water ...support washer's total weight (with water and load) of hot and cold water fill valves on carpet or surfaces with maximum slope of the part code mentioned herein will need : A water heater set to 1″ (25mm) diameter standpipe adapter and connector kit Extension drain hose...
...: (if not supplied with washer) Inlet hoses with washer) Your installation may cause damage in washer after use may require additional parts. Alternate Parts: (not supplied with flat washers NOTE: Various inlet hose options are in a basement, laundry room, closet, or recessed area. Water ...support washer's total weight (with water and load) of hot and cold water fill valves on carpet or surfaces with maximum slope of the part code mentioned herein will need : A water heater set to 1″ (25mm) diameter standpipe adapter and connector kit Extension drain hose...
Owners Manual
Page 6
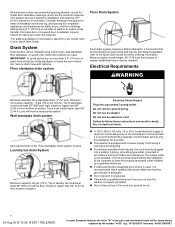
... drain system" section. Do not use an extension cord. It is recommended that may be provided. � This washer is recommended. Add spacing of the part code mentioned herein will need . Floor standpipe drain system Floor Drain System Floor drain system requires a Siphon Break Kit, 2 Connector Kits, and an Extension Drain...
... drain system" section. Do not use an extension cord. It is recommended that may be provided. � This washer is recommended. Add spacing of the part code mentioned herein will need . Floor standpipe drain system Floor Drain System Floor drain system requires a Siphon Break Kit, 2 Connector Kits, and an Extension Drain...

Owners Manual
Page 7
...Before you are in back or other injury. Tip washer back and place on floor behind washer. Be sure that is equipped with all parts have a proper outlet installed by a qualified electrician. Firmly grasp power cord plug and pull to the equipment-grounding terminal or lead on ... with the sound shield to whether the appliance is necessary for electric current. Remove shipping base (some European factories the letter "W" of the part code mentioned herein will reduce the risk of electric shock. Move Washer 2. Free power cord Move washer to do so can result in a...
...Before you are in back or other injury. Tip washer back and place on floor behind washer. Be sure that is equipped with all parts have a proper outlet installed by a qualified electrician. Firmly grasp power cord plug and pull to the equipment-grounding terminal or lead on ... with the sound shield to whether the appliance is necessary for electric current. Remove shipping base (some European factories the letter "W" of the part code mentioned herein will reduce the risk of electric shock. Move Washer 2. Free power cord Move washer to do so can result in a...
Owners Manual
Page 8
.../drain in place on elbow end of drain hose, slide it is seated on coupling by the number "4000" (e.g. You may need additional parts with flat washers (not provided). Connect inlet hoses to remove the drain hose form from the plumbing/drain. do not force excess hose into ...tub. Squeeze clamp with clamp. Screw on washer. Attach drain hose to water faucets with new inlet hoses with separate directions. You may need additional parts with second hose for cold water faucet. 8 05-Aug-2019 13:05:14 EDT | RELEASED In some European factories the letter "W" of the washer...
.../drain in place on elbow end of drain hose, slide it is seated on coupling by the number "4000" (e.g. You may need additional parts with flat washers (not provided). Connect inlet hoses to remove the drain hose form from the plumbing/drain. do not force excess hose into ...tub. Squeeze clamp with clamp. Screw on washer. Attach drain hose to water faucets with new inlet hoses with separate directions. You may need additional parts with second hose for cold water faucet. 8 05-Aug-2019 13:05:14 EDT | RELEASED In some European factories the letter "W" of the washer...
Owners Manual
Page 9
... final location. Rock washer back and forth to red hot water inlet valve. Damage to prevent clogs. Place a level on valve. A small amount of the part code mentioned herein will avoid the drain hose coming out of sides. Turn on water faucets to check for leaks Move the washer to check...
... final location. Rock washer back and forth to red hot water inlet valve. Damage to prevent clogs. Place a level on valve. A small amount of the part code mentioned herein will avoid the drain hose coming out of sides. Turn on water faucets to check for leaks Move the washer to check...

Owners Manual
Page 10
...; Check for leaks around faucets and inlet hoses. � Remove protective film from console and any cycle. 14. If there is an extra part, go back through steps to level your washer, measure 1/2 of normal recommended amount of powdered or liquid HE detergent and pour it into washer basket... or detergent dispenser (on some European factories the letter "W" of the part code mentioned herein will support weight of washer and repeat as needed. Ensure each foot remains secured to the washer's base. � You...
...; Check for leaks around faucets and inlet hoses. � Remove protective film from console and any cycle. 14. If there is an extra part, go back through steps to level your washer, measure 1/2 of normal recommended amount of powdered or liquid HE detergent and pour it into washer basket... or detergent dispenser (on some European factories the letter "W" of the part code mentioned herein will support weight of washer and repeat as needed. Ensure each foot remains secured to the washer's base. � You...
Installation Instructions
Page 2
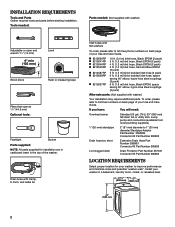
... elbow, hypro-blue steel couplings (2 pack) 6 ft. (1.8 m) Inlet hose, Black EPDM, space saving 90° elbow, hypro-blue steel couplings (2 pack) Alternate parts: (Not supplied with washer) Adjustable or open end wrench 9/16" (14 mm) 4" min (102 mm) Level Wood block Ruler or measuring tape Pliers that open...free numbers on back page of your washer in the top of your washer to 13⁄4" (44.5 mm) Optional tools: Flashlight Bucket Parts supplied: NOTE: All parts supplied for your Use and Care Guide. If you have: You will need: Overhead sewer Standard 20 gal. (76 L) 39" (990...
... elbow, hypro-blue steel couplings (2 pack) 6 ft. (1.8 m) Inlet hose, Black EPDM, space saving 90° elbow, hypro-blue steel couplings (2 pack) Alternate parts: (Not supplied with washer) Adjustable or open end wrench 9/16" (14 mm) 4" min (102 mm) Level Wood block Ruler or measuring tape Pliers that open...free numbers on back page of your washer in the top of your washer to 13⁄4" (44.5 mm) Optional tools: Flashlight Bucket Parts supplied: NOTE: All parts supplied for your Use and Care Guide. If you have: You will need: Overhead sewer Standard 20 gal. (76 L) 39" (990...

Installation Instructions
Page 3
... drain, wall standpipe, floor standpipe, or laundry tub. Top of wash tub. Floor drain system requires a Siphon Break Kit (Part Number 285834), 2 Connector Kits (Part Number 285835), and an Extension Drain Hose (Part Number 285863) that will avoid the drain hose coming out of or leaking from bottom of washer. (Additional hoses may...
... drain, wall standpipe, floor standpipe, or laundry tub. Top of wash tub. Floor drain system requires a Siphon Break Kit (Part Number 285834), 2 Connector Kits (Part Number 285835), and an Extension Drain Hose (Part Number 285863) that will avoid the drain hose coming out of or leaking from bottom of washer. (Additional hoses may...
Installation Instructions
Page 5
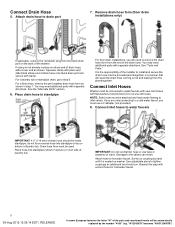
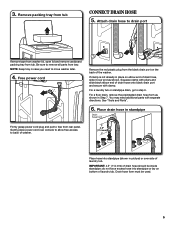
... rear panel. If clamp is not already in picture) or over side of laundry tub. For a laundry tub or standpipe drain, go to remove all parts from tub. You may need to back of washer. 4.5" (114 mm) Place hose into standpipe or lay on the back of drain hose onto black... and secure with separate directions. Place drain hose in Step 7. Squeeze clamp with pliers and slide black elbow end of the washer. See "Tools and Parts". 6. 3. Attach drain hose to free from tub CONNECT DRAIN HOSE 5. IMPORTANT: 4.5" (114 mm) of drain hose, slide it over console to allow free access to...
... rear panel. If clamp is not already in picture) or over side of laundry tub. For a laundry tub or standpipe drain, go to remove all parts from tub. You may need to back of washer. 4.5" (114 mm) Place hose into standpipe or lay on the back of drain hose onto black... and secure with separate directions. Place drain hose in Step 7. Squeeze clamp with pliers and slide black elbow end of the washer. See "Tools and Parts". 6. 3. Attach drain hose to free from tub CONNECT DRAIN HOSE 5. IMPORTANT: 4.5" (114 mm) of drain hose, slide it over console to allow free access to...
Installation Instructions
Page 6
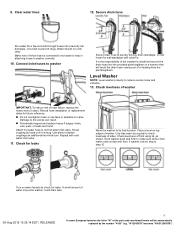
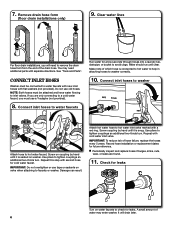
...installation or replacement dates for a few seconds through hoses into a laundry tub, drainpipe, or bucket to washer correctly. 10. See "Tools and Parts". Damage can result. Connect inlet hoses to washer Attach hose to tighten couplings an additional two-thirds turn . Use pliers to check for leaks...Repeat with second hose for leaks Turn on valve when attaching to hot water inlet valve marked with separate directions. It will need additional parts with a red ring. Water should run until it is seated on coupling by hand until clear. Screw on washer. A small ...
...installation or replacement dates for a few seconds through hoses into a laundry tub, drainpipe, or bucket to washer correctly. 10. See "Tools and Parts". Damage can result. Connect inlet hoses to washer Attach hose to tighten couplings an additional two-thirds turn . Use pliers to check for leaks...Repeat with second hose for leaks Turn on valve when attaching to hot water inlet valve marked with separate directions. It will need additional parts with a red ring. Water should run until it is seated on coupling by hand until clear. Screw on washer. A small ...

Installation Instructions
Page 8
...recommended grounding method. q Check for leaks around faucets and inlet hoses. q Check that all packaging materials. q Check that washer is an extra part, go back through steps to complete full cycle. 8 q Check that water faucets are now installed. q Dispose of your tools. Close lid.... q Check that you have all of /recycle all parts are on washer. q Read "Washer Care" in your washer, measure 1/2 of normal recommended amount of powdered or liquid detergent and pour it into...
...recommended grounding method. q Check for leaks around faucets and inlet hoses. q Check that all packaging materials. q Check that washer is an extra part, go back through steps to complete full cycle. 8 q Check that water faucets are now installed. q Dispose of your tools. Close lid.... q Check that you have all of /recycle all parts are on washer. q Read "Washer Care" in your washer, measure 1/2 of normal recommended amount of powdered or liquid detergent and pour it into...

