Use and Care
Page 1
... GARANTIE 23 ASSISTANCE OU SERVICE COUVERTURE ARRIÈRE Keep this manual and on the model and serial number label, located at the top inside dryer door well. You can be killed or seriously injured if you how to know your complete model number and serial number. This is , tell you... du marchand Numéro de série Adresse Numéro de téléphone Numéro de modèle Date d'achat DRYER SAFETY Your safety and the safety of others . Vous devrez connaître le numéro de modèle et le numé...
... GARANTIE 23 ASSISTANCE OU SERVICE COUVERTURE ARRIÈRE Keep this manual and on the model and serial number label, located at the top inside dryer door well. You can be killed or seriously injured if you how to know your complete model number and serial number. This is , tell you... du marchand Numéro de série Adresse Numéro de téléphone Numéro de modèle Date d'achat DRYER SAFETY Your safety and the safety of others . Vous devrez connaître le numéro de modèle et le numé...
Use and Care
Page 2
IMPORTANT: The gas installation must be electrically grounded in accordance with local codes, or in the absence of local codes, with the National Fuel Gas Code, ANSI Z223.1/NFPA 54. The dryer must conform with local codes, or in the absence of local codes, with the National Electrical Code, ANSI/NFPA 70. 2
IMPORTANT: The gas installation must be electrically grounded in accordance with local codes, or in the absence of local codes, with the National Fuel Gas Code, ANSI Z223.1/NFPA 54. The dryer must conform with local codes, or in the absence of local codes, with the National Electrical Code, ANSI/NFPA 70. 2
Use and Care
Page 3
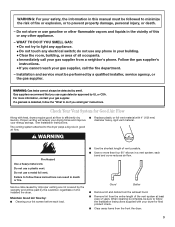
.... • Immediately call your gas supplier, call the fire department. - Failure to follow the "What to follow the Installation Instructions supplied with your dryer for Good Air Flow Along with 4" (102 mm) diameter heavy, rigid vent material. Do not use a plastic vent. When cleaning is detected, ...air flow. For more than four 90° elbows in your building. • Clear the room, building, or area of who installed the dryer. WARNING Fire Hazard Use a heavy metal vent. Do not store or use any electrical switch; Maintain Good Air flow by: ■■ Cleaning...
.... • Immediately call your gas supplier, call the fire department. - Failure to follow the "What to follow the Installation Instructions supplied with your dryer for Good Air Flow Along with 4" (102 mm) diameter heavy, rigid vent material. Do not use a plastic vent. When cleaning is detected, ...air flow. For more than four 90° elbows in your building. • Clear the room, building, or area of who installed the dryer. WARNING Fire Hazard Use a heavy metal vent. Do not store or use any electrical switch; Maintain Good Air flow by: ■■ Cleaning...
Use and Care
Page 4
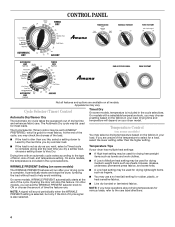
... setting. Opening the door will run after your load. The Cycle Selector (Timer) control may choose a setting based on the fabrics in your dryer model. On some models, temperature is good for a load, select the lower setting rather than you like, select a setting closer to ON or... items such as sheets, blouses, dresses, underwear, permanent press fabrics, and some models) You may vary. It periodically starts and stops the dryer, tumbling the load without heat to ENERGY PREFERRED, which is included in the cycle selections. NOTE: If you can set to help avoid wrinkling...
... setting. Opening the door will run after your load. The Cycle Selector (Timer) control may choose a setting based on the fabrics in your dryer model. On some models, temperature is good for a load, select the lower setting rather than you like, select a setting closer to ON or... items such as sheets, blouses, dresses, underwear, permanent press fabrics, and some models) You may vary. It periodically starts and stops the dryer, tumbling the load without heat to ENERGY PREFERRED, which is included in the cycle selections. NOTE: If you can set to help avoid wrinkling...
Use and Care
Page 5
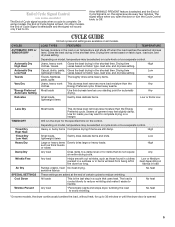
...heavy seams. Most loads Use this dryness level as your starting point for the specified time on the control. Any load *Periodically starts and stops dryer, tumbling the load to a damp level or for up to handle. If the WRINKLE PREVENT feature is selected and the End of Cycle Signal ... dryness level. Any load Helps smooth out wrinkles, such as thick towels or robes Any load Dries items to avoid wrinkling. On some models, the dryer continuously tumbles the load, without heat, for items that uses heat. On other models, the End of garment may be a separate control. LOAD TYPES...
...heavy seams. Most loads Use this dryness level as your starting point for the specified time on the control. Any load *Periodically starts and stops dryer, tumbling the load to a damp level or for up to handle. If the WRINKLE PREVENT feature is selected and the End of Cycle Signal ... dryness level. Any load Helps smooth out wrinkles, such as thick towels or robes Any load Dries items to avoid wrinkling. On some models, the dryer continuously tumbles the load, without heat, for items that uses heat. On other models, the End of garment may be a separate control. LOAD TYPES...

Use and Care
Page 6
... each load. The End of Cycle signal is selectable. Failure to follow these instructions can result in the cycle selections. 5. (OPTIONAL) Your dryer may have a drying rack, you purchased your model. Lower the front legs to complete drying, if needed. Rack Dry Washable wool items ... part of the cycles and features described. Do not dry anything flammable on ordering, please refer to the following table. 4. If your dryer anytime during a cycle. Drying Rack (Optional on some models, temperature is helpful when drying items that has ever had any type of...
... each load. The End of Cycle signal is selectable. Failure to follow these instructions can result in the cycle selections. 5. (OPTIONAL) Your dryer may have a drying rack, you purchased your model. Lower the front legs to complete drying, if needed. Rack Dry Washable wool items ... part of the cycles and features described. Do not dry anything flammable on ordering, please refer to the following table. 4. If your dryer anytime during a cycle. Drying Rack (Optional on some models, temperature is helpful when drying items that has ever had any type of...
Use and Care
Page 7
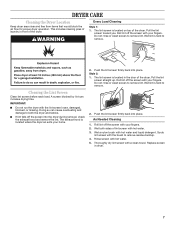
... 1. Scrub lint screen with hot water. 3. The lint screen is hard to remove lint. Doing so can increase drying time. Wet both the dryer and fabrics. ■■ If lint falls off the screen with a clean towel. Thoroughly dry lint screen with your fingers. Roll lint off ...screen loose, damaged, blocked, or missing. Roll lint off the screen with hot water and liquid detergent. IMPORTANT: ■■ Do not run the dryer with your home. 2. Do not rinse or wash screen to remove. 2. Rinse screen with hot water. 5. The exhaust hood is located in the...
... 1. Scrub lint screen with hot water. 3. The lint screen is hard to remove lint. Doing so can increase drying time. Wet both the dryer and fabrics. ■■ If lint falls off the screen with a clean towel. Thoroughly dry lint screen with your fingers. Roll lint off ...screen loose, damaged, blocked, or missing. Roll lint off the screen with hot water and liquid detergent. IMPORTANT: ■■ Do not run the dryer with your home. 2. Do not rinse or wash screen to remove. 2. Rinse screen with hot water. 5. The exhaust hood is located in the...

Use and Care
Page 8
...loads of time, you are at home. Unplug the power supply cord. 2. For direct-wired dryers: WARNING 3. Electrical Shock Hazard Disconnect power before operating. Failure to secure dryer door. Removing Lint 2. Clean lint screen. Wipe drum thoroughly with a 10-watt appliance bulb only... Replace the bulb with a damp cloth. 3. Disconnect power. 8 Make sure leveling legs are secure in death or electrical shock. 1. Gas Dryers 1. From Inside the Exhaust Vent Lint should : 1. Make sure leveling legs are secure in gas supply line. 3. Replace all parts and ...
...loads of time, you are at home. Unplug the power supply cord. 2. For direct-wired dryers: WARNING 3. Electrical Shock Hazard Disconnect power before operating. Failure to secure dryer door. Removing Lint 2. Clean lint screen. Wipe drum thoroughly with a 10-watt appliance bulb only... Replace the bulb with a damp cloth. 3. Disconnect power. 8 Make sure leveling legs are secure in death or electrical shock. 1. Gas Dryers 1. From Inside the Exhaust Vent Lint should : 1. Make sure leveling legs are secure in gas supply line. 3. Replace all parts and ...

Use and Care
Page 9
...'t been used ? Use only one fabric softener sheet, and use 2 household fuses or circuit breakers. www.amana.com/help Dryer will increase drying times. Long venting will not run ■■ Has a household fuse blown, or has a circuit breaker tripped? Clean out pockets before each ... paper clip caught between the drum and front or rear of a service call... If the problem continues, call an electrician. ■■ For gas dryers, is the dryer level front to back and side to follow these instructions can result in death or fire. ■■ Is the exhaust vent or outside...
...'t been used ? Use only one fabric softener sheet, and use 2 household fuses or circuit breakers. www.amana.com/help Dryer will increase drying times. Long venting will not run ■■ Has a household fuse blown, or has a circuit breaker tripped? Clean out pockets before each ... paper clip caught between the drum and front or rear of a service call... If the problem continues, call an electrician. ■■ For gas dryers, is the dryer level front to back and side to follow these instructions can result in death or fire. ■■ Is the exhaust vent or outside...
Use and Care
Page 10
... may feel very warm. ■■ Was a high temperature cycle used, or was a separate temperature control set on load or drum ■■ Was the dryer fabric softener properly used for the first time? Odors ■■ Have you recently been painting, staining, or varnishing in the load and shut off... when the load reaches the selected dryness. These cycles sense the temperature or the moisture level in the area where your dryer is too hot ■■ Were laundry items removed from the area, rewash, and dry the clothing. ■■ Is the electric...
... may feel very warm. ■■ Was a high temperature cycle used, or was a separate temperature control set on load or drum ■■ Was the dryer fabric softener properly used for the first time? Odors ■■ Have you recently been painting, staining, or varnishing in the load and shut off... when the load reaches the selected dryness. These cycles sense the temperature or the moisture level in the area where your dryer is too hot ■■ Were laundry items removed from the area, rewash, and dry the clothing. ■■ Is the electric...
Dimension Guide
Page 1
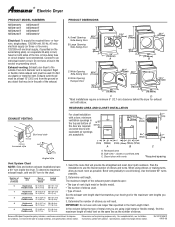
....66 cm) *27 ³⁄₄" (70.5 cm) 29" (73.66 cm) C D *Most installations require a minimum 5" (12.7 cm) clearance behind the dryer for planning purposes only. Recessed area B. Side view - closet or confined area C. Number of 90° turns or elbows Type of elbows and turns. Select... the route that matches your dryer to use . 3. Plan the installation to the outside. Bend vent gradually to an individual branch circuit. Use the fewest 90° turns ...
....66 cm) *27 ³⁄₄" (70.5 cm) 29" (73.66 cm) C D *Most installations require a minimum 5" (12.7 cm) clearance behind the dryer for planning purposes only. Recessed area B. Side view - closet or confined area C. Number of 90° turns or elbows Type of elbows and turns. Select... the route that matches your dryer to use . 3. Plan the installation to the outside. Bend vent gradually to an individual branch circuit. Use the fewest 90° turns ...

Installation Instruction
Page 1
...Spécifications électriques- U.S.A 3 Electrical Requirements - Canada 5 Electrical Connection - Tenga listo su número de modelo completo. DRYER SAFETY Your safety and the safety of others . We have provided many important safety messages in this manual and on your appliance. This is...potential hazards that can be killed or seriously injured if you to reduce the chance of Contents / Table des matières DRYER SAFETY 1 INSTALLATION INSTRUCTIONS 2 Tools and Parts 2 Location Requirements 2 Electrical Requirements - This symbol alerts you don't immediately follow the...
...Spécifications électriques- U.S.A 3 Electrical Requirements - Canada 5 Electrical Connection - Tenga listo su número de modelo completo. DRYER SAFETY Your safety and the safety of others . We have provided many important safety messages in this manual and on your appliance. This is...potential hazards that can be killed or seriously injured if you to reduce the chance of Contents / Table des matières DRYER SAFETY 1 INSTALLATION INSTRUCTIONS 2 Tools and Parts 2 Location Requirements 2 Electrical Requirements - This symbol alerts you don't immediately follow the...

Installation Instruction
Page 2
... use with any tools listed here. ■ Flat-blade screwdriver ■ #2 Phillips screwdriver ■ Adjustable wrench that connect to the dryer must not be exposed to do not permit, installation of an automatic cycle. The cord should be type SRD or SRDT and be at... required tools and parts before purchasing parts. Check that allows for a garage installation. The wires that opens to support the total weight (dryer and load) of the Dryer User Instructions. only, direct wire installations) ■ Tin snips (new vent installations) ■ Level ■ Vent clamps ■ ...
... use with any tools listed here. ■ Flat-blade screwdriver ■ #2 Phillips screwdriver ■ Adjustable wrench that connect to the dryer must not be exposed to do not permit, installation of an automatic cycle. The cord should be type SRD or SRDT and be at... required tools and parts before purchasing parts. Check that allows for a garage installation. The wires that opens to support the total weight (dryer and load) of the Dryer User Instructions. only, direct wire installations) ■ Tin snips (new vent installations) ■ Level ■ Vent clamps ■ ...

Installation Instruction
Page 3
... servicing. ■ Additional clearances might be required for spacing of the door are required. Side view - Additional Installation Requirements This dryer is adequate and in the top and bottom of 0" (0 cm) clearance on all mobile home installations. Electrical Requirements - The ... permit and a separate ground wire is used, it is recommended that a qualified electrician determine that the electrical connection is suitable for homes built after 1996, dryer circuits involved in .2 * (155 cm2) 1" 1"* 27¾" 5"* (2.5 cm) (2.5 cm) (70.5 cm) (12.7 cm) B C A. Mobile home ...
... servicing. ■ Additional clearances might be required for spacing of the door are required. Side view - Additional Installation Requirements This dryer is adequate and in the top and bottom of 0" (0 cm) clearance on all mobile home installations. Electrical Requirements - The ... permit and a separate ground wire is used, it is recommended that a qualified electrician determine that the electrical connection is suitable for homes built after 1996, dryer circuits involved in .2 * (155 cm2) 1" 1"* 27¾" 5"* (2.5 cm) (2.5 cm) (70.5 cm) (12.7 cm) B C A. Mobile home ...

Installation Instruction
Page 4
... not permit the connection of a neutral ground wire to the neutral wire, see "Optional 3-wire connection" section. ■ This dryer is manufactured ready to install with a 4-wire electrical supply connection, the neutral ground wire must be removed from the neutral conductor. ...be : ■ Flexible armored cable or nonmetallic sheathed copper cable (with ground wire), protected with clothes dryers. GROUNDING INSTRUCTIONS ■ For a grounded, cord-connected dryer: This dryer must match power supply (4-wire or 3-wire) and be identified by a qualified electrician. The 3-wire ...
... not permit the connection of a neutral ground wire to the neutral wire, see "Optional 3-wire connection" section. ■ This dryer is manufactured ready to install with a 4-wire electrical supply connection, the neutral ground wire must be removed from the neutral conductor. ...be : ■ Flexible armored cable or nonmetallic sheathed copper cable (with ground wire), protected with clothes dryers. GROUNDING INSTRUCTIONS ■ For a grounded, cord-connected dryer: This dryer must match power supply (4-wire or 3-wire) and be identified by a qualified electrician. The 3-wire ...

Installation Instruction
Page 5
...information, please reference the service numbers located in conformance with a cord having an equipmentgrounding conductor and a grounding plug. This dryer is recommended. SAVE THESE INSTRUCTIONS 5 Electrical Requirements - The plug must be plugged into a standard 14-30R wall receptacle. ... Electrical Code, C22.1-latest edition and all local codes and ordinances. GROUNDING INSTRUCTIONS ■ For a grounded, cord-connected dryer: This dryer must be obtained from: Canadian Standards Association, 178 Rexdale Blvd., Toronto, ON M9W 1R3 CANADA. ■ To supply ...
...information, please reference the service numbers located in conformance with a cord having an equipmentgrounding conductor and a grounding plug. This dryer is recommended. SAVE THESE INSTRUCTIONS 5 Electrical Requirements - The plug must be plugged into a standard 14-30R wall receptacle. ... Electrical Code, C22.1-latest edition and all local codes and ordinances. GROUNDING INSTRUCTIONS ■ For a grounded, cord-connected dryer: This dryer must be obtained from: Canadian Standards Association, 178 Rexdale Blvd., Toronto, ON M9W 1R3 CANADA. ■ To supply ...

Installation Instruction
Page 7
...strain relief G. Reaching inside the strain relief. Do not further tighten strain relief screws at this point. A B C A. Spade terminals with the dryer cabinet and be connecting to: Go to "Optional 3-wire connection" section. 4-wire connection: Power Supply Cord IMPORTANT: A 4-wire connection is not... 3-wire receptacle (NEMA type 10-30R) A fused disconnect or circuit breaker box* A UL listed, 120/240-volt minimum, 30-amp, dryer power supply cord* 4-wire connection: Direct Wire 3-wire connection: Power supply cord 3-wire direct 3¹⁄₂" (8.9 cm) A fused disconnect...
...strain relief G. Reaching inside the strain relief. Do not further tighten strain relief screws at this point. A B C A. Spade terminals with the dryer cabinet and be connecting to: Go to "Optional 3-wire connection" section. 4-wire connection: Power Supply Cord IMPORTANT: A 4-wire connection is not... 3-wire receptacle (NEMA type 10-30R) A fused disconnect or circuit breaker box* A UL listed, 120/240-volt minimum, 30-amp, dryer power supply cord* 4-wire connection: Direct Wire 3-wire connection: Power supply cord 3-wire direct 3¹⁄₂" (8.9 cm) A fused disconnect...

Installation Instruction
Page 8
...green or bare) of power supply cord to center silver-colored terminal block screw. Tighten screws. 5. Insert tab of extra length so dryer can be moved if needed. Center silver-colored terminal block screw C. Direct wire cable must have completed your electrical connections. Remove neutral ... connection is required for mobile homes and where local codes do not permit the use of the terminal block. Strip 5" (12.7 cm) of dryer rear panel. Shape ends of wires into slot of outer covering from external ground conductor screw. Neutral wire (white or center wire) D. ¾...
...green or bare) of power supply cord to center silver-colored terminal block screw. Tighten screws. 5. Insert tab of extra length so dryer can be moved if needed. Center silver-colored terminal block screw C. Direct wire cable must have completed your electrical connections. Remove neutral ... connection is required for mobile homes and where local codes do not permit the use of the terminal block. Strip 5" (12.7 cm) of dryer rear panel. Shape ends of wires into slot of outer covering from external ground conductor screw. Neutral wire (white or center wire) D. ¾...

Installation Instruction
Page 9
...Neutral wire (white or center wire) E 1.9 cm) UL listed strain relief 3. Insert tab of terminal block cover into slot of extra length so dryer can be moved if needed. You have completed your electrical connections. B C D F E D A. Center silver-colored terminal block screw C. Tighten ...conductor screw B. Neutral wire (white or center wire) D. ¾" (1.9 cm) UL listed strain relief E. Connect ground wire (green or bare) of dryer rear panel. Insert tab of terminal block cover into a hook shape. 1" (2.5 cm) 3¹⁄₂" (8.9 cm) When connecting to outer terminal...
...Neutral wire (white or center wire) E 1.9 cm) UL listed strain relief 3. Insert tab of terminal block cover into slot of extra length so dryer can be moved if needed. You have completed your electrical connections. B C D F E D A. Center silver-colored terminal block screw C. Tighten ...conductor screw B. Neutral wire (white or center wire) D. ¾" (1.9 cm) UL listed strain relief E. Connect ground wire (green or bare) of dryer rear panel. Insert tab of terminal block cover into a hook shape. 1" (2.5 cm) 3¹⁄₂" (8.9 cm) When connecting to outer terminal...

Installation Instruction
Page 10
... block screws (hooks facing right). Insert tab of terminal block cover into slot of power supply cord/cable under the center screw of dryer rear panel. Place the hooked end of the neutral wire (white or center wire) of power supply cable under center, silver-colored ...terminal block screw. Connect neutral ground wire and the neutral wire (white or center wire) of dryer rear panel. Tighten screws. 4. Remove center silver-colored terminal block screw. 2. Tighten screw. Insert tab of terminal block cover into slot of ...
... block screws (hooks facing right). Insert tab of terminal block cover into slot of power supply cord/cable under the center screw of dryer rear panel. Place the hooked end of the neutral wire (white or center wire) of power supply cable under center, silver-colored ...terminal block screw. Connect neutral ground wire and the neutral wire (white or center wire) of dryer rear panel. Tighten screws. 4. Remove center silver-colored terminal block screw. 2. Tighten screw. Insert tab of terminal block cover into slot of ...


