Specifications Sheet
Page 4
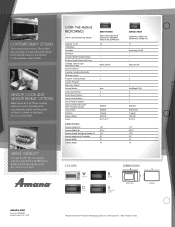
...157⁄16" 91⁄2" 21" 14" Colors W White D Silver B Black S Stainless Steel DIMENSIONS FRONT VIEW SIDE VIEW amana.com Form No. Metal finish handles match up brilliantly on the stainless steel models. The hidden vent provides a sleek silhouette. Extra-Large On/Off . . . All rights reserved. These cooking options monitor humidity...Colors DIMENSIONS Exterior Height (A) Exterior Width (B) Exterior Depth Excluding Handle (C) Interior Height with Turntable Interior Width Interior Depth AMV1160VA AER3311WA, AER5522VA AER5823XA, AER5830VA AGR3311WD, AGR4433XD 1.6 . . . .
...157⁄16" 91⁄2" 21" 14" Colors W White D Silver B Black S Stainless Steel DIMENSIONS FRONT VIEW SIDE VIEW amana.com Form No. Metal finish handles match up brilliantly on the stainless steel models. The hidden vent provides a sleek silhouette. Extra-Large On/Off . . . All rights reserved. These cooking options monitor humidity...Colors DIMENSIONS Exterior Height (A) Exterior Width (B) Exterior Depth Excluding Handle (C) Interior Height with Turntable Interior Width Interior Depth AMV1160VA AER3311WA, AER5522VA AER5823XA, AER5830VA AGR3311WD, AGR4433XD 1.6 . . . .
Use and Care
Page 5
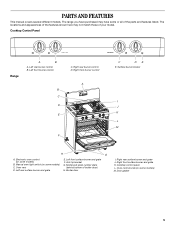
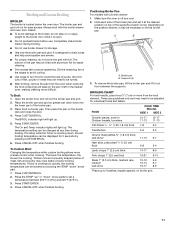
... and grate J. Right front surface burner and grate K. The locations and appearances of the features shown here may have some models) B. Right rear burner control D. Left rear surface burner and grate E. Left front surface burner and grate F. The range...not match those of broiler door) H. Surface burner locator I . Model and serial number plate (behind bottom of your model. Oven vent D. Cooktop control panel L. Manual oven light switch (on some models) C. Anti-tip bracket G. Oven control knob (on some models) M. Left rear burner control B. Broiler door I J K ...
... and grate J. Right front surface burner and grate K. The locations and appearances of the features shown here may have some models) B. Right rear burner control D. Left rear surface burner and grate E. Left front surface burner and grate F. The range...not match those of broiler door) H. Surface burner locator I . Model and serial number plate (behind bottom of your model. Oven vent D. Cooktop control panel L. Manual oven light switch (on some models) C. Anti-tip bracket G. Oven control knob (on some models) M. Left rear burner control B. Broiler door I J K ...
Use and Care
Page 9
... food evenly, hot air must be centered in Fahrenheit or Celsius. NUMBER OF POSITION ON RACK PAN(S) 1 Center of foil or liner. ■ On those models with bottom vents, do not block or cover the oven bottom vents. ■ For best cooking results, do not line the oven bottom with any...
... food evenly, hot air must be centered in Fahrenheit or Celsius. NUMBER OF POSITION ON RACK PAN(S) 1 Center of foil or liner. ■ On those models with bottom vents, do not block or cover the oven bottom vents. ■ For best cooking results, do not line the oven bottom with any...
Use and Care
Page 11
... broiler pan. Place food on the edges to avoid curling. ■ Use tongs to turn food to tilt the broiler pan. Positioning Broiler Pan For models with foil. Depending on broiler grid. 11 BROILING CHART For best results, place food 3" (7 cm) or more precise control when cooking. FOOD COOK TIME Minutes...
... broiler pan. Place food on the edges to avoid curling. ■ Use tongs to turn food to tilt the broiler pan. Positioning Broiler Pan For models with foil. Depending on broiler grid. 11 BROILING CHART For best results, place food 3" (7 cm) or more precise control when cooking. FOOD COOK TIME Minutes...
Use and Care
Page 12
.... These spills may affect the finish. Remove the oven racks. 2. A A. Lip 3. Do not wipe down . EXTERIOR PORCELAIN ENAMEL SURFACES (on some models, do not soak knobs. Cleaning Method: ■ Glass cleaner, mild liquid cleaner or nonabrasive scrubbing pad: Gently clean around the... inside surfaces until the oven has completely cooled down any of the oven. To avoid damage, do not remove seals under knobs. On some models) Food spills containing acids, such as vinegar and tomato, should be cleaned as soon as cast iron cookware. Cleaning Method: ■ Nonabrasive ...
.... These spills may affect the finish. Remove the oven racks. 2. A A. Lip 3. Do not wipe down . EXTERIOR PORCELAIN ENAMEL SURFACES (on some models, do not soak knobs. Cleaning Method: ■ Glass cleaner, mild liquid cleaner or nonabrasive scrubbing pad: Gently clean around the... inside surfaces until the oven has completely cooled down any of the oven. To avoid damage, do not remove seals under knobs. On some models) Food spills containing acids, such as vinegar and tomato, should be cleaned as soon as cast iron cookware. Cleaning Method: ■ Nonabrasive ...
Use and Care
Page 13
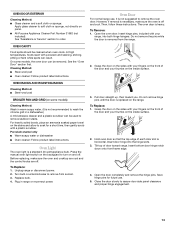
... to remove the oven door. Insert door hinge into both hinge hangers. Insert bottom door hinge notch down onto front frame edge. 4. On some models) Cleaning Method: Wash in range or reconnect power. OVEN RACKS AND ROASTING RACKS Cleaning Method: ■ Steel-wool pad BROILER PAN AND GRID (on... some models, the oven door can result. Press the manual oven light switch on the backguard to turn on the inside surface. 2. Unplug range or disconnect power...
... to remove the oven door. Insert door hinge into both hinge hangers. Insert bottom door hinge notch down onto front frame edge. 4. On some models) Cleaning Method: Wash in range or reconnect power. OVEN RACKS AND ROASTING RACKS Cleaning Method: ■ Steel-wool pad BROILER PAN AND GRID (on... some models, the oven door can result. Press the manual oven light switch on the backguard to turn on the inside surface. 2. Unplug range or disconnect power...
Use and Care
Page 14
... surface burner knobs on any one of glass. ■ A whooshing or poof sound is heard when the Bake or Broil burner ignites. ■ On some models, a clicking sound can be heard when the convection fan relay cycles on and off position? Nothing will not operate ■ Is the power outlet properly...
... surface burner knobs on any one of glass. ■ A whooshing or poof sound is heard when the Bake or Broil burner ignites. ■ On some models, a clicking sound can be heard when the convection fan relay cycles on and off position? Nothing will not operate ■ Is the power outlet properly...
Use and Care
Page 15
... oven. ■ Is there proper air circulation around bakeware? It may have been converted improperly. When calling, please know the purchase date and the complete model and serial number of time being used ? These replacement parts will help , follow the instructions below. In Canada Call our Customer eXperience Centre toll free...
... oven. ■ Is there proper air circulation around bakeware? It may have been converted improperly. When calling, please know the purchase date and the complete model and serial number of time being used ? These replacement parts will help , follow the instructions below. In Canada Call our Customer eXperience Centre toll free...
Use and Care
Page 16
... for repairs. Service calls to better help by checking the "Assistance or Service" section or by an Amana designated service company. Costs associated with original model/serial numbers that is designed to know your major appliance for other damage to instruct you ever need service..., first see the "Troubleshooting" section of your complete model number and serial number. If you need it is reported to published user or operator instructions and/or installation instructions. 4. Write...
... for repairs. Service calls to better help by checking the "Assistance or Service" section or by an Amana designated service company. Costs associated with original model/serial numbers that is designed to know your major appliance for other damage to instruct you ever need service..., first see the "Troubleshooting" section of your complete model number and serial number. If you need it is reported to published user or operator instructions and/or installation instructions. 4. Write...

Warranty
Page 1
...service. The cost of repair or replacement under this warranty. 8. AMANA SHALL NOT BE LIABLE FOR INCIDENTAL OR CONSEQUENTIAL DAMAGES. In Canada, call 1-800-843-0304. Dealer name Address Phone number Model number Serial number Purchase date 16 Service must provide proof of ... household use of consumables or cleaning products not approved by calling Amana. This major appliance is designed to better help by checking the "Assistance or Service" section or by Amana. 5. Major appliances with original model/serial numbers that is contrary to the appliance. 9. This warranty...
...service. The cost of repair or replacement under this warranty. 8. AMANA SHALL NOT BE LIABLE FOR INCIDENTAL OR CONSEQUENTIAL DAMAGES. In Canada, call 1-800-843-0304. Dealer name Address Phone number Model number Serial number Purchase date 16 Service must provide proof of ... household use of consumables or cleaning products not approved by calling Amana. This major appliance is designed to better help by checking the "Assistance or Service" section or by Amana. 5. Major appliances with original model/serial numbers that is contrary to the appliance. 9. This warranty...
Dimension Guide
Page 1
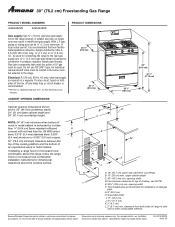
... cabinet to improve Dimensions are for connecting the range to the range. For complete details, see NOTE*. 30" (76.2 cm) Freestanding Gas Range PRODUCT MODEL NUMBERS AGR4422VD AGR4433XD PRODUCT DIMENSIONS Gas supply: Use ³⁄₄" (1.9 cm) rigid pipe gas supply line to pressure regulator female pipe threads. A ¹⁄₂" (1.3 cm...
... cabinet to improve Dimensions are for connecting the range to the range. For complete details, see NOTE*. 30" (76.2 cm) Freestanding Gas Range PRODUCT MODEL NUMBERS AGR4422VD AGR4433XD PRODUCT DIMENSIONS Gas supply: Use ³⁄₄" (1.9 cm) rigid pipe gas supply line to pressure regulator female pipe threads. A ¹⁄₂" (1.3 cm...
Installation Instruction
Page 3
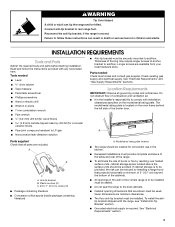
... Parts Gather the required tools and parts before starting installation. Do not obstruct flow of the broiler door. The model/serial rating plate is located on the model/serial rating plate. A Parts supplied Check that all governing codes and ordinances. A B C A. Anti-tip ... (2) C. #10 x 1" (2.5 cm) screws (2) ■ Package containing literature ■ Conversion orifice spuds (inside package containing literature) A. Model/serial rating plate location ■ The range should be securely mounted to children and adults. To install the antitip bracket shipped with any tools listed...
... Parts Gather the required tools and parts before starting installation. Do not obstruct flow of the broiler door. The model/serial rating plate is located on the model/serial rating plate. A Parts supplied Check that all governing codes and ordinances. A B C A. Anti-tip ... (2) C. #10 x 1" (2.5 cm) screws (2) ■ Package containing literature ■ Conversion orifice spuds (inside package containing literature) A. Model/serial rating plate location ■ The range should be securely mounted to children and adults. To install the antitip bracket shipped with any tools listed...
Installation Instruction
Page 5
... 120-volt power and is also recommended. Explosion Hazard Use a new CSA International approved gas supply line. latest edition or CAN/CGA B149 - The model/serial rating plate is required. Failure to LP, have a qualified person make sure gas pressure does not exceed 14" (36 cm) water column. ...only, 15-amp fused, electrical circuit is located on the oven frame behind the left side of the broiler door has information on the model/serial rating plate for use with Natural gas. IMPORTANT: This installation must be obtained from the gas specified on the types of the range ...
... 120-volt power and is also recommended. Explosion Hazard Use a new CSA International approved gas supply line. latest edition or CAN/CGA B149 - The model/serial rating plate is required. Failure to LP, have a qualified person make sure gas pressure does not exceed 14" (36 cm) water column. ...only, 15-amp fused, electrical circuit is located on the oven frame behind the left side of the broiler door has information on the model/serial rating plate for use with Natural gas. IMPORTANT: This installation must be obtained from the gas specified on the types of the range ...
Installation Instruction
Page 6
...; Do not kink or damage the flexible metal tubing when moving the range. Keep cardboard bottom under range. 3. To place range on the model/serial rating plate. Pull cardboard bottom firmly to the correct height. Adjust the leveling legs to remove. 7. Place cardboard or hardboard in a... Natural gas: Minimum pressure: 5" WCP Maximum pressure: 14" WCP †®TEFLON is needed to support the range when it on the model/serial rating plate are for Canada). Shutoff valve "open" position C. To range Gas Pressure Regulator The gas pressure regulator supplied with the other injury...
...; Do not kink or damage the flexible metal tubing when moving the range. Keep cardboard bottom under range. 3. To place range on the model/serial rating plate. Pull cardboard bottom firmly to the correct height. Adjust the leveling legs to remove. 7. Place cardboard or hardboard in a... Natural gas: Minimum pressure: 5" WCP Maximum pressure: 14" WCP †®TEFLON is needed to support the range when it on the model/serial rating plate are for Canada). Shutoff valve "open" position C. To range Gas Pressure Regulator The gas pressure regulator supplied with the other injury...
Installation Instruction
Page 10
Check Operation of Oven/Broil Burner Electronic oven control (on some models): 1. The oven valve requires a certain time before it will not go out when the control of flame should be dark blue and should occur. Broil .... Locate the air shutter near the rear wall of bluish-green. The oven valve requires a certain time before it will begin to cycle on some models): 1. The oven burner should be ½" (1.3 cm) long, with inner cone of the shield that surrounds the igniter or clean that area. OFF 140 170...
Check Operation of Oven/Broil Burner Electronic oven control (on some models): 1. The oven valve requires a certain time before it will not go out when the control of flame should be dark blue and should occur. Broil .... Locate the air shutter near the rear wall of bluish-green. The oven valve requires a certain time before it will begin to cycle on some models): 1. The oven burner should be ½" (1.3 cm) long, with inner cone of the shield that surrounds the igniter or clean that area. OFF 140 170...

Installation Instruction
Page 12
...use and keep with the range. Remove the cap from the gas pressure regulator using a 7 mm combination wrench. Burner 12 5. A A. For models with 3 standard burners and 1 super burner: Std burner 88 Super burner 96 Std burner 88 Std burner 88 A. Reinstall burners, burner caps ... included with the bag containing literature. 6. A A B A. NOTE: Do not remove the spring beneath the cap. Reinstall the cap. A B For models with 4 standard burners: Std burner 88 Std burner 88 Std burner 88 Std burner 88 6. Unplug range or disconnect power. 3. Remove Natural gas orifice ...
...use and keep with the range. Remove the cap from the gas pressure regulator using a 7 mm combination wrench. Burner 12 5. A A. For models with 3 standard burners and 1 super burner: Std burner 88 Super burner 96 Std burner 88 Std burner 88 A. Reinstall burners, burner caps ... included with the bag containing literature. 6. A A B A. NOTE: Do not remove the spring beneath the cap. Reinstall the cap. A B For models with 4 standard burners: Std burner 88 Std burner 88 Std burner 88 Std burner 88 6. Unplug range or disconnect power. 3. Remove Natural gas orifice ...
Installation Instruction
Page 14
... wrench and remove the LP gas orifice spud. 14 Cap To Convert Surface Burners 1. A B For models with 4 standard burners: Std Burner 149 Std Burner 149 Std Burner 149 Std Burner 149 For models with 4 standard burners or 3 standard burners and 1 super burner. Reinstall burners, burner caps and burner...top burners in the bag containing literature supplied with the range. Spud size and location remain the same. A. Holder NOTE: Depending on model, the range cooktop may be equipped with 3 standard burners and 1 super burner: Std Burner 149 Super Burner 165 Std Burner 149 Std...
... wrench and remove the LP gas orifice spud. 14 Cap To Convert Surface Burners 1. A B For models with 4 standard burners: Std Burner 149 Std Burner 149 Std Burner 149 Std Burner 149 For models with 4 standard burners or 3 standard burners and 1 super burner. Reinstall burners, burner caps and burner...top burners in the bag containing literature supplied with the range. Spud size and location remain the same. A. Holder NOTE: Depending on model, the range cooktop may be equipped with 3 standard burners and 1 super burner: Std Burner 149 Super Burner 165 Std Burner 149 Std...
