

Use and Care
Page 1
... de la estufa eléctrica" en español, o para obtener información adicional acerca de su producto, visite: www.amana.com Tenga listo su número de modelo completo. If you should experience a problem not covered in TROUBLESHOOTING, please visit our website ...at 1-800-253-1301. Table of Contents RANGE SAFETY 2 The Anti-Tip Bracket 2 FEATURE GUIDE 4 COOKTOP USE 5 OVEN USE 6 Electronic Oven Controls 6 Positioning Racks and Bakeware 6 Oven Vent 7...
... de la estufa eléctrica" en español, o para obtener información adicional acerca de su producto, visite: www.amana.com Tenga listo su número de modelo completo. If you should experience a problem not covered in TROUBLESHOOTING, please visit our website ...at 1-800-253-1301. Table of Contents RANGE SAFETY 2 The Anti-Tip Bracket 2 FEATURE GUIDE 4 COOKTOP USE 5 OVEN USE 6 Electronic Oven Controls 6 Positioning Racks and Bakeware 6 Oven Vent 7...

Use and Care
Page 2
...bracket securely attached to such substances. WARNING: This product contains a chemical known to the State of potential exposure to floor. • Slide range back so rear range foot is the safety alert symbol. This symbol alerts you to cause cancer, birth defects, or other reproductive harm, and requires businesses to... use. This appliance can result in this manual and on your appliance. All safety messages will tell you what can be killed. RANGE SAFETY Your safety and the safety of others . We have provided many important safety messages in death or serious burns to rear...
...bracket securely attached to such substances. WARNING: This product contains a chemical known to the State of potential exposure to floor. • Slide range back so rear range foot is the safety alert symbol. This symbol alerts you to cause cancer, birth defects, or other reproductive harm, and requires businesses to... use. This appliance can result in this manual and on your appliance. All safety messages will tell you what can be killed. RANGE SAFETY Your safety and the safety of others . We have provided many important safety messages in death or serious burns to rear...

Use and Care
Page 3
...Proper relationship of utensil to accumulate on hood or filter. ■ When flambeing foods under the hood, turn the fan on the backguard of a range - Contact a qualified technician immediately. ■ Clean Cooktop With Caution - Heating elements may result in a risk of electric shock, or fire.... Liners - Do not let potholder touch hot heating elements. Areas near units until they have had sufficient time to cool. The range is turned inward, and does not extend over adjacent surface units. ■ Do Not Soak Removable Heating Elements - Boilover causes smoking...
...Proper relationship of utensil to accumulate on hood or filter. ■ When flambeing foods under the hood, turn the fan on the backguard of a range - Contact a qualified technician immediately. ■ Clean Cooktop With Caution - Heating elements may result in a risk of electric shock, or fire.... Liners - Do not let potholder touch hot heating elements. Areas near units until they have had sufficient time to cool. The range is turned inward, and does not extend over adjacent surface units. ■ Do Not Soak Removable Heating Elements - Boilover causes smoking...

Use and Care
Page 4
... (150°C and 275°C). 4. The oven light will turn the light on during the Self-Clean cycle. The oven light will sound at www.amana.com for 5 seconds. 1. Only the SET CLOCK and TIMER keypads will be set the time of the items listed. The Clock uses a 12-hour cycle.../TIME "More" or "Less" arrow pads to broil stop position. To change the temperature in oven and close door to set the length of the range. Press CANCEL/OFF when finished. 1. Position cookware in 5°F (5°C) increments between 170°F and 525°F (75°C and 275°C). 3. The door ...
... (150°C and 275°C). 4. The oven light will turn the light on during the Self-Clean cycle. The oven light will sound at www.amana.com for 5 seconds. 1. Only the SET CLOCK and TIMER keypads will be set the time of the items listed. The Clock uses a 12-hour cycle.../TIME "More" or "Less" arrow pads to broil stop position. To change the temperature in oven and close door to set the length of the range. Press CANCEL/OFF when finished. 1. Position cookware in 5°F (5°C) increments between 170°F and 525°F (75°C and 275°C). 3. The door ...
Use and Care
Page 5
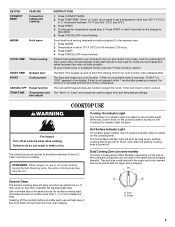
... used in the warmed oven. 1. The Start Time keypad is canceled and the time of time, and/or shut off . REMEMBER: When range is located on the console panel. Single size can be used to touch, even after the surface cooking area is turned off automatically. Ceramic Glass... heat level. Press START. 4. Fire Hazard Turn off to do so can result in 5° increments between HI and LO. If start CANCEL/OFF Range function TEMP/TIME Temperature and time adjust INSTRUCTIONS 1. To set a temperature other than ½" (1.3 cm) outside the area. Dual Cooking Zone (on some...
... used in the warmed oven. 1. The Start Time keypad is canceled and the time of time, and/or shut off . REMEMBER: When range is located on the console panel. Single size can be used to touch, even after the surface cooking area is turned off automatically. Ceramic Glass... heat level. Press START. 4. Fire Hazard Turn off to do so can result in 5° increments between HI and LO. If start CANCEL/OFF Range function TEMP/TIME Temperature and time adjust INSTRUCTIONS 1. To set a temperature other than ½" (1.3 cm) outside the area. Dual Cooking Zone (on some...
Use and Care
Page 8
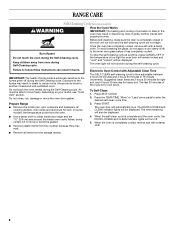
... off during the Self-Cleaning cycle. Depending on your model, see "Oven Vent" section. Do not clean, rub, damage or move freely. Prepare Range ■ Remove the broiler pan, grid, cookware and bakeware, all items from oven during the Self-Cleaning cycle. The last 30 minutes of the ...has completely cooled. Suggested clean times are 2 hours 30 minutes for light soil, and 4 hours 30 minutes for cool down. To Self-Clean: 1. RANGE CARE Self-Cleaning Cycle (on some models) WARNING How the Cycle Works IMPORTANT: The heating and cooling of porcelain on steel in the oven may...
... off during the Self-Cleaning cycle. Depending on your model, see "Oven Vent" section. Do not clean, rub, damage or move freely. Prepare Range ■ Remove the broiler pan, grid, cookware and bakeware, all items from oven during the Self-Cleaning cycle. The last 30 minutes of the ...has completely cooled. Suggested clean times are 2 hours 30 minutes for light soil, and 4 hours 30 minutes for cool down. To Self-Clean: 1. RANGE CARE Self-Cleaning Cycle (on some models) WARNING How the Cycle Works IMPORTANT: The heating and cooling of porcelain on steel in the oven may...

Use and Care
Page 9
...is also recommended for contact information. Cleaning Method: ■ Mild detergent Oven Light The oven light is still warm. To Replace: 1. Unplug range or disconnect power. 4. Soap, water and a soft cloth or sponge are in the OFF position. Scrape off sugary spills while the cooktop is...guides will become less noticeable. When replacing knobs, make sure knobs are harder to slide, a light coating of our website at www.amana.com. These spills may remove numbers. Liquid detergent or all controls are off position. 2. CONTROL PANEL AND OVEN DOOR EXTERIOR To avoid...
...is also recommended for contact information. Cleaning Method: ■ Mild detergent Oven Light The oven light is still warm. To Replace: 1. Unplug range or disconnect power. 4. Soap, water and a soft cloth or sponge are in the OFF position. Scrape off sugary spills while the cooktop is...guides will become less noticeable. When replacing knobs, make sure knobs are harder to slide, a light coating of our website at www.amana.com. These spills may remove numbers. Liquid detergent or all controls are off position. 2. CONTROL PANEL AND OVEN DOOR EXTERIOR To avoid...
Use and Care
Page 10
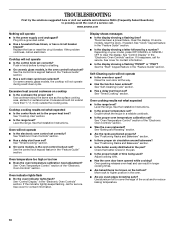
....amana.com Nothing will not operate ■ Is the oven door open? Plug into a grounded outlet. ■ Has a household fuse blown, or has a circuit breaker tripped? Cooktop will not operate ■ Is the control knob set correctly? Excessive heat around bakeware? Level the range.... self-clean cycle been selected? See "Clock" keypad feature in a reliable cookbook. ■ Is the proper oven temperature calibration set ? Level the range. Double-check the recipe in the "Feature Guide" section. ■ Is the display showing a letter followed by a number? See "Oven Temperature Control...
....amana.com Nothing will not operate ■ Is the oven door open? Plug into a grounded outlet. ■ Has a household fuse blown, or has a circuit breaker tripped? Cooktop will not operate ■ Is the control knob set correctly? Excessive heat around bakeware? Level the range.... self-clean cycle been selected? See "Clock" keypad feature in a reliable cookbook. ■ Is the proper oven temperature calibration set ? Level the range. Double-check the recipe in the "Feature Guide" section. ■ Is the display showing a letter followed by a number? See "Oven Temperature Control...

Dimension Guide
Page 1
...29⁷⁄₈" (75.9 cm) width E. 25" (63.5 cm) depth F. CABINET OPENING DIMENSIONS Cabinet opening width C. This range is protected by adjusting the leveling legs. A circuit breaker is located behind the control panel or on the model/serial number rating plate. ...the right to change without notice. Ref. 30" (76 cm) Freestanding Electric Range PRODUCT MODEL NUMBERS AER3311WA AER5522VA AER5523XA AER5524XA AER5822VA AER5823XA AER5830VA AER5844VA AER6011VA Electrical: Range must be connected to the proper electrical voltage and frequency as specified on the oven...
...29⁷⁄₈" (75.9 cm) width E. 25" (63.5 cm) depth F. CABINET OPENING DIMENSIONS Cabinet opening width C. This range is protected by adjusting the leveling legs. A circuit breaker is located behind the control panel or on the model/serial number rating plate. ...the right to change without notice. Ref. 30" (76 cm) Freestanding Electric Range PRODUCT MODEL NUMBERS AER3311WA AER5522VA AER5523XA AER5524XA AER5822VA AER5823XA AER5830VA AER5844VA AER6011VA Electrical: Range must be connected to the proper electrical voltage and frequency as specified on the oven...

Installation Instruction
Page 1
Only 7 Verify Anti-Tip Bracket Location 12 Level Range 12 Storage Drawer 12 Complete Installation 13 Moving the Range 14 ANTI-TIP BRACKET TEMPLATE 15 IMPORTANT: Save for local electrical inspector's use. W10252706B U.S.A. U.S.A. Only 4 INSTALLATION INSTRUCTIONS 6 Unpack Range 6 Install Anti-Tip Bracket 6 Electrical Connection - INSTALLATION INSTRUCTIONS 30" (76 CM) FREESTANDING ELECTRIC RANGES Table of Contents RANGE SAFETY 2 INSTALLATION REQUIREMENTS 3 Tools and Parts 3 Location Requirements 3 Electrical Requirements -
Only 7 Verify Anti-Tip Bracket Location 12 Level Range 12 Storage Drawer 12 Complete Installation 13 Moving the Range 14 ANTI-TIP BRACKET TEMPLATE 15 IMPORTANT: Save for local electrical inspector's use. W10252706B U.S.A. U.S.A. Only 4 INSTALLATION INSTRUCTIONS 6 Unpack Range 6 Install Anti-Tip Bracket 6 Electrical Connection - INSTALLATION INSTRUCTIONS 30" (76 CM) FREESTANDING ELECTRIC RANGES Table of Contents RANGE SAFETY 2 INSTALLATION REQUIREMENTS 3 Tools and Parts 3 Location Requirements 3 Electrical Requirements -
Installation Instruction
Page 2
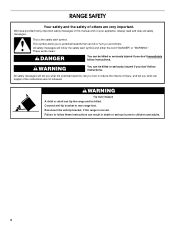
We have provided many important safety messages in death or serious burns to reduce the chance of others . This symbol alerts you to rear range foot. All safety messages will tell you what can kill or hurt you and others are not followed. WARNING Tip Over Hazard A child or .... All safety messages will follow these instructions can be killed. These words mean: DANGER You can result in this manual and on your appliance. RANGE SAFETY Your safety and the safety of injury, and tell you what the potential hazard is, tell you how to children and adults. 2
We have provided many important safety messages in death or serious burns to reduce the chance of others . This symbol alerts you to rear range foot. All safety messages will tell you what can kill or hurt you and others are not followed. WARNING Tip Over Hazard A child or .... All safety messages will follow these instructions can be killed. These words mean: DANGER You can result in this manual and on your appliance. RANGE SAFETY Your safety and the safety of injury, and tell you what the potential hazard is, tell you how to children and adults. 2

Installation Instruction
Page 3
... listed strain relief. IMPORTANT: To avoid damage to terminal block) ■ 3 - Mobile home installations require: ■ When this range must be reduced by a licensed, qualified electrical installer. Check existing electrical supply. This oven has been designed in ring terminals or open...-end spade terminals with the range, see "Install Anti-Tip Bracket" section. ■ Grounded electrical supply is adequate as long as it must be rated...
... listed strain relief. IMPORTANT: To avoid damage to terminal block) ■ 3 - Mobile home installations require: ■ When this range must be reduced by a licensed, qualified electrical installer. Check existing electrical supply. This oven has been designed in ring terminals or open...-end spade terminals with the range, see "Install Anti-Tip Bracket" section. ■ Grounded electrical supply is adequate as long as it must be rated...
Installation Instruction
Page 4
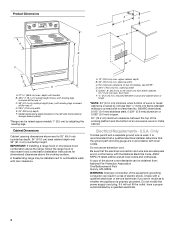
... height (max.) with leveling legs screwed all local codes and ordinances. Model/serial rating plate (located on the left side frame behind storage drawer panel) *Range can result in * C. 36" (91.4 cm) cooktop height (max.) with the National Electrical Code, ANSI/ NFPA 70-latest edition and all the ...way in a risk of the above the cooktop surface. A freestanding range may be installed next to 22" (55.9 cm) from floor F 2.2 cm) min. A. 13" (33.0 cm) max. upper cabinet depth B. 30" (76.2 cm) ...
... height (max.) with leveling legs screwed all local codes and ordinances. Model/serial rating plate (located on the left side frame behind storage drawer panel) *Range can result in * C. 36" (91.4 cm) cooktop height (max.) with the National Electrical Code, ANSI/ NFPA 70-latest edition and all the ...way in a risk of the above the cooktop surface. A freestanding range may be installed next to 22" (55.9 cm) from floor F 2.2 cm) min. A. 13" (33.0 cm) max. upper cabinet depth B. 30" (76.2 cm) ...

Installation Instruction
Page 5
...connected load listed on the model/serial rating plate. **If connecting to the cabinet. For 50-amp rated cord kits, use kits that the range can be connected directly to the neutral by a white cover. See "Electrical Connection." mobile homes; The fourth (grounding) conductor must be ... use a 50-amp rated cord with a nominal 1³⁄₈" (34.9 mm) diameter connection opening. ■ A circuit breaker is recommended. ■ The range can be moved if servicing is used . Connectors on the supply end. See the "Electrical Connection" section. ■ Allow 2 to 3 ft (61.0 cm to...
...connected load listed on the model/serial rating plate. **If connecting to the cabinet. For 50-amp rated cord kits, use kits that the range can be connected directly to the neutral by a white cover. See "Electrical Connection." mobile homes; The fourth (grounding) conductor must be ... use a 50-amp rated cord with a nominal 1³⁄₈" (34.9 mm) diameter connection opening. ■ A circuit breaker is recommended. ■ The range can be moved if servicing is used . Connectors on the supply end. See the "Electrical Connection" section. ■ Allow 2 to 3 ft (61.0 cm to...

Installation Instruction
Page 6
... oven cavity) or from inside oven. 3. Rear leveling leg C. Front leveling leg C. Failure to do so can tip the range and be necessary to follow these instructions can result in cabinet opening so that specified in the "Location Requirements" section, adjust template so... by removing the warming drawer. Use wrench or pliers to children and adults. Use a ¼" drive ratchet to rear range foot. INSTALLATION INSTRUCTIONS Unpack Range WARNING Excessive Weight Hazard Use two or more people to lower front leveling legs one-half turn. Remove shipping materials, tape ...
... oven cavity) or from inside oven. 3. Rear leveling leg C. Front leveling leg C. Failure to do so can tip the range and be necessary to follow these instructions can result in cabinet opening so that specified in the "Location Requirements" section, adjust template so... by removing the warming drawer. Use wrench or pliers to children and adults. Use a ¼" drive ratchet to rear range foot. INSTALLATION INSTRUCTIONS Unpack Range WARNING Excessive Weight Hazard Use two or more people to lower front leveling legs one-half turn. Remove shipping materials, tape ...
Installation Instruction
Page 7
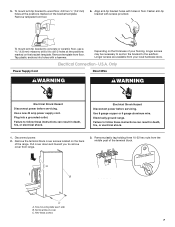
... subfloor. Depending on the bracket template. Plug into holes with holes in death, fire, or electrical shock. Electrically ground range. Remove plastic tag holding three 10-32 hex nuts from floor. Use a new 40 amp power supply cord. Electrical Shock... servicing. Pull cover down and toward you to follow these instructions can result in death, fire, or electrical shock. 1. Failure to remove cover from range. 3. 5. Tap plastic anchors into a grounded outlet. Longer screws are available from floor. 6. Two mounting tabs each side B. U.S.A. Disconnect power....
... subfloor. Depending on the bracket template. Plug into holes with holes in death, fire, or electrical shock. Electrically ground range. Remove plastic tag holding three 10-32 hex nuts from floor. Use a new 40 amp power supply cord. Electrical Shock... servicing. Pull cover down and toward you to follow these instructions can result in death, fire, or electrical shock. 1. Failure to remove cover from range. 3. 5. Tap plastic anchors into a grounded outlet. Longer screws are available from floor. 6. Two mounting tabs each side B. U.S.A. Disconnect power....

Installation Instruction
Page 8
...under the screw. 8 Use a Phillips screwdriver to : 4-wire receptacle (NEMA type 14-50R) A UL listed, 250-volt minimum, 40-amp, range power supply cord 4-wire connection: Power supply cord A A. Concuit ■ Tighten strain relief screw against the power supply cord. 4-wire direct &#...9632; Assemble a UL listed strain relief in the opening . Metal ground strap B. Discard C. Electrical Connection Options If your type of the range. A B A. Complete installation following instructions for : ■ New branch-circuit installations (1996 NEC) ■ Mobile homes ■ ...
...under the screw. 8 Use a Phillips screwdriver to : 4-wire receptacle (NEMA type 14-50R) A UL listed, 250-volt minimum, 40-amp, range power supply cord 4-wire connection: Power supply cord A A. Concuit ■ Tighten strain relief screw against the power supply cord. 4-wire direct &#...9632; Assemble a UL listed strain relief in the opening . Metal ground strap B. Discard C. Electrical Connection Options If your type of the range. A B A. Complete installation following instructions for : ■ New branch-circuit installations (1996 NEC) ■ Mobile homes ■ ...

Installation Instruction
Page 9
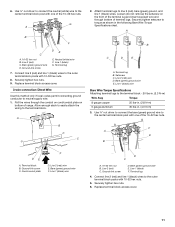
...amps that is marked for use with nominal 1³⁄₈" (3.5 cm) diameter connection opening, with ring terminals and marked for use with ranges. 5. Securely tighten hex nuts. Ground-link screw C. Line 1 (black) 6. Terminal block B. Feed the power supply cord through the ...strain relief on the cord/conduit plate on bottom of range. Neutral (center) wire F. NOTE: For power supply cord replacement, use only a power cord rated at 250 volts minimum, 40 amps or...
...amps that is marked for use with nominal 1³⁄₈" (3.5 cm) diameter connection opening, with ring terminals and marked for use with ranges. 5. Securely tighten hex nuts. Ground-link screw C. Line 1 (black) 6. Terminal block B. Feed the power supply cord through the ...strain relief on the cord/conduit plate on bottom of range. Neutral (center) wire F. NOTE: For power supply cord replacement, use only a power cord rated at 250 volts minimum, 40 amps or...

Installation Instruction
Page 10
... lugs to your electrical supply, make the required 3-wire or 4-wire connection. 1. Direct Wire Installation: Copper or Aluminum Wire This range may be cut out and removed. Strip the insulation back ³⁄₈" (1.0 cm) from the back of electrical supply (4-wire... the bare (green) ground wire to expose wires. A B 3" (7.6 cm) 2. C G D EF A. Strip outer covering back 3" (7.6 cm) to the range with the ground-link screw and ground-link section. Allow enough slack in the wire to torque as shown in . (4.0 N-m) 5. Bare (green) ground wire E. Line...
... lugs to your electrical supply, make the required 3-wire or 4-wire connection. 1. Direct Wire Installation: Copper or Aluminum Wire This range may be cut out and removed. Strip the insulation back ³⁄₈" (1.0 cm) from the back of electrical supply (4-wire... the bare (green) ground wire to expose wires. A B 3" (7.6 cm) 2. C G D EF A. Strip outer covering back 3" (7.6 cm) to the range with the ground-link screw and ground-link section. Allow enough slack in the wire to torque as shown in . (4.0 N-m) 5. Bare (green) ground wire E. Line...
Installation Instruction
Page 11
... Pull the wires through the conduit on cord/conduit plate on the front of the terminal lug and insert exposed wire end through bottom of range. Terminal block B. 6. Line 2 (red) C. Cord/conduit plate F D. Line 2 (red) C. Bare (green) ground wire E. G A B F DE C A. 10-32 hex nut B. Ground-link screw...
... Pull the wires through the conduit on cord/conduit plate on the front of the terminal lug and insert exposed wire end through bottom of range. Terminal block B. 6. Line 2 (red) C. Cord/conduit plate F D. Line 2 (red) C. Bare (green) ground wire E. G A B F DE C A. 10-32 hex nut B. Ground-link screw...
