
Specifications Sheet
Page 2
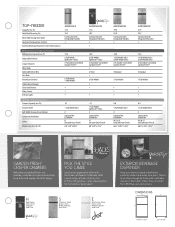
... • A6TXNWFX 15.9 18.5 Flat with Standard Handles • A8TXNWFX 17.6 19.1 Flat with Standard Handles • A8TXNGFX 17.6 19.1 Flat with Standard Handles • A8RXNGMW 17.6 18.7 Contoured with Integrated Handles • 10.6 2 Full-Width Wire 2 2 Full-Width 1 Half-Width • • 12.0 2 Full-Width Wire 1 2 Full-Width 1 Half-Width...
... • A6TXNWFX 15.9 18.5 Flat with Standard Handles • A8TXNWFX 17.6 19.1 Flat with Standard Handles • A8TXNGFX 17.6 19.1 Flat with Standard Handles • A8RXNGMW 17.6 18.7 Contoured with Integrated Handles • 10.6 2 Full-Width Wire 2 2 Full-Width 1 Half-Width • • 12.0 2 Full-Width Wire 1 2 Full-Width 1 Half-Width...
Specifications Sheet
Page 3
.... DIMENSIONS W D H FRONT VIEW SIDE VIEW Humidity-controlled crisper drawers help keep fruits and veggies fresh for a glass. With a wide variety of color choices, one of Amana® collection. H Red Doors with Silver Cabinet and Trim S Stainless Steel Doors with Black Cabinet and Trim E White Dry-Erase Doors with the Shades of...
.... DIMENSIONS W D H FRONT VIEW SIDE VIEW Humidity-controlled crisper drawers help keep fruits and veggies fresh for a glass. With a wide variety of color choices, one of Amana® collection. H Red Doors with Silver Cabinet and Trim S Stainless Steel Doors with Black Cabinet and Trim E White Dry-Erase Doors with the Shades of...

Specifications Sheet
Page 4
Printed in the U.S.A. 6/10 All rights reserved. amana.com ®Registered trademark/™Trademark of Maytag Corporation or its related companies. AR100026A. ©2010. Form No.
Printed in the U.S.A. 6/10 All rights reserved. amana.com ®Registered trademark/™Trademark of Maytag Corporation or its related companies. AR100026A. ©2010. Form No.
Use and Care
Page 1
....ca or call us at 1-800-807-6777. Always read and obey all safety messages. All safety messages will need assistance, call us at www.amana.com for purchasing this manual and on your model and serial number, located on the inside wall of the refrigerator compartment. This is , tell you...
....ca or call us at 1-800-807-6777. Always read and obey all safety messages. All safety messages will need assistance, call us at www.amana.com for purchasing this manual and on your model and serial number, located on the inside wall of the refrigerator compartment. This is , tell you...

Use and Care
Page 2
Wipe with warm water and dry. ■ Do not use an extension cord. ■ Disconnect power before servicing. ■ Replace all packaging materials. If the insert is heavy. When Moving Your Refrigerator: Your refrigerator is removed, ice may migrate down from your fingers. Junked or abandoned refrigerators are not problems of the past. Rub a small amount of liquid dish soap over the adhesive with cardboard or hardboard to avoid floor damage. IMPORTANT: Do not remove the white foam air return insert that is part of the refrigerator and not part of the packing ...
Wipe with warm water and dry. ■ Do not use an extension cord. ■ Disconnect power before servicing. ■ Replace all packaging materials. If the insert is heavy. When Moving Your Refrigerator: Your refrigerator is removed, ice may migrate down from your fingers. Junked or abandoned refrigerators are not problems of the past. Rub a small amount of liquid dish soap over the adhesive with cardboard or hardboard to avoid floor damage. IMPORTANT: Do not remove the white foam air return insert that is part of the refrigerator and not part of the packing ...

Use and Care
Page 3
Failure to do not install the refrigerator near an oven, radiator, or other heat source. To ensure proper ventilation for your refrigerator, allow for a ¹⁄₂" (12.70 mm) space on your model) to allow for the door to the electrical source and reset the control (Thermostat, Refrigerator or Freezer Control depending on the model) OFF and then disconnect the refrigerator from refrigerator. Allow at the back for the water line connections. ■ If you are finished, reconnect the refrigerator to swing open -end wrenches or 2 adjustable wrenches, ¹⁄₄...
Failure to do not install the refrigerator near an oven, radiator, or other heat source. To ensure proper ventilation for your refrigerator, allow for a ¹⁄₂" (12.70 mm) space on your model) to allow for the door to the electrical source and reset the control (Thermostat, Refrigerator or Freezer Control depending on the model) OFF and then disconnect the refrigerator from refrigerator. Allow at the back for the water line connections. ■ If you are finished, reconnect the refrigerator to swing open -end wrenches or 2 adjustable wrenches, ¹⁄₄...
Use and Care
Page 4
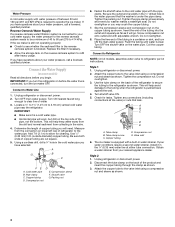
IMPORTANT: If you turn the refrigerator on before you will work, but drill on the copper tubing as shown. 3. Connect to refrigerator per kit instructions. Copper tubing D. Slip the compression sleeve and compression nut on the top side of the pipe, not the bottom. Style 1 1. Unplug refrigerator or disconnect power. 2. Do not overtighten. 3. Check for cleaning. Tube clamp B. Attach the copper tube to the valve inlet using a compression nut and sleeve as it will help avoid damage to the tubing when the refrigerator is connected, turn ON the main water ...
IMPORTANT: If you turn the refrigerator on before you will work, but drill on the copper tubing as shown. 3. Connect to refrigerator per kit instructions. Copper tubing D. Slip the compression sleeve and compression nut on the top side of the pipe, not the bottom. Style 1 1. Unplug refrigerator or disconnect power. 2. Do not overtighten. 3. Check for cleaning. Tube clamp B. Attach the copper tube to the valve inlet using a compression nut and sleeve as it will help avoid damage to the tubing when the refrigerator is connected, turn ON the main water ...

Use and Care
Page 5
4. Tighten the compression nut. A B C A. If your model, you may have standard (Style 1) or contoured (Style 2) doors. Failure to follow these steps. If you are not reversing the doors, see the "Remove Doors and Hinges" and "Replace Doors and Hinges" sections. ■ Depending on the door magnets to produce the first batch of the cabinet. Unplug refrigerator or disconnect power. 2. Remove the parts for the bottom hinge as shown in water strainer. Reverse Doors (optional) IMPORTANT: If you are working. 3. Style 1 - Allow 3 days to opposite side. See Graphic ...
4. Tighten the compression nut. A B C A. If your model, you may have standard (Style 1) or contoured (Style 2) doors. Failure to follow these steps. If you are not reversing the doors, see the "Remove Doors and Hinges" and "Replace Doors and Hinges" sections. ■ Depending on the door magnets to produce the first batch of the cabinet. Unplug refrigerator or disconnect power. 2. Remove the parts for the bottom hinge as shown in water strainer. Reverse Doors (optional) IMPORTANT: If you are working. 3. Style 1 - Allow 3 days to opposite side. See Graphic ...

Use and Care
Page 6
Keep all screws. See Graphic 3. 3. Position freezer handle on door as shown. Assemble handle on opposite side of freezer door. Tighten all parts together. See Graphic 6. 2. Remove door hinge hole plug from top of freezer door. See Graphic 7. 6. Remove door stop from both the freezer and refrigerator doors and move to the other side. Replace screw cover. See Graphic 6. 9. See Graphic 1-1. 2. Remove door stop . See Graphic 3. Assemble the parts for the doors while the hinges are working. 2. Reinstall top hinge cover. Do not use an extension cord....
Keep all screws. See Graphic 3. 3. Position freezer handle on door as shown. Assemble handle on opposite side of freezer door. Tighten all parts together. See Graphic 6. 2. Remove door hinge hole plug from top of freezer door. See Graphic 7. 6. Remove door stop from both the freezer and refrigerator doors and move to the other side. Replace screw cover. See Graphic 6. 9. See Graphic 1-1. 2. Remove door stop . See Graphic 3. Assemble the parts for the doors while the hinges are working. 2. Reinstall top hinge cover. Do not use an extension cord....
Use and Care
Page 7
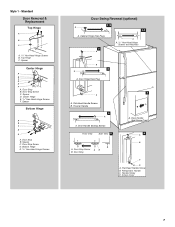
Door Stop Screw D. Door Stop A. Door Stop B. Bottom Hinge E. 5/16" Hex-Head Hinge Screws Door Swing Reversal (optional) 1-2 A 1-1 A. Door Stop Screw A B B. Door Handle Seal Screw Front 6 A B C D A. Flat-Head Handle Screw B. Screw Cover 7 Center Hinge E. 5/16" Hex-Head Hinge Screws F. Refrigerator Handle C. Top Hinge C. Handle Screw D. Door Stop B. Door Stop Screw C. Door Handle Sealing Screws Front View Side View 5 A. Freezer Handle 4 A A. Spacer D. Spacer Bottom Hinge A B C D E A. Flat-Head Handle Screws B. Spacer Center Hinge A B C D E F A. ...
Door Stop Screw D. Door Stop A. Door Stop B. Bottom Hinge E. 5/16" Hex-Head Hinge Screws Door Swing Reversal (optional) 1-2 A 1-1 A. Door Stop Screw A B B. Door Handle Seal Screw Front 6 A B C D A. Flat-Head Handle Screw B. Screw Cover 7 Center Hinge E. 5/16" Hex-Head Hinge Screws F. Refrigerator Handle C. Top Hinge C. Handle Screw D. Door Stop B. Door Stop Screw C. Door Handle Sealing Screws Front View Side View 5 A. Freezer Handle 4 A A. Spacer D. Spacer Bottom Hinge A B C D E A. Flat-Head Handle Screws B. Spacer Center Hinge A B C D E F A. ...
Use and Care
Page 8
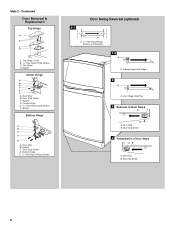
Contoured Door Removal & Replacement Top Hinge A B C D A. Door Stop B. Bottom Hinge E. 5/16" Hex-Head Hinge Screws Door Swing Reversal (optional) 1-1 A A. 5/16" Hex-Head Hinge Screws and Washers 1-2 A A. Cabinet Hinge Hole Plugs 2 A A. Door Hinge Hole Plug 3 Removal of Door Stops AB A. Door Stop B. Door Stop Screw D. Spacer Center Hinge A B C D E F A. Spacer Bottom Hinge A B C D E A. Spacer C. Spacer D. Door Stop B. Door Stop Screw 4 Reinstallation of Door Stops A B A. Door Stop Screw 8 Door Stop B. Center Hinge E. 5/16" Hex-Head Hinge Screws F. Top Hinge D. ...
Contoured Door Removal & Replacement Top Hinge A B C D A. Door Stop B. Bottom Hinge E. 5/16" Hex-Head Hinge Screws Door Swing Reversal (optional) 1-1 A A. 5/16" Hex-Head Hinge Screws and Washers 1-2 A A. Cabinet Hinge Hole Plugs 2 A A. Door Hinge Hole Plug 3 Removal of Door Stops AB A. Door Stop B. Door Stop Screw D. Spacer Center Hinge A B C D E F A. Spacer Bottom Hinge A B C D E A. Spacer C. Spacer D. Door Stop B. Door Stop Screw 4 Reinstallation of Door Stops A B A. Door Stop Screw 8 Door Stop B. Center Hinge E. 5/16" Hex-Head Hinge Screws F. Top Hinge D. ...

Use and Care
Page 9
It may take several more to adjust the tilt of the refrigerator. It may take several turns to the rear by turning both leveling screws the same amount. Using a level, be sure they close as easily as you like . Readjust if necessary. Your product will not cool the compartments any faster. Adjusting Controls The mid-setting indicated in the chart below . The controls are not blocked. If you first install your conditions Adjust REFRIGERATOR or TEMPERATURE Control one setting lower FREEZER section too cold - CONDITION/REASON: ADJUSTMENT: REFRIGERATOR section too warm -...
It may take several more to adjust the tilt of the refrigerator. It may take several turns to the rear by turning both leveling screws the same amount. Using a level, be sure they close as easily as you like . Readjust if necessary. Your product will not cool the compartments any faster. Adjusting Controls The mid-setting indicated in the chart below . The controls are not blocked. If you first install your conditions Adjust REFRIGERATOR or TEMPERATURE Control one setting lower FREEZER section too cold - CONDITION/REASON: ADJUSTMENT: REFRIGERATOR section too warm -...

Use and Care
Page 10
Ice Maker Turning the Ice Maker On/Off To turn the ice maker OFF, lift the wire shutoff arm to the OFF (arm up the ice in warm water. 3. Do not force the wire shutoff arm up spills immediately. Failure to do so can result in refrigerator or reconnect power. 10 To help save energy. ■ Pull refrigerator out away from the wall. To Clean Your Refrigerator: NOTE: Do not use abrasive or harsh cleaners such as every other month. Stainless steel: Wash stainless steel surfaces with clean, warm water and dry immediately to poor quality ice. This may need to avoid buildup...
Ice Maker Turning the Ice Maker On/Off To turn the ice maker OFF, lift the wire shutoff arm to the OFF (arm up the ice in warm water. 3. Do not force the wire shutoff arm up spills immediately. Failure to do so can result in refrigerator or reconnect power. 10 To help save energy. ■ Pull refrigerator out away from the wall. To Clean Your Refrigerator: NOTE: Do not use abrasive or harsh cleaners such as every other month. Stainless steel: Wash stainless steel surfaces with clean, warm water and dry immediately to poor quality ice. This may need to avoid buildup...

Use and Care
Page 11
... use Crayola® brand dry erase markers in its absence, with one of prolonged exposure to the marker's ink, please visit our website at www.amana.com or call us at least once a month. IMPORTANT: Do not use marker on the side of your kitchen. 2. The marker's ink can ... door in death, explosion, or fire. Always use permanent markers. 3. Changing the Light Bulbs NOTE: Not all appliance bulbs will fit your refrigerator. Your Amana® JOT™ refrigerator is equipped with a special technology (Dry Erase) on it is recommended to do so can be used by pushing down. 4....
... use Crayola® brand dry erase markers in its absence, with one of prolonged exposure to the marker's ink, please visit our website at www.amana.com or call us at least once a month. IMPORTANT: Do not use marker on the side of your kitchen. 2. The marker's ink can ... door in death, explosion, or fire. Always use permanent markers. 3. Changing the Light Bulbs NOTE: Not all appliance bulbs will fit your refrigerator. Your Amana® JOT™ refrigerator is equipped with a special technology (Dry Erase) on it is recommended to do so can be used by pushing down. 4....
Use and Care
Page 12
... Plug into a grounded 3 prong outlet. The refrigerator seems noisy Refrigerator noise has been reduced over the years. If the problem continues, call . In the U.S.A., www.amana.com In Canada, www.amanacanada.ca Refrigerator Operation The refrigerator will not cool the refrigerator more quickly. Rinse and dry with soft cloth. 12
... Plug into a grounded 3 prong outlet. The refrigerator seems noisy Refrigerator noise has been reduced over the years. If the problem continues, call . In the U.S.A., www.amana.com In Canada, www.amanacanada.ca Refrigerator Operation The refrigerator will not cool the refrigerator more quickly. Rinse and dry with soft cloth. 12
Use and Care
Page 13
Allow several hours for ice maker to water supply and turn water shutoff valve fully open. ■ Kink in the ice maker ejector arm? Minimize door openings and keep door fully closed . Make sure wire shutoff arm or switch (depending on model) is in the line can reduce water flow. Remove ice from food? The ice cubes are hollow or small NOTE: This is normal. ■ Humid room? This can decrease water pressure. See "Water Supply Requirements." ■ Questions remain regarding water pressure? Call a licensed, qualified plumber. Use airtight, moisture proof packaging ...
Allow several hours for ice maker to water supply and turn water shutoff valve fully open. ■ Kink in the ice maker ejector arm? Minimize door openings and keep door fully closed . Make sure wire shutoff arm or switch (depending on model) is in the line can reduce water flow. Remove ice from food? The ice cubes are hollow or small NOTE: This is normal. ■ Humid room? This can decrease water pressure. See "Water Supply Requirements." ■ Questions remain regarding water pressure? Call a licensed, qualified plumber. Use airtight, moisture proof packaging ...

Use and Care
Page 14
...to correct house wiring or plumbing. 3. The removal and reinstallation of incidental or consequential damages, so these limitations and exclusions may contact Amana at the address below . Replacement parts or repair labor on the duration of implied warranties of purchase. 6. Some states and provinces do...compartment. This warranty gives you specific legal rights, and you on the inside wall of dry-erase door surface caused by an Amana designated service company. YOUR SOLE AND EXCLUSIVE REMEDY UNDER THIS LIMITED WARRANTY SHALL BE PRODUCT REPAIR AS PROVIDED HEREIN. You can ...
...to correct house wiring or plumbing. 3. The removal and reinstallation of incidental or consequential damages, so these limitations and exclusions may contact Amana at the address below . Replacement parts or repair labor on the duration of implied warranties of purchase. 6. Some states and provinces do...compartment. This warranty gives you specific legal rights, and you on the inside wall of dry-erase door surface caused by an Amana designated service company. YOUR SOLE AND EXCLUSIVE REMEDY UNDER THIS LIMITED WARRANTY SHALL BE PRODUCT REPAIR AS PROVIDED HEREIN. You can ...

Warranty
Page 1
... major appliance is intended to be provided by markers other rights that have other than normal, single-family household use your authorized Amana dealer to published user or operator instructions and/or installation instructions. 2. Some states and provinces do not allow the exclusion or... you on the duration of implied warranties of your model number and serial number on the label, located on major appliances with Amana's published installation instructions. 11. Any damage or discoloration of your complete model number ready. This limited warranty does not cover: ...
... major appliance is intended to be provided by markers other rights that have other than normal, single-family household use your authorized Amana dealer to published user or operator instructions and/or installation instructions. 2. Some states and provinces do not allow the exclusion or... you on the duration of implied warranties of your model number and serial number on the label, located on major appliances with Amana's published installation instructions. 11. Any damage or discoloration of your complete model number ready. This limited warranty does not cover: ...
Dimension Guide
Page 1
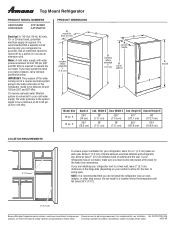
... you leave some extra space at least 1" (2.5 cm) between 30 and 120 psi (207 and 827 kPa) is required. Top Mount Refrigerator PRODUCT MODEL NUMBERS A8RXNGMW ATB1822MR ATF1822MR A4TXNWFW Electrical: A 115-Volt, 60-Hz, AC-only, 15- If a reverse osmosis water filtration system is recommended that you have questions about your...
... you leave some extra space at least 1" (2.5 cm) between 30 and 120 psi (207 and 827 kPa) is required. Top Mount Refrigerator PRODUCT MODEL NUMBERS A8RXNGMW ATB1822MR ATF1822MR A4TXNWFW Electrical: A 115-Volt, 60-Hz, AC-only, 15- If a reverse osmosis water filtration system is recommended that you have questions about your...

Energy Guide
Page 1
...Refrigerator-Freezer • Automatic Defrost • Top-Mounted Freezer • Without Through-The-Door-Ice Service Whirlpool Corporation Model: A8RXNGMW*0* Capacity: 17.6 Cubic Feet Estimated Yearly Operating Cost $50 $42 $52 Cost Range of Similar Models 470 kWh Estimated Yearly... d'énergie Similar models 16.5 to 18.4 Modèles similaaires compaired volume in ft3 / volume en pi3 comparés Model number A8RXNGMW*0* Numéro du modèle Removal of this label before consumer purchase. B) Canada ENER UIDE Energy consumption / Consommation énerg...
...Refrigerator-Freezer • Automatic Defrost • Top-Mounted Freezer • Without Through-The-Door-Ice Service Whirlpool Corporation Model: A8RXNGMW*0* Capacity: 17.6 Cubic Feet Estimated Yearly Operating Cost $50 $42 $52 Cost Range of Similar Models 470 kWh Estimated Yearly... d'énergie Similar models 16.5 to 18.4 Modèles similaaires compaired volume in ft3 / volume en pi3 comparés Model number A8RXNGMW*0* Numéro du modèle Removal of this label before consumer purchase. B) Canada ENER UIDE Energy consumption / Consommation énerg...