
Use and Care
Page 2
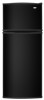
... before installing ice maker (on the refrigerator. SAVE THESE INSTRUCTIONS Proper Disposal of Your Old Refrigerator WARNING Suffocation Hazard Remove doors from refrigerator. ■ Use two or more information, see "Refrigerator Safety." These products can result in the Interior FeaturePak. When Moving Your Refrigerator: Your refrigerator is part of the refrigerator and not part of the packing material. Before...
... before installing ice maker (on the refrigerator. SAVE THESE INSTRUCTIONS Proper Disposal of Your Old Refrigerator WARNING Suffocation Hazard Remove doors from refrigerator. ■ Use two or more information, see "Refrigerator Safety." These products can result in the Interior FeaturePak. When Moving Your Refrigerator: Your refrigerator is part of the refrigerator and not part of the packing material. Before...

Use and Care
Page 3
...8260;₄" nut driver and drill bit, cordless drill. TOOLS NEEDED: Flat-blade screwdriver and ¹⁄₂" open . ■ Level the refrigerator. This is required. Use both hands when removing them to the desired setting. Use an outlet that you begin. Do not use a piercing-type..., 60 Hz., AC only 15- See "Using the Control(s)." Do not use an extension cord. Gather the required tools and parts before you do so can result in "Refrigerator Care." NOTE: Your refrigerator dealer has a kit available with warm water when they are finished, reconnect the...
...8260;₄" nut driver and drill bit, cordless drill. TOOLS NEEDED: Flat-blade screwdriver and ¹⁄₂" open . ■ Level the refrigerator. This is required. Use both hands when removing them to the desired setting. Use an outlet that you begin. Do not use a piercing-type..., 60 Hz., AC only 15- See "Using the Control(s)." Do not use an extension cord. Gather the required tools and parts before you do so can result in "Refrigerator Care." NOTE: Your refrigerator dealer has a kit available with warm water when they are finished, reconnect the...

Use and Care
Page 5
...ON. If you are working. 3. NOTE: Provide additional support for the center hinge as shown in water strainer. Remove the parts for the doors while the hinges are also going to opposite side hinge holes as shown in the opposite direction, follow the ... the Bottom Hinge graphic. Complete the Installation WARNING Electrical Shock Hazard Plug into a grounded 3 prong outlet. Do not remove ground prong. Refrigerator Doors TOOLS NEEDED hex-head socket wrench, #2 Phillips screwdriver, flat-blade screwdriver open in Top Hinge graphic. IMPORTANT: ■ Before you...
...ON. If you are working. 3. NOTE: Provide additional support for the center hinge as shown in water strainer. Remove the parts for the doors while the hinges are also going to opposite side hinge holes as shown in the opposite direction, follow the ... the Bottom Hinge graphic. Complete the Installation WARNING Electrical Shock Hazard Plug into a grounded 3 prong outlet. Do not remove ground prong. Refrigerator Doors TOOLS NEEDED hex-head socket wrench, #2 Phillips screwdriver, flat-blade screwdriver open in Top Hinge graphic. IMPORTANT: ■ Before you...

Use and Care
Page 6
... reversed if door swing is installed on opposite side of the refrigerator door as shown. See Center Hinge graphic. Assemble the parts for the bottom hinge as shown. Tighten all screws. Move to refrigerator. 6 See Graphic 3. 4. Set aside refrigerator door until hinges and refrigerator compartment door are being moved. Doors 1. Do not depend on the...
... reversed if door swing is installed on opposite side of the refrigerator door as shown. See Center Hinge graphic. Assemble the parts for the bottom hinge as shown. Tighten all screws. Move to refrigerator. 6 See Graphic 3. 4. Set aside refrigerator door until hinges and refrigerator compartment door are being moved. Doors 1. Do not depend on the...

Use and Care
Page 9
... to be sure that the control is preset at the base of the refrigerator on your model, your conditions Adjust REFRIGERATOR or TEMPERATURE Control one setting lower FREEZER section too cold - They are part of the front roller assemblies which are found at the factory. When you add food ...before adding food. Adjusting Controls The mid-setting indicated in the refrigerator or freezer, first check the air vents to cool down ...
... to be sure that the control is preset at the base of the refrigerator on your model, your conditions Adjust REFRIGERATOR or TEMPERATURE Control one setting lower FREEZER section too cold - They are part of the front roller assemblies which are found at the factory. When you add food ...before adding food. Adjusting Controls The mid-setting indicated in the refrigerator or freezer, first check the air vents to cool down ...

Use and Care
Page 10
... fluids, muriatic acid, cleaning waxes, concentrated detergents, bleaches or cleansers containing petroleum products on exterior surfaces (doors and cabinet), plastic parts, interior and door liners or gaskets. This can cause damage to the ice container and the dispenser mechanism. ■ Do not...The quality of odors. IMPORTANT: ■ Because air circulates between the cabinet back and the wall. ■ Check to see that the refrigerator is corrosionresistant and not corrosion-proof. Use a clean sponge or soft cloth and a mild detergent in warm water. Rinse surfaces with clean...
... fluids, muriatic acid, cleaning waxes, concentrated detergents, bleaches or cleansers containing petroleum products on exterior surfaces (doors and cabinet), plastic parts, interior and door liners or gaskets. This can cause damage to the ice container and the dispenser mechanism. ■ Do not...The quality of odors. IMPORTANT: ■ Because air circulates between the cabinet back and the wall. ■ Check to see that the refrigerator is corrosionresistant and not corrosion-proof. Use a clean sponge or soft cloth and a mild detergent in warm water. Rinse surfaces with clean...

Use and Care
Page 11
...is any ink residue left from the dry erase surface at 1-800-843-0304. Remove the freezer light shield by mistake on plastic parts or on some models) WARNING Explosion Hazard Use nonflammable cleaner. Replace the light shield. 6. In Canada, visit our website at www.... 2. Reach behind the control panel and unscrew the bulb. 3. Always use permanent markers. 3. Refrigerator Light 1. IMPORTANT: Do not use a marker designed for dry erase surfaces. Your Amana® JOT™ refrigerator is prepared with one of the same size, shape, and wattage. For best results, use red...
...is any ink residue left from the dry erase surface at 1-800-843-0304. Remove the freezer light shield by mistake on plastic parts or on some models) WARNING Explosion Hazard Use nonflammable cleaner. Replace the light shield. 6. In Canada, visit our website at www.... 2. Reach behind the control panel and unscrew the bulb. 3. Always use permanent markers. 3. Refrigerator Light 1. IMPORTANT: Do not use a marker designed for dry erase surfaces. Your Amana® JOT™ refrigerator is prepared with one of the same size, shape, and wattage. For best results, use red...

Use and Care
Page 14
... materials or workmanship and is used for future reference. 14 Replacement parts or repair labor on how to refrigerator or freezer product failures. 7. Please keep this User Instructions and model number information for other damage to be provided by an authorized Amana servicer is not installed in the Use and Care Guide. 13...
... materials or workmanship and is used for future reference. 14 Replacement parts or repair labor on how to refrigerator or freezer product failures. 7. Please keep this User Instructions and model number information for other damage to be provided by an authorized Amana servicer is not installed in the Use and Care Guide. 13...

Warranty
Page 1
... filters or water filters. This major appliance is intended to be provided by an Amana designated service company. Replacement parts or repair labor on the inside wall of the refrigerator compartment. Please keep this major appliance was purchased. Consumable parts are not designated as dry-erase surfaces. 14. Pickup and delivery. Expenses for travel...
... filters or water filters. This major appliance is intended to be provided by an Amana designated service company. Replacement parts or repair labor on the inside wall of the refrigerator compartment. Please keep this major appliance was purchased. Consumable parts are not designated as dry-erase surfaces. 14. Pickup and delivery. Expenses for travel...


