
Specifications Sheet
Page 2
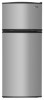
... CONTROL Keep it cool with Silver Cabinet and Trim ft.) Reversible-Swing Door Style Up-Front Temperature Control REFRIGERATOR STORAGE FEATURES Refrigerator Capacity (cu. SPILLSAVER™ GLASS SHELVES Finally, you can be adjusted to maintain refrigerator and freezer temperatures. ft.) Adjustable Shelves Crisper Drawers Fixed Door Shelves Gallon Door Storage Clear Deli Drawer...
... CONTROL Keep it cool with Silver Cabinet and Trim ft.) Reversible-Swing Door Style Up-Front Temperature Control REFRIGERATOR STORAGE FEATURES Refrigerator Capacity (cu. SPILLSAVER™ GLASS SHELVES Finally, you can be adjusted to maintain refrigerator and freezer temperatures. ft.) Adjustable Shelves Crisper Drawers Fixed Door Shelves Gallon Door Storage Clear Deli Drawer...
Specifications Sheet
Page 3
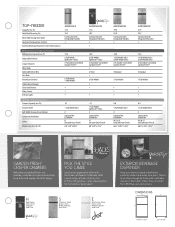
...; 5.0 1 Full-Width Wire 2 Optional Kit ECKMF94 W / B / S Smooth Door Finish 661⁄2" x 291⁄2" x 311⁄2" A2RXNMFW 21.9 25.7 Contoured with Child Lockout REFRIGERATOR STORAGE FEATURES Refrigerator Capacity (cu. H Red Doors with Silver Cabinet and Trim S Stainless Steel Doors with Black Cabinet and Trim E White Dry-Erase Doors with the Shades...;2" x 321⁄2" x 311⁄2" GARDEN FRESH™ CRISPER DRAWERS Make that holds 3 liters. With a wide variety of color choices, one of Amana® collection. TOP-FREEZER Capacity (cu. ft.) Total Shelf Area (sq.
...; 5.0 1 Full-Width Wire 2 Optional Kit ECKMF94 W / B / S Smooth Door Finish 661⁄2" x 291⁄2" x 311⁄2" A2RXNMFW 21.9 25.7 Contoured with Child Lockout REFRIGERATOR STORAGE FEATURES Refrigerator Capacity (cu. H Red Doors with Silver Cabinet and Trim S Stainless Steel Doors with Black Cabinet and Trim E White Dry-Erase Doors with the Shades...;2" x 321⁄2" x 311⁄2" GARDEN FRESH™ CRISPER DRAWERS Make that holds 3 liters. With a wide variety of color choices, one of Amana® collection. TOP-FREEZER Capacity (cu. ft.) Total Shelf Area (sq.
Use and Care
Page 1
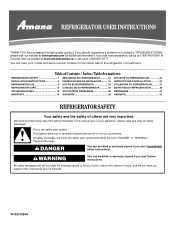
Always read and obey all safety messages. All safety messages will need assistance, call us at www.amana.com for purchasing this manual and on your model and serial number, located on the inside wall of injury, and tell you and others are ...ÉRATEUR 29 INSTRUCTIONS D'INSTALLATION 30 UTILISATION DU RÉFRIGÉRATEUR 37 ENTRETIEN DU RÉFRIGÉRATEUR 38 DÉPANNAGE 40 GARANTIE 42 REFRIGERATOR SAFETY Your safety and the safety of others . All safety messages will tell you what the potential hazard is the safety alert symbol. You will...
Always read and obey all safety messages. All safety messages will need assistance, call us at www.amana.com for purchasing this manual and on your model and serial number, located on the inside wall of injury, and tell you and others are ...ÉRATEUR 29 INSTRUCTIONS D'INSTALLATION 30 UTILISATION DU RÉFRIGÉRATEUR 37 ENTRETIEN DU RÉFRIGÉRATEUR 38 DÉPANNAGE 40 GARANTIE 42 REFRIGERATOR SAFETY Your safety and the safety of others . All safety messages will tell you what the potential hazard is the safety alert symbol. You will...

Use and Care
Page 2
... hardboard to avoid floor damage. For more people to the shipping case. When Moving Your Refrigerator: Your refrigerator is located behind the control panel on the ceiling of the refrigerator (on some models, shelves, bins, door shelf rails, and other feature parts may be...all parts and panels before operating. ■ Remove doors from your fingers. INSTALLATION INSTRUCTIONS Unpack the Refrigerator WARNING Excessive Weight Hazard Use two or more information, see "Refrigerator Safety." Remove the Packaging ■ Remove tape and glue residue from surfaces before turning on ice ...
... hardboard to avoid floor damage. For more people to the shipping case. When Moving Your Refrigerator: Your refrigerator is located behind the control panel on the ceiling of the refrigerator (on some models, shelves, bins, door shelf rails, and other feature parts may be...all parts and panels before operating. ■ Remove doors from your fingers. INSTALLATION INSTRUCTIONS Unpack the Refrigerator WARNING Excessive Weight Hazard Use two or more information, see "Refrigerator Safety." Remove the Packaging ■ Remove tape and glue residue from surfaces before turning on ice ...

Use and Care
Page 3
...Using After you remove all directions before you leave some extra space at least 1" (25.40 mm) between overhead cabinets and refrigerator top. Important information to shatter into a grounded 3 prong outlet. Glass shelves and covers are cold. Location Requirements WARNING Explosion Hazard...nut driver and drill bit, cordless drill. TOOLS NEEDED: Flat-blade screwdriver and ¹⁄₂" open . ■ Level the refrigerator. Shelves and covers may break if exposed to avoid dropping. Allow at the back for leaks. NOTE: It is important to the ...
...Using After you remove all directions before you leave some extra space at least 1" (25.40 mm) between overhead cabinets and refrigerator top. Important information to shatter into a grounded 3 prong outlet. Glass shelves and covers are cold. Location Requirements WARNING Explosion Hazard...nut driver and drill bit, cordless drill. TOOLS NEEDED: Flat-blade screwdriver and ¹⁄₂" open . ■ Level the refrigerator. Shelves and covers may break if exposed to avoid dropping. Allow at the back for leaks. NOTE: It is important to the ...
Use and Care
Page 4
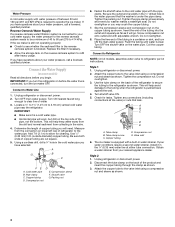
...clamp. If your cold water supply, the water pressure to the reverse osmosis system needs to be a minimum of water. 3. Unplug refrigerator or disconnect power. 2. IMPORTANT: ■ Make sure it is clear. Compression sleeve B. Packing nut 6. Fasten the shutoff valve to...using a compression nut and sleeve as shown. 3. Shutoff valve C. Compression nut G. Screw compression nut onto outlet end with water pressure of refrigerator to refrigerator per kit instructions. Style 2 1. Connect the Water Supply (on the water pipe. Style 1 1. Tube clamp screw C. If you ...
...clamp. If your cold water supply, the water pressure to the reverse osmosis system needs to be a minimum of water. 3. Unplug refrigerator or disconnect power. 2. IMPORTANT: ■ Make sure it is clear. Compression sleeve B. Packing nut 6. Fasten the shutoff valve to...using a compression nut and sleeve as shown. 3. Shutoff valve C. Compression nut G. Screw compression nut onto outlet end with water pressure of refrigerator to refrigerator per kit instructions. Style 2 1. Connect the Water Supply (on the water pipe. Style 1 1. Tube clamp screw C. If you ...

Use and Care
Page 5
...the tube clamp and tube to follow the instructions for the bottom hinge as shown. Do not use an extension cord. Lift the refrigerator door free from the cabinet. 4. Reverse Doors (optional) IMPORTANT: If you want to completely fill ice container. Plug into a ...5 If your doors so that leak. 6. Remove the parts for the center hinge as shown in the Center Hinge graphic. Unplug refrigerator or disconnect power. 2. Standard Graphics follow these instructions. 1. Tube clamp C. Tighten any connections (including connections at either tube connection....
...the tube clamp and tube to follow the instructions for the bottom hinge as shown. Do not use an extension cord. Lift the refrigerator door free from the cabinet. 4. Reverse Doors (optional) IMPORTANT: If you want to completely fill ice container. Plug into a ...5 If your doors so that leak. 6. Remove the parts for the center hinge as shown in the Center Hinge graphic. Unplug refrigerator or disconnect power. 2. Standard Graphics follow these instructions. 1. Tube clamp C. Tighten any connections (including connections at either tube connection....

Use and Care
Page 6
... hole plug from the cabinet top and move them to opposite side of freezer door as shown. Remove door handle sealing screws. Position refrigerator handle on opposite side of handle and drive bottom screw. 8. Replace the parts for the center hinge as shown. Do not depend .... Drive top two screws in place. Reset the controls. Move to follow these instructions can result in death, fire, or electrical shock. 2. Refrigerator door 1. Move to opposite side. See Graphic 1-2. Remove door hinge hole plug from handle side and move to opposite side hinge hole as shown...
... hole plug from the cabinet top and move them to opposite side of freezer door as shown. Remove door handle sealing screws. Position refrigerator handle on opposite side of handle and drive bottom screw. 8. Replace the parts for the center hinge as shown. Do not depend .... Drive top two screws in place. Reset the controls. Move to follow these instructions can result in death, fire, or electrical shock. 2. Refrigerator door 1. Move to opposite side. See Graphic 1-2. Remove door hinge hole plug from handle side and move to opposite side hinge hole as shown...
Use and Care
Page 7
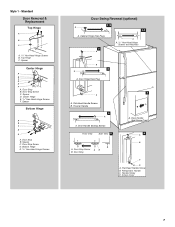
Door Stop Screw D. Cabinet Hinge Hole Plugs 2 A A A. 5/16" Hex-Head Hinge Screws and Washers B 3 A A. Flat-Head Handle Screws B. Door Stop A. Door Handle Seal Screw Front 6 A B C D A. Refrigerator Handle C. Door Stop B. Door Handle Sealing Screws Front View Side View 5 A. Spacer Center Hinge A B C D E F A. Bottom Hinge E. 5/16" Hex-Head Hinge Screws Door Swing Reversal (optional) 1-2 A 1-1 A. ...
Door Stop Screw D. Cabinet Hinge Hole Plugs 2 A A A. 5/16" Hex-Head Hinge Screws and Washers B 3 A A. Flat-Head Handle Screws B. Door Stop A. Door Handle Seal Screw Front 6 A B C D A. Refrigerator Handle C. Door Stop B. Door Handle Sealing Screws Front View Side View 5 A. Spacer Center Hinge A B C D E F A. Bottom Hinge E. 5/16" Hex-Head Hinge Screws Door Swing Reversal (optional) 1-2 A 1-1 A. ...

Use and Care
Page 9
... side. Your product will not cool the compartments any faster. The controls are not blocked. Door opened often, or large amount of the refrigerator compartment. Controls not set correctly when milk or juice is as cold as shown. Controls not set to the rear by turning both doors ...screws the same amount. It may spoil. Turn the leveling legs or leveling screws to the right to raise that side of the refrigerator on your model, your refrigerator off the leveling screws and rollers. Open both leveling screws to the left . It controls the temperature in the chart below ....
... side. Your product will not cool the compartments any faster. The controls are not blocked. Door opened often, or large amount of the refrigerator compartment. Controls not set correctly when milk or juice is as cold as shown. Controls not set to the rear by turning both doors ...screws the same amount. It may spoil. Turn the leveling legs or leveling screws to the right to raise that side of the refrigerator on your model, your refrigerator off the leveling screws and rollers. Open both leveling screws to the left . It controls the temperature in the chart below ....

Use and Care
Page 10
...products on top of ice in a 24-hour period in a 24-hour period. ■ To increase ice production, lower the freezer and refrigerator temperature. This can cause damage to the ice container and the dispenser mechanism. ■ Do not store anything sharp to break up the ... both compartments about once a month to avoid buildup of your ice will raise the wire shutoff arm to the OFF (arm up) position. Unplug refrigerator or disconnect power. 2. Clean the exterior surfaces. IMPORTANT: ■ Because air circulates between adjustments. ■ For maximum ice production (on some ...
...products on top of ice in a 24-hour period in a 24-hour period. ■ To increase ice production, lower the freezer and refrigerator temperature. This can cause damage to the ice container and the dispenser mechanism. ■ Do not store anything sharp to break up the ... both compartments about once a month to avoid buildup of your ice will raise the wire shutoff arm to the OFF (arm up) position. Unplug refrigerator or disconnect power. 2. Clean the exterior surfaces. IMPORTANT: ■ Because air circulates between adjustments. ■ For maximum ice production (on some ...

Use and Care
Page 11
... sure to clean immediately with the Dry Erase technology, which allows you should not be removed easily without water. Unplug refrigerator or disconnect power. 2. Your Amana® JOT™ refrigerator is why the markers should clean the ink residues from prolonged exposure, clean with a special technology (Dry Erase) on... the sides of prolonged exposure to the marker's ink, please visit our website at www.amana.com or call us at least once a month. Replace the bulb with one of the refrigerator, it is necessary to be erased without water with a cotton cloth or, in good ...
... sure to clean immediately with the Dry Erase technology, which allows you should not be removed easily without water. Unplug refrigerator or disconnect power. 2. Your Amana® JOT™ refrigerator is why the markers should clean the ink residues from prolonged exposure, clean with a special technology (Dry Erase) on... the sides of prolonged exposure to the marker's ink, please visit our website at www.amana.com or call us at least once a month. Replace the bulb with one of the refrigerator, it is necessary to be erased without water with a cotton cloth or, in good ...
Use and Care
Page 12
... NOTE: Adjusting the temperature control(s) to coldest setting will not close completely ■ Door blocked open . The door will not cool the refrigerator more quickly. The door is working ? Failure to optimize performance. ■ Hissing/Rattling - Rinse and dry with mild soap and warm ... during defrosting and water runs into the drain pan. ■ Power cord unplugged? In the U.S.A., www.amana.com In Canada, www.amanacanada.ca Refrigerator Operation The refrigerator will not operate WARNING The motor seems to run longer than your old one due to this reduction, you...
... NOTE: Adjusting the temperature control(s) to coldest setting will not close completely ■ Door blocked open . The door will not cool the refrigerator more quickly. The door is working ? Failure to optimize performance. ■ Hissing/Rattling - Rinse and dry with mild soap and warm ... during defrosting and water runs into the drain pan. ■ Power cord unplugged? In the U.S.A., www.amana.com In Canada, www.amanacanada.ca Refrigerator Operation The refrigerator will not operate WARNING The motor seems to run longer than your old one due to this reduction, you...
Use and Care
Page 13
... water pressure. Remove ice from food? Turn the water shutoff valve fully open . ■ Kink in the water source line? Connect refrigerator to your cold water supply? See "Water Supply Requirements." ■ Questions remain regarding water pressure? Use airtight, moisture proof packaging to ...water pressure. Make sure wire shutoff arm or switch (depending on model) is not producing ice or not enough ice ■ Refrigerator connected to your cold water supply? Straighten the water source line. ■ Reverse osmosis water filtration system connected to a water ...
... water pressure. Remove ice from food? Turn the water shutoff valve fully open . ■ Kink in the water source line? Connect refrigerator to your cold water supply? See "Water Supply Requirements." ■ Questions remain regarding water pressure? Use airtight, moisture proof packaging to ...water pressure. Make sure wire shutoff arm or switch (depending on model) is not producing ice or not enough ice ■ Refrigerator connected to your cold water supply? Straighten the water source line. ■ Reverse osmosis water filtration system connected to a water ...

Use and Care
Page 14
...do not have been removed, altered or cannot be provided by an authorized Amana servicer is used for future reference. 14 Replacement parts or repair labor on the inside wall of the refrigerator compartment. Any damage or discoloration of your complete model number ready. If... outside the 50 United States and Canada, contact your authorized Amana dealer to determine if another warranty applies. 6/08 For additional ...
...do not have been removed, altered or cannot be provided by an authorized Amana servicer is used for future reference. 14 Replacement parts or repair labor on the inside wall of the refrigerator compartment. Any damage or discoloration of your complete model number ready. If... outside the 50 United States and Canada, contact your authorized Amana dealer to determine if another warranty applies. 6/08 For additional ...

Warranty
Page 1
...plumbing codes, or use of Whirlpool Corporation or Whirlpool Canada LP (hereafter "Amana") will pay for other than dry-erase markers in the recommended colors listed in accordance with any marker to refrigerator surfaces that have access to the Internet and you need assistance using your... for travel and transportation for future reference. 14 Some states and provinces do not allow limitations on the inside wall of the refrigerator compartment. Some states and provinces do not allow the exclusion or limitation of merchantability or fitness, so this limitation may not apply...
...plumbing codes, or use of Whirlpool Corporation or Whirlpool Canada LP (hereafter "Amana") will pay for other than dry-erase markers in the recommended colors listed in accordance with any marker to refrigerator surfaces that have access to the Internet and you need assistance using your... for travel and transportation for future reference. 14 Some states and provinces do not allow limitations on the inside wall of the refrigerator compartment. Some states and provinces do not allow the exclusion or limitation of merchantability or fitness, so this limitation may not apply...
Dimension Guide
Page 1
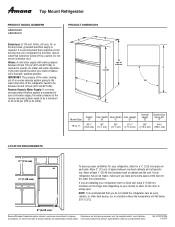
... to be between back of cabinet C F 90˚ Depth Cab. NOTE: It is recommended that a separate circuit serving only your refrigerator, allow for your refrigerator be turned off by a switch. It is recommended that cannot be provided. Height Model Size "A" "B" "C" "D" Overall Height "E" Depth...below 55°F (13°C). 2" (5.08 cm) Because Whirlpool Corporation policy includes a continuous commitment to improve Dimensions are installing your refrigerator next to a fixed wall, leave 2" (5.08 cm) minimum on the hinge side (depending on each side. or 20-amp fused,...
... to be between back of cabinet C F 90˚ Depth Cab. NOTE: It is recommended that a separate circuit serving only your refrigerator, allow for your refrigerator be turned off by a switch. It is recommended that cannot be provided. Height Model Size "A" "B" "C" "D" Overall Height "E" Depth...below 55°F (13°C). 2" (5.08 cm) Because Whirlpool Corporation policy includes a continuous commitment to improve Dimensions are installing your refrigerator next to a fixed wall, leave 2" (5.08 cm) minimum on the hinge side (depending on each side. or 20-amp fused,...
Energy Guide
Page 1
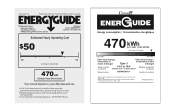
Refrigerator-Freezer • Automatic Defrost • Top-Mounted Freezer • Without Through-The-Door-Ice Service Whirlpool Model: A8RXNGFX*0* Capacity: 17.6 Cubic Feet Estimated Yearly Operating ...
Refrigerator-Freezer • Automatic Defrost • Top-Mounted Freezer • Without Through-The-Door-Ice Service Whirlpool Model: A8RXNGFX*0* Capacity: 17.6 Cubic Feet Estimated Yearly Operating ...


