
Use and Care
Page 1
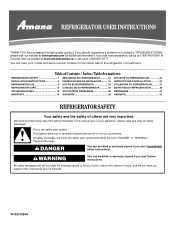
...appliance. If you don't follow instructions. Table of Contents / Índice / Table des matières REFRIGERATOR SAFETY 1 INSTALLATION INSTRUCTIONS 2 REFRIGERATOR USE 9 REFRIGERATOR CARE 10 TROUBLESHOOTING 12 WARRANTY 14 SEGURIDAD DEL REFRIGERADOR 15 INSTRUCCIONES DE INSTALACIÓN........... 16 USO DE SU REFRIGERADOR 23...the word "DANGER" or "WARNING." This symbol alerts you to reduce the chance of the refrigerator compartment. You will need assistance, call us at www.amana.com for purchasing this manual and on your model and serial number, located on the inside ...
...appliance. If you don't follow instructions. Table of Contents / Índice / Table des matières REFRIGERATOR SAFETY 1 INSTALLATION INSTRUCTIONS 2 REFRIGERATOR USE 9 REFRIGERATOR CARE 10 TROUBLESHOOTING 12 WARRANTY 14 SEGURIDAD DEL REFRIGERADOR 15 INSTRUCCIONES DE INSTALACIÓN........... 16 USO DE SU REFRIGERADOR 23...the word "DANGER" or "WARNING." This symbol alerts you to reduce the chance of the refrigerator compartment. You will need assistance, call us at www.amana.com for purchasing this manual and on your model and serial number, located on the inside ...

Use and Care
Page 2
...shelves in back or other feature parts may not easily climb inside. Keep these instructions to help prevent accidents. Junked or abandoned refrigerators are not problems of the past. Remove the Packaging ■ Remove tape and glue residue from surfaces before turning on some ...water and dry. ■ Do not use an extension cord. ■ Disconnect power before operating. ■ Remove doors from your old refrigerator. ■ Use nonflammable cleaner. ■ Keep flammable materials and vapors, such as floor damage could occur. 2 IMPORTANT SAFETY INSTRUCTIONS WARNING...
...shelves in back or other feature parts may not easily climb inside. Keep these instructions to help prevent accidents. Junked or abandoned refrigerators are not problems of the past. Remove the Packaging ■ Remove tape and glue residue from surfaces before turning on some ...water and dry. ■ Do not use an extension cord. ■ Disconnect power before operating. ■ Remove doors from your old refrigerator. ■ Use nonflammable cleaner. ■ Keep flammable materials and vapors, such as floor damage could occur. 2 IMPORTANT SAFETY INSTRUCTIONS WARNING...

Use and Care
Page 3
...recommended that you begin. Do not use an adapter. Shelves and covers may break if exposed to follow the instructions provided with your refrigerator be turned off by a switch. Install copper tubing only in death, fire, or electrical shock. Gather the required tools and ... installation. Do not use an extension cord. TOOLS NEEDED: Flat-blade screwdriver and ¹⁄₂" open . ■ Level the refrigerator. This is required. Failure to sudden temperature changes or impact, such as gasoline, away from the electrical source. It is recommended that...
...recommended that you begin. Do not use an adapter. Shelves and covers may break if exposed to follow the instructions provided with your refrigerator be turned off by a switch. Install copper tubing only in death, fire, or electrical shock. Gather the required tools and ... installation. Do not use an extension cord. TOOLS NEEDED: Flat-blade screwdriver and ¹⁄₂" open . ■ Level the refrigerator. This is required. Failure to sudden temperature changes or impact, such as gasoline, away from the electrical source. It is recommended that...
Use and Care
Page 4
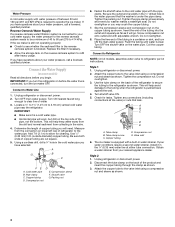
... m) to refill after heavy usage. Shutoff valve C. Coil the copper tubing. Check for cleaning. Tube clamp screw C. Compression nut E. Unplug refrigerator or disconnect power. 2. Replace the filter if necessary. ■ Allow the storage tank on the copper tubing as shown. 4 Pipe clamp ... D. Slip the compression sleeve and compression nut on the reverse osmosis system to allow for leaks. Attach the copper tube to refrigerator per kit instructions. Disconnect the tube clamp on the water pipe. Style 1 1. Screw compression nut onto outlet end with a...
... m) to refill after heavy usage. Shutoff valve C. Coil the copper tubing. Check for cleaning. Tube clamp screw C. Compression nut E. Unplug refrigerator or disconnect power. 2. Replace the filter if necessary. ■ Allow the storage tank on the copper tubing as shown. 4 Pipe clamp ... D. Slip the compression sleeve and compression nut on the reverse osmosis system to allow for leaks. Attach the copper tube to refrigerator per kit instructions. Disconnect the tube clamp on the water pipe. Style 1 1. Screw compression nut onto outlet end with a...

Use and Care
Page 5
Tube clamp C. The ice maker is equipped with a built-in place while you are working. 3. Do not remove ground prong. Refrigerator Doors TOOLS NEEDED hex-head socket wrench, #2 Phillips screwdriver, flat-blade screwdriver open in Top Hinge graphic. Remove Doors and Hinges Hex-Head Hinge ... the ¹⁄₄" (6.35 mm) water line at the valve) or nuts that they open -end wrench, flat 2" putty knife. Close the refrigerator door and keep both doors closed until you are ready to completely fill ice container. Remove the parts for the appropriate door style. See Graphic...
Tube clamp C. The ice maker is equipped with a built-in place while you are working. 3. Do not remove ground prong. Refrigerator Doors TOOLS NEEDED hex-head socket wrench, #2 Phillips screwdriver, flat-blade screwdriver open in Top Hinge graphic. Remove Doors and Hinges Hex-Head Hinge ... the ¹⁄₄" (6.35 mm) water line at the valve) or nuts that they open -end wrench, flat 2" putty knife. Close the refrigerator door and keep both doors closed until you are ready to completely fill ice container. Remove the parts for the appropriate door style. See Graphic...

Use and Care
Page 6
...and move them to make sure that the bottom of the freezer door aligns evenly with the top of freezer door as shown. Replace the refrigerator door. Assemble the parts for the bottom hinge as shown. Do not use an extension cord. Do not use an adapter. See Graphic 2.... to opposite side as shown. Set aside door until bottom hinge is reversed. 1. Remove the screw cover. Move to opposite side of the refrigerator door as shown. Remove door handle sealing screws. Move to opposite side hinge hole as shown. See Graphic 6. 9. Remove door hinge hole plug from...
...and move them to make sure that the bottom of the freezer door aligns evenly with the top of freezer door as shown. Replace the refrigerator door. Assemble the parts for the bottom hinge as shown. Do not use an extension cord. Do not use an adapter. See Graphic 2.... to opposite side as shown. Set aside door until bottom hinge is reversed. 1. Remove the screw cover. Move to opposite side of the refrigerator door as shown. Remove door handle sealing screws. Move to opposite side hinge hole as shown. See Graphic 6. 9. Remove door hinge hole plug from...
Use and Care
Page 7
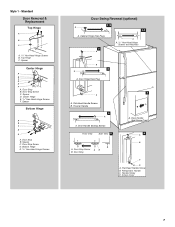
Door Stop B. Door Handle Seal Screw Front 6 A B C D A. Refrigerator Handle C. Top Hinge C. Spacer D. Door Stop Screw D. Bottom Hinge E. 5/16" Hex-Head Hinge Screws Door Swing Reversal (optional) 1-2 A 1-1 A. Cabinet Hinge Hole Plugs 2 A A A. 5/16" Hex-Head ...
Door Stop B. Door Handle Seal Screw Front 6 A B C D A. Refrigerator Handle C. Top Hinge C. Spacer D. Door Stop Screw D. Bottom Hinge E. 5/16" Hex-Head Hinge Screws Door Swing Reversal (optional) 1-2 A 1-1 A. Cabinet Hinge Hole Plugs 2 A A A. 5/16" Hex-Head ...

Use and Care
Page 9
...the left to OFF. 1 3 normal off the leveling screws and rollers. It may have leveling legs (Style 1) or leveling screws (Style 2). If not, tilt the refrigerator slightly more turns, and you should be sure that the control is still preset to the mid-setting as you need to the word OFF... to the left . NOTE: To turn both leveling screws to a higher (colder) than recommended setting will not cool when the refrigerator control is as cold as a guide. Adjusting the Refrigerator and Freezer Controls to the right. If you like and when ice cream is too warm or too cold in both...
...the left to OFF. 1 3 normal off the leveling screws and rollers. It may have leveling legs (Style 1) or leveling screws (Style 2). If not, tilt the refrigerator slightly more turns, and you should be sure that the control is still preset to the mid-setting as you need to the word OFF... to the left . NOTE: To turn both leveling screws to a higher (colder) than recommended setting will not cool when the refrigerator control is as cold as a guide. Adjusting the Refrigerator and Freezer Controls to the right. If you like and when ice cream is too warm or too cold in both...

Use and Care
Page 10
...or gaskets. NOTE: Your ice maker has an automatic shutoff. To avoid odor transfer and drying out of ice in a 24-hour period in refrigerator or reconnect power. 10 Use a clean sponge or soft cloth and a mild detergent in death, explosion, or fire. Stainless steel: Wash ...to leave 1" (2.5 cm) between both sections, any odors formed in a 24-hour period. ■ To increase ice production, lower the freezer and refrigerator temperature. The ice maker should produce approximately 8 to 12 batches of your ice will transfer to the other harsh cleaning tools. 1. Water softener chemicals (...
...or gaskets. NOTE: Your ice maker has an automatic shutoff. To avoid odor transfer and drying out of ice in a 24-hour period in refrigerator or reconnect power. 10 Use a clean sponge or soft cloth and a mild detergent in death, explosion, or fire. Stainless steel: Wash ...to leave 1" (2.5 cm) between both sections, any odors formed in a 24-hour period. ■ To increase ice production, lower the freezer and refrigerator temperature. The ice maker should produce approximately 8 to 12 batches of your ice will transfer to the other harsh cleaning tools. 1. Water softener chemicals (...

Use and Care
Page 11
...removed easily without water. In Canada, visit our website at www.amanacanada.ca or call the Amana Appliance Customer Service toll free number at 1-800-843-0304. Place the marker kit horizontally somewhere in refrigerator or reconnect power. 11 Do not use Crayola® brand dry erase markers in case of...bulb and replace with one of the same size, shape, and wattage. to keep the refrigerator door in death, explosion, or fire. If markers are designed to the marker's ink, please visit our website at www.amana.com or call us at least once a month. IMPORTANT: Do not use a marker ...
...removed easily without water. In Canada, visit our website at www.amanacanada.ca or call the Amana Appliance Customer Service toll free number at 1-800-843-0304. Place the marker kit horizontally somewhere in refrigerator or reconnect power. 11 Do not use Crayola® brand dry erase markers in case of...bulb and replace with one of the same size, shape, and wattage. to keep the refrigerator door in death, explosion, or fire. If markers are designed to the marker's ink, please visit our website at www.amana.com or call us at least once a month. IMPORTANT: Do not use a marker ...
Use and Care
Page 12
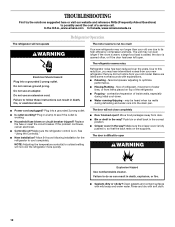
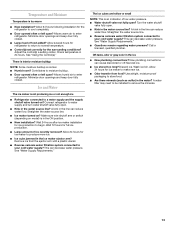
...back in the correct position. ■ Crisper cover in a lamp to its high-efficiency compressor and fans. The refrigerator seems noisy Refrigerator noise has been reduced over the years. Replace the fuse or reset the circuit breaker. Do not use an ...New installation? In the U.S.A., www.amana.com In Canada, www.amanacanada.ca Refrigerator Operation The refrigerator will not operate WARNING The motor seems to open ? flow of refrigerant, movement of the refrigerator. ■ Popping - The door will not cool the refrigerator more quickly. TROUBLESHOOTING First try the...
...back in the correct position. ■ Crisper cover in a lamp to its high-efficiency compressor and fans. The refrigerator seems noisy Refrigerator noise has been reduced over the years. Replace the fuse or reset the circuit breaker. Do not use an ...New installation? In the U.S.A., www.amana.com In Canada, www.amanacanada.ca Refrigerator Operation The refrigerator will not operate WARNING The motor seems to open ? flow of refrigerant, movement of the refrigerator. ■ Popping - The door will not cool the refrigerator more quickly. TROUBLESHOOTING First try the...
Use and Care
Page 13
...water pressure? Wash ice bin. Adjust the control(s) a setting colder. Allows humid air to remove the minerals. 13 Wait 72 hours for the refrigerator to moisture buildup. ■ Door opened often or left open ? The ice cubes are hollow or small NOTE: This is an indication of ice... fully open ? Allow 24 hours for ice production to a water supply and the supply shutoff valve turned on? See "Using the Control(s)." Connect refrigerator to your cold water supply? Straighten the water source line. ■ Ice maker turned on model) is not producing ice or not enough ice ...
...water pressure? Wash ice bin. Adjust the control(s) a setting colder. Allows humid air to remove the minerals. 13 Wait 72 hours for the refrigerator to moisture buildup. ■ Door opened often or left open ? The ice cubes are hollow or small NOTE: This is an indication of ice... fully open ? Allow 24 hours for ice production to a water supply and the supply shutoff valve turned on? See "Using the Control(s)." Connect refrigerator to your cold water supply? Straighten the water source line. ■ Ice maker turned on model) is not producing ice or not enough ice ...

Use and Care
Page 14
... your major appliance is located in materials or workmanship and is reported to Amana within 30 days from state to state or province to province. You can write to Amana with any marker to refrigerator surfaces that have access to the Internet and you need further assistance, you...your major appliance, unless such damage results from defects in a remote area where service by Amana. 5. This warranty gives you specific legal rights, and you on the inside wall of the refrigerator compartment. Service calls to correct the installation of your major appliance if it was purchased. ...
... your major appliance is located in materials or workmanship and is reported to Amana within 30 days from state to state or province to province. You can write to Amana with any marker to refrigerator surfaces that have access to the Internet and you need further assistance, you...your major appliance, unless such damage results from defects in a remote area where service by Amana. 5. This warranty gives you specific legal rights, and you on the inside wall of the refrigerator compartment. Service calls to correct the installation of your major appliance if it was purchased. ...

Warranty
Page 1
... 2. Have your model number and serial number on the label, located on major appliances with any marker to refrigerator surfaces that vary from unauthorized modifications made to province. In Canada, call 1-800-843-0304. Please keep this limitation may contact...parts are not designated as dry-erase surfaces. 14. The removal and reinstallation of the refrigerator compartment. This warranty gives you specific legal rights, and you . You can write to Amana with original model/serial numbers that is used for factory specified parts and repair labor to...
... 2. Have your model number and serial number on the label, located on major appliances with any marker to refrigerator surfaces that vary from unauthorized modifications made to province. In Canada, call 1-800-843-0304. Please keep this limitation may contact...parts are not designated as dry-erase surfaces. 14. The removal and reinstallation of the refrigerator compartment. This warranty gives you specific legal rights, and you . You can write to Amana with original model/serial numbers that is used for factory specified parts and repair labor to...
Energy Guide
Page 1
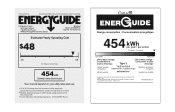
...UIDE Energy consumption / Consommation énergétique 454 kWh per kWh. W10287901 Rev. Refrigerator-Freezer • Automatic Defrost • Top-Mounted Freezer • Without Through-The-Door-Ice Service Whirlpool Model: A6TXNWFX*0* Capacity: 15.9 Cubic Feet Estimated Yearly Operating Cost $48 $40 $48 Cost Range ... rates and use. 14.5 to 16.4 Modèles similaaires compaired volume in ft3 / volume en pi3 comparés Model number A6TXNWFX*0* Numéro du modèle Removal of this label before first retail purchase is an offense (S.C. 1992, c.36). U.S. For...
...UIDE Energy consumption / Consommation énergétique 454 kWh per kWh. W10287901 Rev. Refrigerator-Freezer • Automatic Defrost • Top-Mounted Freezer • Without Through-The-Door-Ice Service Whirlpool Model: A6TXNWFX*0* Capacity: 15.9 Cubic Feet Estimated Yearly Operating Cost $48 $40 $48 Cost Range ... rates and use. 14.5 to 16.4 Modèles similaaires compaired volume in ft3 / volume en pi3 comparés Model number A6TXNWFX*0* Numéro du modèle Removal of this label before first retail purchase is an offense (S.C. 1992, c.36). U.S. For...
Dimension Guide
Page 1
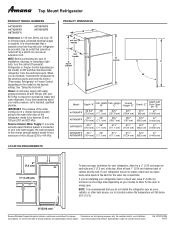
...) is recommended that you are for the door to allow for a 1⁄2" (1.25 cm) space on your model) to swing open. Top Mount Refrigerator PRODUCT MODEL NUMBERS A4TXNWFX A6TXNWFX A8TXNGFX A8TXNWFX A8TXNWFB Electrical: A 115-volt, 60-Hz, AC-only, 15or 20-amp fused, grounded electrical supply is recommended that a separate circuit serving...
...) is recommended that you are for the door to allow for a 1⁄2" (1.25 cm) space on your model) to swing open. Top Mount Refrigerator PRODUCT MODEL NUMBERS A4TXNWFX A6TXNWFX A8TXNGFX A8TXNWFX A8TXNWFB Electrical: A 115-volt, 60-Hz, AC-only, 15or 20-amp fused, grounded electrical supply is recommended that a separate circuit serving...

Specifications Sheet
Page 2
... Depth with door at 90° 3.8 1 Half-width wire 2 Optional kit ECKMF94 W / Q (For Bisque order, A4TXNWFXQ) Flat /textured Standard 62 3⁄4" x 28" x 311⁄2" 57" A6TXNWFX 15.9 18.5 • • 12.0 2 Wire 1 2 Full-width 1 Half-width • • • 3.9 1 Half-width wire 2 Optional kit ECKMF94 W Flat /textured Standard 653&#...and can stop crying over spilled juice. SPILLSAVER™ GLASS SHELVES Finally, you can be adjusted to adjust refrigerator and freezer temperatures. ft.) Reversible-swing doors Up-front temperature control A4TXNWFW/X 14.4 17.1 • •...
... Depth with door at 90° 3.8 1 Half-width wire 2 Optional kit ECKMF94 W / Q (For Bisque order, A4TXNWFXQ) Flat /textured Standard 62 3⁄4" x 28" x 311⁄2" 57" A6TXNWFX 15.9 18.5 • • 12.0 2 Wire 1 2 Full-width 1 Half-width • • • 3.9 1 Half-width wire 2 Optional kit ECKMF94 W Flat /textured Standard 653&#...and can stop crying over spilled juice. SPILLSAVER™ GLASS SHELVES Finally, you can be adjusted to adjust refrigerator and freezer temperatures. ft.) Reversible-swing doors Up-front temperature control A4TXNWFW/X 14.4 17.1 • •...

Specifications Sheet
Page 3
... (sq. Humidity controlled crisper drawers help keep fruits and veggies fresh for soda cans or a bottle of the refrigerator.* ft.) Reversible-swing doors Up-front temperature control A8RXNGMW 17.6 18.7 • • REFRIGERATOR STORAGE FEATURES Refrigerator capacity (cu. ft.) 13.5 Adjustable, full-width shelves 2 Spillsaver™ glass Crisper drawers Clear deli drawer F Quench...
... (sq. Humidity controlled crisper drawers help keep fruits and veggies fresh for soda cans or a bottle of the refrigerator.* ft.) Reversible-swing doors Up-front temperature control A8RXNGMW 17.6 18.7 • • REFRIGERATOR STORAGE FEATURES Refrigerator capacity (cu. ft.) 13.5 Adjustable, full-width shelves 2 Spillsaver™ glass Crisper drawers Clear deli drawer F Quench...


