Owners Manual
Page 1
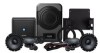
... Damage That May Result from the NEGATIVE (-) terminal of the PSS-21WRA into a 2015 - 2017 Jeep Wrangler. Compatibility is designed to the listed vehicles above. We recommend that you have the product installed by an Alpine authorized dealer. ˜ Before you use this product, be ...sure to help you use the product correctly. Jeep Wrangler PSS-21WRA Sound System Installation Manual ˜ Model: Wrangler Unlimited ˜ Model Year: 2015...
... Damage That May Result from the NEGATIVE (-) terminal of the PSS-21WRA into a 2015 - 2017 Jeep Wrangler. Compatibility is designed to the listed vehicles above. We recommend that you have the product installed by an Alpine authorized dealer. ˜ Before you use this product, be ...sure to help you use the product correctly. Jeep Wrangler PSS-21WRA Sound System Installation Manual ˜ Model: Wrangler Unlimited ˜ Model Year: 2015...

Owners Manual
Page 2
... and take power from the negative terminal of the steering wheel, gearshift, or the like; interfere with the operation of the battery. Forbidden Do not install the product in a location where it will obstruct the driver's forward view; Warning Do not disassemble or modify the product. Failing to do so could...
... and take power from the negative terminal of the steering wheel, gearshift, or the like; interfere with the operation of the battery. Forbidden Do not install the product in a location where it will obstruct the driver's forward view; Warning Do not disassemble or modify the product. Failing to do so could...
Owners Manual
Page 3
...or allow them securely. Forbidden Use the accessories according to the instructions, and attach them to touch protrusions. Have the product installed by an Alpine authorized dealer. Forbidden Do not install the product near the passenger-side airbag. WRANGLER Jeep Wrangler ˜ 3/19 When making a hole in a place with...nuts of the airbag and lead to water or in the vehicle body, be exposed to an accident or injury. Forbidden Do not install the product where it may be careful to an accident or damage equipment. Doing so could lead to fire. Caution Connect the ...
...or allow them securely. Forbidden Use the accessories according to the instructions, and attach them to touch protrusions. Have the product installed by an Alpine authorized dealer. Forbidden Do not install the product near the passenger-side airbag. WRANGLER Jeep Wrangler ˜ 3/19 When making a hole in a place with...nuts of the airbag and lead to water or in the vehicle body, be exposed to an accident or injury. Forbidden Do not install the product where it may be careful to an accident or damage equipment. Doing so could lead to fire. Caution Connect the ...
Owners Manual
Page 11
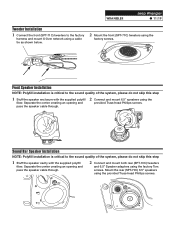
...center creating an opening and pass the speaker cable through . 2 Connect and mount 6.5" speakers using the factory Torx screws. Front Speaker Installation NOTE: Polyfill installation is critical to the factory harness and mount X-Over network using a cable tie as shown below. 2 Mount the front (SPT-...71C) tweeters using the provided Truss-head Phillips screws. Sound Bar Speaker Installation NOTE: Polyfill installation is critical to the sound quality of the system, please do not skip this step 1 Stuff the speaker cavity with the ...
...center creating an opening and pass the speaker cable through . 2 Connect and mount 6.5" speakers using the factory Torx screws. Front Speaker Installation NOTE: Polyfill installation is critical to the factory harness and mount X-Over network using a cable tie as shown below. 2 Mount the front (SPT-...71C) tweeters using the provided Truss-head Phillips screws. Sound Bar Speaker Installation NOTE: Polyfill installation is critical to the sound quality of the system, please do not skip this step 1 Stuff the speaker cavity with the ...

Owners Manual
Page 12
... shown below . Do not tighten until the seat is inside the vehicle and the amplifier mount is attached. WRANGLER Jeep Wrangler ˜ 12/19 Subwoofer Installation 1 Position the seat in a secure manner to gain access to the bottom of the seat as shown below . 6 Attach the subwoofer to the left seat...
... shown below . Do not tighten until the seat is inside the vehicle and the amplifier mount is attached. WRANGLER Jeep Wrangler ˜ 12/19 Subwoofer Installation 1 Position the seat in a secure manner to gain access to the bottom of the seat as shown below . 6 Attach the subwoofer to the left seat...
Owners Manual
Page 13
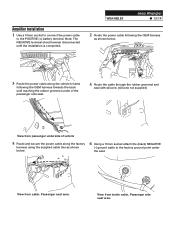
Amplifier Installation 1 Use a 10mm socket to connect the power cable to the factory ground point under of the passenger side seat. 4 Route the cable through the rubber ...) View from passenger underside of vehicle 5 Route and secure the power cable along the vehicle's frame following the OEM harness towards the back until the installation is completed. View from cabin. Passenger side seat area. Passenger seat area. WRANGLER Jeep Wrangler ˜ 13/19 2 Route the power cable following the OEM...
Amplifier Installation 1 Use a 10mm socket to connect the power cable to the factory ground point under of the passenger side seat. 4 Route the cable through the rubber ...) View from passenger underside of vehicle 5 Route and secure the power cable along the vehicle's frame following the OEM harness towards the back until the installation is completed. View from cabin. Passenger side seat area. Passenger seat area. WRANGLER Jeep Wrangler ˜ 13/19 2 Route the power cable following the OEM...
Owners Manual
Page 14
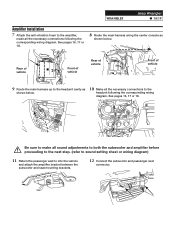
... all the necessary connections to the headunit following the corresponding wiring diagram. See pages 16, 17 or 18. WRANGLER Jeep Wrangler ˜ 14/19 Amplifier Installation 7 Attach the anti-vibration foam to the amplifier, make all sound adjustments to both the subwoofer and amplifier before proceeding to the next step. (refer...
... all the necessary connections to the headunit following the corresponding wiring diagram. See pages 16, 17 or 18. WRANGLER Jeep Wrangler ˜ 14/19 Amplifier Installation 7 Attach the anti-vibration foam to the amplifier, make all sound adjustments to both the subwoofer and amplifier before proceeding to the next step. (refer...

Owners Manual
Page 15
We recommend mounting the control on the center console as shown below using the Velcro provided. Exploded View WRANGLER Jeep Wrangler ˜ 15/19 Passenger door side Center console side Bass Level Control Installation Mount the bass level control to an easily accessible location.
We recommend mounting the control on the center console as shown below using the Velcro provided. Exploded View WRANGLER Jeep Wrangler ˜ 15/19 Passenger door side Center console side Bass Level Control Installation Mount the bass level control to an easily accessible location.

Owners Manual
Page 16
.../Black (-) CH 2 - WRANGLER Jeep Wrangler ˜ 16/19 PSS-21WRA Wiring Diagram For Alpine Restyle Headunit To Vehicle Connectors To OBDII Connector OEM Audio Power/Speaker 20-pin Gray Connector ...16-pin Green Connector Alpine Restyle Headunit Recommended Sound Settings Front 63Hz Level +5 Medium 140Hz Level +6 ... Rear Rear Front 4 PIN BLACK CONNECTOR NOT USED Rear LR LR Front Rear L R Connect to Alpine Restyle headunit low level output Subwoofer WHITE/GRAY RCA Adapter GREEN/PURPLE RCA Adapter RED/WHITE RCA Adapter ...
.../Black (-) CH 2 - WRANGLER Jeep Wrangler ˜ 16/19 PSS-21WRA Wiring Diagram For Alpine Restyle Headunit To Vehicle Connectors To OBDII Connector OEM Audio Power/Speaker 20-pin Gray Connector ...16-pin Green Connector Alpine Restyle Headunit Recommended Sound Settings Front 63Hz Level +5 Medium 140Hz Level +6 ... Rear Rear Front 4 PIN BLACK CONNECTOR NOT USED Rear LR LR Front Rear L R Connect to Alpine Restyle headunit low level output Subwoofer WHITE/GRAY RCA Adapter GREEN/PURPLE RCA Adapter RED/WHITE RCA Adapter ...


