Installation Manual
Page 1
ALPINE ELECTRONICS OF AMERICA, INC. 19145 Gramercy Place Torrance, California 90501 U.S.A. Tel.: 1-800-ALPINE-1 (1-800-257-4631) ALPINE ELECTRONICS OF CANADA, INC. 7300 Warden Ave. Suite 203, Markham, Ontario L3R 9Z6, Canada Tel.: 1-800-ALPINE-1 (1-800-257-4631) KTX-C10lP is suitable for future reference. License Plate Mounting Kit for Rearview Camera KTX-C10LP • INSTALLATION MANUAL Please read all of these instructions regarding your product and retain them for the rearview camera, HCE-C105 and HCE-C1070.
ALPINE ELECTRONICS OF AMERICA, INC. 19145 Gramercy Place Torrance, California 90501 U.S.A. Tel.: 1-800-ALPINE-1 (1-800-257-4631) ALPINE ELECTRONICS OF CANADA, INC. 7300 Warden Ave. Suite 203, Markham, Ontario L3R 9Z6, Canada Tel.: 1-800-ALPINE-1 (1-800-257-4631) KTX-C10lP is suitable for future reference. License Plate Mounting Kit for Rearview Camera KTX-C10LP • INSTALLATION MANUAL Please read all of these instructions regarding your product and retain them for the rearview camera, HCE-C105 and HCE-C1070.
Installation Manual
Page 2
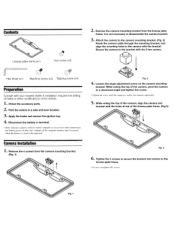
... is disconnected. Disconnect the battery (-) terminal. • Some vehicles contain a vehicle control computer, or accessories that continuously use battelY power. Camera Installation 1. Secure the camera to the license plate frame. • Do not overtighten the screws Remove the 4 screws from the license plate frame. ... Consult with the bracket. Check the accessory parts. 2. Park the vehicle in the camera with your nearest dealer if installation requires the drilling of holes or other modifications of the camera, pivot the camera to disassemble the camera bracket. 3.
... is disconnected. Disconnect the battery (-) terminal. • Some vehicles contain a vehicle control computer, or accessories that continuously use battelY power. Camera Installation 1. Secure the camera to the license plate frame. • Do not overtighten the screws Remove the 4 screws from the license plate frame. ... Consult with the bracket. Check the accessory parts. 2. Park the vehicle in the camera with your nearest dealer if installation requires the drilling of holes or other modifications of the camera, pivot the camera to disassemble the camera bracket. 3.
Installation Manual
Page 3
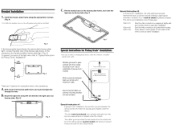
... light. (Fig. 5) To prevent corrosion of three ways: Option #1) Option #2) Option #3) Seal the white connector by wrapping it is instal/ed outside a/the cabin. Apply dielectric white grease to both sides of pickup truck" White connector between the camera and the AV Head Unit... vehicle exterior must be exposed to the connectors: A. Drill a hole in one of the light wire, refer to "Special Instructions for Pickup Truck* Installations" GND Fig. 5 There are included. ~-- ~~(~?~=~l!rY_: L Fig. 4 If the license plate frame blocks the automobile's license plate light, connect...
... light. (Fig. 5) To prevent corrosion of three ways: Option #1) Option #2) Option #3) Seal the white connector by wrapping it is instal/ed outside a/the cabin. Apply dielectric white grease to both sides of pickup truck" White connector between the camera and the AV Head Unit... vehicle exterior must be exposed to the connectors: A. Drill a hole in one of the light wire, refer to "Special Instructions for Pickup Truck* Installations" GND Fig. 5 There are included. ~-- ~~(~?~=~l!rY_: L Fig. 4 If the license plate frame blocks the automobile's license plate light, connect...
Installation Manual
Page 4
...a rubber grommet to prevent the wire's insulation from moving parts (like the seat rails) or sharp or pointed edges. The wiring and installation of other equipment. This will exceed the current carrying capacity of the hole. Failure to heed them can result in place. WHEN USING ...passes through a hole in metal, use only the specified accessory parts. Lh CAUTION This symbol means important instructions. HAVE THE WIRING AND INSTALLATION DONE BY EXPERTS. Failure to heed them can result in hazards or product failure. DO NOT DAMAGE PIPE OR WIRING WHEN DRILLING HOLES....
...a rubber grommet to prevent the wire's insulation from moving parts (like the seat rails) or sharp or pointed edges. The wiring and installation of other equipment. This will exceed the current carrying capacity of the hole. Failure to heed them can result in place. WHEN USING ...passes through a hole in metal, use only the specified accessory parts. Lh CAUTION This symbol means important instructions. HAVE THE WIRING AND INSTALLATION DONE BY EXPERTS. Failure to heed them can result in hazards or product failure. DO NOT DAMAGE PIPE OR WIRING WHEN DRILLING HOLES....
Installation Manual
Page 5
... covers defects in materials or workmanship (parts and labor) in your nearest Authorized Alpine Service Center. If the repairs are covered only in the Owner's manual. @ Damage caused by the installation center. .HOW TO CONTACT CUSTOMER SERVICE: Should the product require service, please call... California 90501, U.S.A. are responsible for delivery of the product to an Authorized Alpine Service Center or Alpine for repair and for payment of any questions, please contact your Alpine car audio product has been installed in the product. .WHAT IS NOT COVERED: This Warranty does not cover ...
... covers defects in materials or workmanship (parts and labor) in your nearest Authorized Alpine Service Center. If the repairs are covered only in the Owner's manual. @ Damage caused by the installation center. .HOW TO CONTACT CUSTOMER SERVICE: Should the product require service, please call... California 90501, U.S.A. are responsible for delivery of the product to an Authorized Alpine Service Center or Alpine for repair and for payment of any questions, please contact your Alpine car audio product has been installed in the product. .WHAT IS NOT COVERED: This Warranty does not cover ...
