

User Manual
Page 4
... Setting Artwork Download (Artwork Display 16 Setting Artwork Type (Artwork Type 16 iPod Search Mode Setting 16 Information In Case of Difficulty 17 Specifications 17 Installation and Connections Warning 18 Caution 18 Precautions 18 Installation Installing the Monitor 19 Mounting the Microphone 20 Connecting the Cigarette Adapter to the Cigarette I/F Box 20...
... Setting Artwork Download (Artwork Display 16 Setting Artwork Type (Artwork Type 16 iPod Search Mode Setting 16 Information In Case of Difficulty 17 Specifications 17 Installation and Connections Warning 18 Caution 18 Precautions 18 Installation Installing the Monitor 19 Mounting the Microphone 20 Connecting the Cigarette Adapter to the Cigarette I/F Box 20...

User Manual
Page 5
... dissolving the paint or damaging the plastic. Return it to your authorized Alpine dealer or the nearest Alpine Service Center for other than its designed application may result in a location subjected to the product. Installation Location Make sure the eX-10 will not be installed in fire or electric shock. Other trademarks and trade names are...
... dissolving the paint or damaging the plastic. Return it to your authorized Alpine dealer or the nearest Alpine Service Center for other than its designed application may result in a location subjected to the product. Installation Location Make sure the eX-10 will not be installed in fire or electric shock. Other trademarks and trade names are...

User Manual
Page 6
... direct sunlight. • The remote control is connected. Keep away from food, moisture and dirt. - Do not place in direct sunshine. • If another Alpine device is installed, it will function at the remote control sensor within 2 m of the remote control sensor of the specified component. Remote control sensor Point the remote...
... direct sunlight. • The remote control is connected. Keep away from food, moisture and dirt. - Do not place in direct sunshine. • If another Alpine device is installed, it will function at the remote control sensor within 2 m of the remote control sensor of the specified component. Remote control sensor Point the remote...

User Manual
Page 7
... manual as illustrated until a click is displayed on the control from the built-in speaker of the car, refer to a complete stop the vehicle in "Installing the Monitor" (page 19). The pairing mode is activated, and connection with a Bluetooth compatible device is available. 4 Set a Bluetooth connection from a Bluetooth compatible device. 5 The...
... manual as illustrated until a click is displayed on the control from the built-in speaker of the car, refer to a complete stop the vehicle in "Installing the Monitor" (page 19). The pairing mode is activated, and connection with a Bluetooth compatible device is available. 4 Set a Bluetooth connection from a Bluetooth compatible device. 5 The...

User Manual
Page 20
... in place. Precautions • If an antenna cable on the bottom of the unit. 18-EN SERIAL NUMBER: INSTALLATION DATE: INSTALLATION TECHNICIAN: PLACE OF PURCHASE: When connecting the eX-10 to provide power for this unit. The serial number or the engraved serial number is located on the car side ... and when triggered the air bag may result in fire or electric shock. Failure to disconnect the cable from the (-) battery post before installing your Alpine dealer. and results in fire. ARRANGE THE WIRING SO IT IS NOT CRIMPED OR PINCHED BY A SHARP METAL EDGE. Moisture or dust ...
... in place. Precautions • If an antenna cable on the bottom of the unit. 18-EN SERIAL NUMBER: INSTALLATION DATE: INSTALLATION TECHNICIAN: PLACE OF PURCHASE: When connecting the eX-10 to provide power for this unit. The serial number or the engraved serial number is located on the car side ... and when triggered the air bag may result in fire or electric shock. Failure to disconnect the cable from the (-) battery post before installing your Alpine dealer. and results in fire. ARRANGE THE WIRING SO IT IS NOT CRIMPED OR PINCHED BY A SHARP METAL EDGE. Moisture or dust ...

User Manual
Page 21
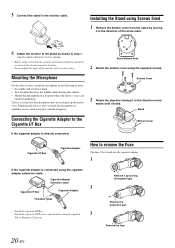
... any dirt on the surface to step 3. A Temporarily fasten the stand with the supplied fixing screws. (For installation, refer to page 20.) 19-EN B Adjust to step 1. 4 Install the stand using the supplied cloth. Install the monitor on the stand securely. Monitor Bracket Stand 2 Check the mounting location. Line of sight Dashboard If...
... any dirt on the surface to step 3. A Temporarily fasten the stand with the supplied fixing screws. (For installation, refer to page 20.) 19-EN B Adjust to step 1. 4 Install the stand using the supplied cloth. Install the monitor on the stand securely. Monitor Bracket Stand 2 Check the mounting location. Line of sight Dashboard If...
User Manual
Page 22
... that the monitor and stand assembly is connected using the cigarette adapter extension cable: Cigarette Adapter Extension Cable 2 Cigarette I/F Box Cigarette Adapter Threaded Types • Install the cigarette I/F Box: Install the cigarette I/F Box in a safe location using the supplied screws. Installing the Stand using , check that can easily be dangerous.
... that the monitor and stand assembly is connected using the cigarette adapter extension cable: Cigarette Adapter Extension Cable 2 Cigarette I/F Box Cigarette Adapter Threaded Types • Install the cigarette I/F Box: Install the cigarette I/F Box in a safe location using the supplied screws. Installing the Stand using , check that can easily be dangerous.