

User Manual
Page 4
... Setting Artwork Download (Artwork Display 16 Setting Artwork Type (Artwork Type 16 iPod Search Mode Setting 16 Information In Case of Difficulty 17 Specifications 17 Installation and Connections Warning 18 Caution 18 Precautions 18 Installation Installing the Monitor 19 Mounting the Microphone 20 Connecting the Cigarette Adapter to the Cigarette I/F Box 20...
... Setting Artwork Download (Artwork Display 16 Setting Artwork Type (Artwork Type 16 iPod Search Mode Setting 16 Information In Case of Difficulty 17 Specifications 17 Installation and Connections Warning 18 Caution 18 Precautions 18 Installation Installing the Monitor 19 Mounting the Microphone 20 Connecting the Cigarette Adapter to the Cigarette I/F Box 20...

User Manual
Page 5
... an accident. USE THIS PRODUCT FOR MOBILE 12V APPLICATIONS. When inserting the batteries, be installed in a location subjected to repair the unit yourself. Installation Location Make sure the eX-10 will not be sure to build up inside the vehicle is under license. Viewing the... sun and heat • High humidity and water • Excessive dust • Excessive vibrations • iPod is the trademark registered by Alpine Electronics, Inc. is between LIM Corporation Ltd., and Chiba University Faculty of Engineering. • "Uni-Type™" is a trademark of ...
... an accident. USE THIS PRODUCT FOR MOBILE 12V APPLICATIONS. When inserting the batteries, be installed in a location subjected to repair the unit yourself. Installation Location Make sure the eX-10 will not be sure to build up inside the vehicle is under license. Viewing the... sun and heat • High humidity and water • Excessive dust • Excessive vibrations • iPod is the trademark registered by Alpine Electronics, Inc. is between LIM Corporation Ltd., and Chiba University Faculty of Engineering. • "Uni-Type™" is a trademark of ...

User Manual
Page 6
... subject the remote control to direct sunlight. • The remote control is installed, it will function at the remote control sensor within 2 m of the remote control sensor of the specified component. Do not put in direct sunshine. • If another Alpine device is a small, lightweight precision device. Accessory List • Monitor 1 •...
... subject the remote control to direct sunlight. • The remote control is installed, it will function at the remote control sensor within 2 m of the remote control sensor of the specified component. Do not put in direct sunshine. • If another Alpine device is a small, lightweight precision device. Accessory List • Monitor 1 •...

User Manual
Page 7
... the Monitor For taking the monitor out of monitor to turn off , and if it is turned on this unit. 6 Input the PIN code in "Installing the Monitor" (page 19). Slide switch on the right: "the LIST switch" Slide switch on when the cigarette lighter power is left forward ▼ or...
... the Monitor For taking the monitor out of monitor to turn off , and if it is turned on this unit. 6 Input the PIN code in "Installing the Monitor" (page 19). Slide switch on the right: "the LIST switch" Slide switch on when the cigarette lighter power is left forward ▼ or...

User Manual
Page 20
...the vehicle. The serial number or the engraved serial number is not installed correctly the air bag may not function correctly and when triggered the air bag may result in locations with your Alpine dealer. BEFORE WIRING THE ANTENNA CABLE ON THE CAR SIDE, DISCONNECT ... connections. If swallowed, consult a physician immediately. IMPORTANT Please record the serial number of your eX-10. Doing so will reduce any other equipment. USE SPECIFIED ACCESSORY PARTS AND INSTALL THEM SECURELY. This will exceed the current carrying capacity of the wire and result in product failure...
...the vehicle. The serial number or the engraved serial number is not installed correctly the air bag may not function correctly and when triggered the air bag may result in locations with your Alpine dealer. BEFORE WIRING THE ANTENNA CABLE ON THE CAR SIDE, DISCONNECT ... connections. If swallowed, consult a physician immediately. IMPORTANT Please record the serial number of your eX-10. Doing so will reduce any other equipment. USE SPECIFIED ACCESSORY PARTS AND INSTALL THEM SECURELY. This will exceed the current carrying capacity of the wire and result in product failure...

User Manual
Page 21
...main unit cannot hit against if you lean forward while you wearing your view. A Temporarily fasten the stand with the supplied fixing screws. (For installation, refer to humidity, within 24 hours after attaching. • If the mount is not firmly stuck, then we recommend that if the surface of... the stand. B Adjust to step 1. 4 Install the stand using the supplied cloth. Monitor Bracket Stand 2 Check the mounting location. When you take the monitor out of the car, remove the monitor...
...main unit cannot hit against if you lean forward while you wearing your view. A Temporarily fasten the stand with the supplied fixing screws. (For installation, refer to humidity, within 24 hours after attaching. • If the mount is not firmly stuck, then we recommend that if the surface of... the stand. B Adjust to step 1. 4 Install the stand using the supplied cloth. Monitor Bracket Stand 2 Check the mounting location. When you take the monitor out of the car, remove the monitor...
User Manual
Page 22
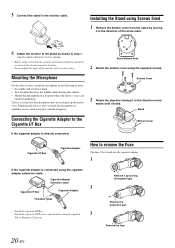
...arrow marks until it by turning it in the direction of the monitor with excessive force. Remove the fuse. 20-EN Installing the Stand using Screws fixed 1 Remove the bottom cover from the stand by turning (Threaded Type) Remove the projection part...adapter is connected using the cigarette adapter extension cable: Cigarette Adapter Extension Cable 2 Cigarette I/F Box Cigarette Adapter Threaded Types • Install the cigarette I/F Box: Install the cigarette I/F Box in a safe location using the supplied 3 Velcro Fasteners (2 pieces). Stand Bottom Side 2 Attach the bottom...
...arrow marks until it by turning it in the direction of the monitor with excessive force. Remove the fuse. 20-EN Installing the Stand using Screws fixed 1 Remove the bottom cover from the stand by turning (Threaded Type) Remove the projection part...adapter is connected using the cigarette adapter extension cable: Cigarette Adapter Extension Cable 2 Cigarette I/F Box Cigarette Adapter Threaded Types • Install the cigarette I/F Box: Install the cigarette I/F Box in a safe location using the supplied 3 Velcro Fasteners (2 pieces). Stand Bottom Side 2 Attach the bottom...