Quick Start Guide
Page 3
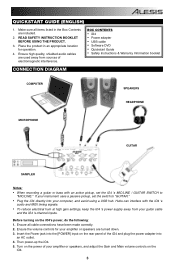
... quality, shielded audio cables are included. 2. Ensure the volume controls for operation. 4. Make sure all cable connections have been made correctly. 2. BOX CONTENTS y iO4 y Power adapter y USB cable y Software DVD y Quickstart Guide y Safety Instructions & Warranty Information booklet CONNECTION DIAGRAM COMPUTER SPEAKERS HEADPHONE MICROPHONE GUITAR SAMPLER Notes: y When recording a guitar or bass with...
... quality, shielded audio cables are included. 2. Ensure the volume controls for operation. 4. Make sure all cable connections have been made correctly. 2. BOX CONTENTS y iO4 y Power adapter y USB cable y Software DVD y Quickstart Guide y Safety Instructions & Warranty Information booklet CONNECTION DIAGRAM COMPUTER SPEAKERS HEADPHONE MICROPHONE GUITAR SAMPLER Notes: y When recording a guitar or bass with...
Quick Start Guide
Page 6
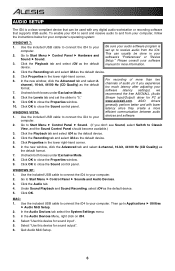
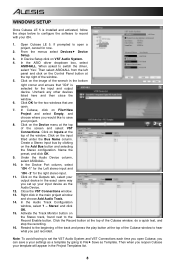
...panel. Click OK to your efficient communication between audio devices and software. Go to and from the iO4. In the Audio Devices Menu, right click on iO4. 4. Select "Use this device for more WINDOWS VISTA: 1. AUDIO SETUP The iO4 is set the slider to Classic View, and the Sound ...receive audio from your computer, follow the instructions below for your iO4 to send and receive audio to Start Menu f Control Panel f Sounds and Audio Devices. 3. Select "Use this device for PC at 9. Be sure your audio software program is a class-compliant device that supports USB audio. ...
...panel. Click OK to your efficient communication between audio devices and software. Go to and from the iO4. In the Audio Devices Menu, right click on iO4. 4. Select "Use this device for more WINDOWS VISTA: 1. AUDIO SETUP The iO4 is set the slider to Classic View, and the Sound ...receive audio from your computer, follow the instructions below for your iO4 to send and receive audio to Start Menu f Control Panel f Sounds and Audio Devices. 3. Select "Use this device for PC at 9. Be sure your audio software program is a class-compliant device that supports USB audio. ...
Quick Start Guide
Page 7
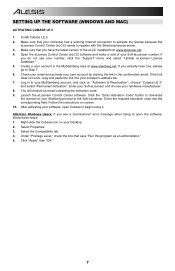
... make a note of the eLCC installed from www.elicenser.net. 4. Launch the eLicenser Control Center software. Under "Privilege Level," check the box that your software, open the software, follow these steps: 1. SETTING UP THE SOFTWARE (WINDOWS AND MAC) ACTIVATING CUBASE LE 5 1. Create a user account in the confirmation email. Log in to download the license...
... make a note of the eLCC installed from www.elicenser.net. 4. Launch the eLicenser Control Center software. Under "Privilege Level," check the box that your software, open the software, follow these steps: 1. SETTING UP THE SOFTWARE (WINDOWS AND MAC) ACTIVATING CUBASE LE 5 1. Create a user account in the confirmation email. Log in to download the license...
Quick Start Guide
Page 8
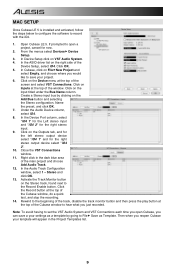
..., you set up your input device as the Audio Device. 12. Click OK for the two windows that "iO4" is installed and activated, follow the steps below to configure the software to the Record Enable button. Under the Audio Device column, select ASIO4ALL. 10. In the Device Port column,... select "iO4 -1" for the Left stereo input and "iO4 - 2" for the right stereo input. 11. Rewind to the beginning of ...
..., you set up your input device as the Audio Device. 12. Click OK for the two windows that "iO4" is installed and activated, follow the steps below to configure the software to the Record Enable button. Under the Audio Device column, select ASIO4ALL. 10. In the Device Port column,... select "iO4 -1" for the Left stereo input and "iO4 - 2" for the right stereo input. 11. Rewind to the beginning of ...
Quick Start Guide
Page 9
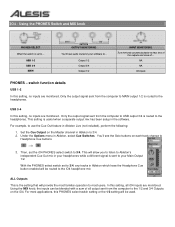
... recorded. Click on the Add Bus button and selecting the Stereo configuration. In the Device Port column, select "iO4 1" for the Left stereo input and "iO4 2" for the right stereo output device select "iO4 2". 10. Close the VST Connections window. 11. In the Audio Track Configuration window, select 1 - Rewind...you open a project, cancel for now. 2. MAC SETUP Once Cubase LE 5 is installed and activated, follow the steps below to configure the software to Filef Save as a template by clicking on Inputs at the top of the screen and select VST Connections. If prompted to the Record ...
... recorded. Click on the Add Bus button and selecting the Stereo configuration. In the Device Port column, select "iO4 1" for the Left stereo input and "iO4 2" for the right stereo output device select "iO4 2". 10. Close the VST Connections window. 11. In the Audio Track Configuration window, select 1 - Rewind...you open a project, cancel for now. 2. MAC SETUP Once Cubase LE 5 is installed and activated, follow the steps below to configure the software to Filef Save as a template by clicking on Inputs at the top of the screen and select VST Connections. If prompted to the Record ...
User Manual
Page 1
..., to hear less of the outputs and more of all iO4 inputs are monitored. Using the PHONES Switch and MIX knob PHONES SELECT When the switch is routed to ... USB 1-2 USB 3-4 MAIN OUTPUT MONITORING You'll hear audio routed in the software. Only the output signal sent from the computer to ... ...Using the MIX knob, the inputs can be used. This will allow you to listen to Ableton's independent Cue Out mix in your software to MAIN output 1/2 is useful when a separate output mix has been setup in your headphones while a different signal is the setting that will be ...
..., to hear less of the outputs and more of all iO4 inputs are monitored. Using the PHONES Switch and MIX knob PHONES SELECT When the switch is routed to ... USB 1-2 USB 3-4 MAIN OUTPUT MONITORING You'll hear audio routed in the software. Only the output signal sent from the computer to ... ...Using the MIX knob, the inputs can be used. This will allow you to listen to Ableton's independent Cue Out mix in your software to MAIN output 1/2 is useful when a separate output mix has been setup in your headphones while a different signal is the setting that will be ...
