
User Manual
Page 1
... display. First you launch the program for the first time - Please remember to check back at the Alesis website (www.alesis.com) for updates to the program and to the Vyzex Vortex User's Guide. Now you should quit any possible conflicts between Vyzex and your Patches...2 What if Vyzex ...couldn't find my Vortex? ...2 Where's the Help for this document. By default, Vyzex Vortex will open every MIDI In and MIDI Out ...
... display. First you launch the program for the first time - Please remember to check back at the Alesis website (www.alesis.com) for updates to the program and to the Vyzex Vortex User's Guide. Now you should quit any possible conflicts between Vyzex and your Patches...2 What if Vyzex ...couldn't find my Vortex? ...2 Where's the Help for this document. By default, Vyzex Vortex will open every MIDI In and MIDI Out ...

User Manual
Page 6
Each zone's specific MIDI channel, velocity curve and pitch shift can be set the split point between upper and lower zones in the current Patch. Vyzex Vortex User's Guide 6 These knobs can be configured to transmit CC, Pitch Bend or Aftertouch messages on patch load for each zone is also ...here. Keybed The Keybed detail page provides a drag-keyboard control that you can click or drag to set here, and the value of your Vortex. Knobs The Knobs detail page provides access to the three central knobs of the volume message sent on individual channels and within user-defined ranges...
Each zone's specific MIDI channel, velocity curve and pitch shift can be set the split point between upper and lower zones in the current Patch. Vyzex Vortex User's Guide 6 These knobs can be configured to transmit CC, Pitch Bend or Aftertouch messages on patch load for each zone is also ...here. Keybed The Keybed detail page provides a drag-keyboard control that you can click or drag to set here, and the value of your Vortex. Knobs The Knobs detail page provides access to the three central knobs of the volume message sent on individual channels and within user-defined ranges...
User Manual
Page 10
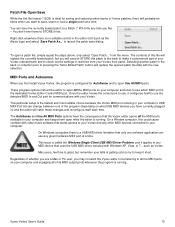
...is configured for communications with Windows XP, Vista, or 7 ...such as the Alesis logo) and select 'Save Patch As...' This particular setup is the fastest and most reliable choice because the Vortex MIDI port ordering in your Vortex. On a Window computer, this patch to the bank to make it a permanent... but you will need to STORE this could cause conflicts with the new selection. to a Patch (*.PCH) file any other MIDI devices connected to your Vortex front panel. Selecting another patch in the bank or collection prior to pressing the 'Store Edited Patch' button will replace the ...
...is configured for communications with Windows XP, Vista, or 7 ...such as the Alesis logo) and select 'Save Patch As...' This particular setup is the fastest and most reliable choice because the Vortex MIDI port ordering in your Vortex. On a Window computer, this patch to the bank to make it a permanent... but you will need to STORE this could cause conflicts with the new selection. to a Patch (*.PCH) file any other MIDI devices connected to your Vortex front panel. Selecting another patch in the bank or collection prior to pressing the 'Store Edited Patch' button will replace the ...

User Manual
Page 11
...details. Now repeat this point, Vyzex Vortex has been reconfigured to manually use only the ports you may have to manually update these companion PDFs are also accessible from the application's main menu and uncheck the 'Use All Available MIDI Ports' option: Ensure that the program... system in the future you have selected. Just as with the the MIDI > MIDI Out Ports... This concludes the Vyzex Vortex User's Guide. Should you add or remove USB MIDI Devices to MIDI port selection, open the MIDI > MIDI In Ports... At this process with this document, these settings afterwards. ...
...details. Now repeat this point, Vyzex Vortex has been reconfigured to manually use only the ports you may have to manually update these companion PDFs are also accessible from the application's main menu and uncheck the 'Use All Available MIDI Ports' option: Ensure that the program... system in the future you have selected. Just as with the the MIDI > MIDI Out Ports... This concludes the Vyzex Vortex User's Guide. Should you add or remove USB MIDI Devices to MIDI port selection, open the MIDI > MIDI In Ports... At this process with this document, these settings afterwards. ...
Quick Start Guide
Page 3
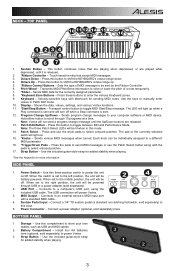
... Connector - Battery Compartment - Press these buttons to power Vortex. 3. Program Change Up/Down - Note: Vortex will be 2 4 battery-powered. Use this button to power the unit on/off when a Stop command is released. 2. 3. *Ribbon Controller - Connects to shift the KEYBOARD's omcetasvseagrae1nsg. Keyboard - Sends various MIDI messages when turned. USB Port - BOTTOM PANEL 1. Press...
... Connector - Battery Compartment - Press these buttons to power Vortex. 3. Program Change Up/Down - Note: Vortex will be 2 4 battery-powered. Use this button to power the unit on/off when a Stop command is released. 2. 3. *Ribbon Controller - Connects to shift the KEYBOARD's omcetasvseagrae1nsg. Keyboard - Sends various MIDI messages when turned. USB Port - BOTTOM PANEL 1. Press...
Quick Start Guide
Page 4
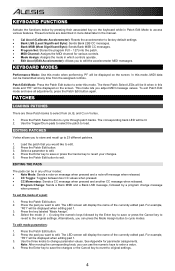
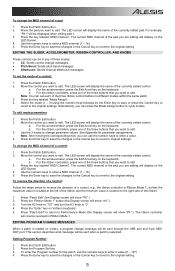
...keys to 23 different patches. 1. KEYBOARD MODES Performance Mode: Use this mode. The corresponding bank LED will be lit. 2. EDITING PATCHES Vortex allows you want to edit. Press the key labeled "Mode Assign". 4. PF will be displayed on the screen. Press the Patch ...Most Significant Byte): Sends Bank MSB CC messages. • Program Set: Stores the program # (0 - 127) into the patch. • MIDI Channel: Assigns the MIDI channel for parameter assignments. The LED screen will display the name of a pad: 1. These functions are three Patch banks to the original settings...
...keys to 23 different patches. 1. KEYBOARD MODES Performance Mode: Use this mode. The corresponding bank LED will be lit. 2. EDITING PATCHES Vortex allows you want to edit. Press the key labeled "Mode Assign". 4. PF will be displayed on the screen. Press the Patch ...Most Significant Byte): Sends Bank MSB CC messages. • Program Set: Stores the program # (0 - 127) into the patch. • MIDI Channel: Assigns the MIDI channel for parameter assignments. The LED screen will display the name of a pad: 1. These functions are three Patch banks to the original settings...
Quick Start Guide
Page 5
...left of the ribbon and the minimum value is located on Vortex, a program change message will show "PF".). The ribbon controller will be sent through the USB port and 5-pin MIDI OUT port. Press the key labeled "MIDI Channel". For the ribbon controllers, press one of the ...to revert to enter a MIDI channel (1 - 16). 5. To enter the Program number for parameter assignments. For the ribbon controllers, press one of the currently edited control. To set each of the currently edited control. For the accelerometer, press the Edit Accel key on Vortex's keyboard. 5. Use ...
...left of the ribbon and the minimum value is located on Vortex, a program change message will show "PF".). The ribbon controller will be sent through the USB port and 5-pin MIDI OUT port. Press the key labeled "MIDI Channel". For the ribbon controllers, press one of the ...to revert to enter a MIDI channel (1 - 16). 5. To enter the Program number for parameter assignments. For the ribbon controllers, press one of the currently edited control. To set each of the currently edited control. For the accelerometer, press the Edit Accel key on Vortex's keyboard. 5. Use ...
Quick Start Guide
Page 6
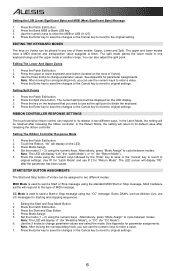
... parameter has been saved. Use #1 for "Latch Mode" and use CC messages for "Return Mode". START/STOP BUTTON ASSIGNMENTS The Start and Stop button of Vortex). 3. Some DAWs, such as the split point to change parameter values and select the mode. Press the Start and Stop Button. 4. Set the mode (1 ...modes. The current split point will be displayed on the LED display. 3. Note: The LED will display on Vortex can respond to send a Start or Stop message using the standard MIDI Start or Stop message. Press the Enter key to save or the 'Cancel' key to revert to change parameter...
... parameter has been saved. Use #1 for "Latch Mode" and use CC messages for "Return Mode". START/STOP BUTTON ASSIGNMENTS The Start and Stop button of Vortex). 3. Some DAWs, such as the split point to change parameter values and select the mode. Press the Start and Stop Button. 4. Set the mode (1 ...modes. The current split point will be displayed on the LED display. 3. Note: The LED will display on Vortex can respond to send a Start or Stop message using the standard MIDI Start or Stop message. Press the Enter key to save or the 'Cancel' key to revert to change parameter...
Quick Start Guide
Page 7
... will be mapped to set calibrated threshold (45 degrees by default). Press "Patch Edit" to return to download the Sonivox Vortex-I DVi 1. "XY1" will only send MIDI messages when Vortex is lit. 3. Visit the Alesis Vortex support page to Performance Mode. (the Display screen will show "PF") CALIBRATING THE ACCELEROMETER 1. The display screen will show...
... will be mapped to set calibrated threshold (45 degrees by default). Press "Patch Edit" to return to download the Sonivox Vortex-I DVi 1. "XY1" will only send MIDI messages when Vortex is lit. 3. Visit the Alesis Vortex support page to Performance Mode. (the Display screen will show "PF") CALIBRATING THE ACCELEROMETER 1. The display screen will show...
Quick Start Guide
Page 35
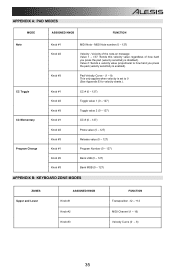
APPENDIX A: PAD MODES MODE ASSIGNED KNOB FUNCTION Note Knob #1 Knob #2 MIDI Note - CC Toggle Knob #1 Knob #2 CC # (0 - 127) Toggle value 1 (0 - 127) CC Momentary Knob #3 Knob #1 Toggle value 2 (0 - 127) CC # (0 - 127) Program Change ... Bank LSB (0 - 127) Bank MSB (0 - 127) APPENDIX B: KEYBOARD ZONE MODES ZONES Upper and Lower ASSIGNED KNOB Knob #1 Knob #2 Knob #3 FUNCTION Transposition -12 - +12 MIDI Channel (1 - 16) Velocity Curve (0 - 8) 35 Value 0: Sends a velocity value proportional to 0 (See Appendix E for velocity charts.). Velocity of the note-on message Value 1...
APPENDIX A: PAD MODES MODE ASSIGNED KNOB FUNCTION Note Knob #1 Knob #2 MIDI Note - CC Toggle Knob #1 Knob #2 CC # (0 - 127) Toggle value 1 (0 - 127) CC Momentary Knob #3 Knob #1 Toggle value 2 (0 - 127) CC # (0 - 127) Program Change ... Bank LSB (0 - 127) Bank MSB (0 - 127) APPENDIX B: KEYBOARD ZONE MODES ZONES Upper and Lower ASSIGNED KNOB Knob #1 Knob #2 Knob #3 FUNCTION Transposition -12 - +12 MIDI Channel (1 - 16) Velocity Curve (0 - 8) 35 Value 0: Sends a velocity value proportional to 0 (See Appendix E for velocity charts.). Velocity of the note-on message Value 1...

Quick Start Guide
Page 36
... #2 Knob #3 Pitch Bend Aftertouch Knob #1 Knob #2 Knob #3 Knob #1 Knob #2 Knob #3 APPENDIX D: START AND STOP ASSIGNMENTS MODE Realtime MIDI Mode ASSIGNED KNOB Knob #1 CC Mode Knob #2 Knob #3 Knob #1 Knob #2 FUNCTION CC # (0 - 127) Range Min (0 - 127) Range Max (0 - 127...) MIDI Channel (1 - 16) Range Min (0 - 127) Range Max (0 - 127) MIDI Channel (1 - 16) Range Min (0 - 127) Range Max (0 - 127) FUNCTION Change Mode (0 - 63) Realtime MIDI Mode (64 - 127) CC Mode No effect No effect Change Mode (0 - 63) Realtime...
... #2 Knob #3 Pitch Bend Aftertouch Knob #1 Knob #2 Knob #3 Knob #1 Knob #2 Knob #3 APPENDIX D: START AND STOP ASSIGNMENTS MODE Realtime MIDI Mode ASSIGNED KNOB Knob #1 CC Mode Knob #2 Knob #3 Knob #1 Knob #2 FUNCTION CC # (0 - 127) Range Min (0 - 127) Range Max (0 - 127...) MIDI Channel (1 - 16) Range Min (0 - 127) Range Max (0 - 127) MIDI Channel (1 - 16) Range Min (0 - 127) Range Max (0 - 127) FUNCTION Change Mode (0 - 63) Realtime MIDI Mode (64 - 127) CC Mode No effect No effect Change Mode (0 - 63) Realtime...
Quick Start Guide
Page 38
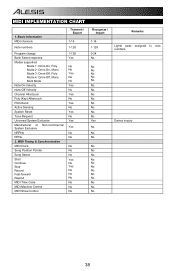
... Song Position Pointer Song Select Start Continue Stop Record Fast-forward Rewind MIDI Time Code MIDI Machine Control MIDI Show Control Transmit / Export 1-16 1-128 1-128 Yes No No Yes No No Yes No Yes No Yes No Yes No Yes Yes No No ... No No No No No No No No No No No No No Remarks Lights pads assigned to note numbers Device inquiry 38 MIDI IMPLEMENTATION CHART 1. Basic Information MIDI channels Note numbers Program change Bank Select response Modes supported: Mode 1: Omni-On, Poly Mode 2: Omni-On, Mono Mode 3: Omni-Off, Poly Mode...
... Song Position Pointer Song Select Start Continue Stop Record Fast-forward Rewind MIDI Time Code MIDI Machine Control MIDI Show Control Transmit / Export 1-16 1-128 1-128 Yes No No Yes No No Yes No Yes No Yes No Yes No Yes Yes No No ... No No No No No No No No No No No No No Remarks Lights pads assigned to note numbers Device inquiry 38 MIDI IMPLEMENTATION CHART 1. Basic Information MIDI channels Note numbers Program change Bank Select response Modes supported: Mode 1: Omni-On, Poly Mode 2: Omni-On, Mono Mode 3: Omni-Off, Poly Mode...


