
User Manual
Page 2
...Recording 4 1.2D What's a Voice 4 1.2E About Defaults 4 1.2F Physical Layout 5 1.2G Display Layout 6 1.2H Text Protocols 6 1.3 IMPORTANT HOW TO COMMUNICATE WITH THE SR-16 7 1.3A Entering Numbers 7 1.3B The Cursor...7 1.3C Leading Zeroes 7 1.3D Automatic Revert 7 1.3E The INC/DEC Buttons 7 1.3F Buttons that Toggle 8 1.4 10 ... 15 2.9 PAGE 9: STEP MODE RECORDING (STEP MODE 15 2.9A Add a New Drum to a Step 17 2.9B Erase a Drum Sound From a Step 17 2.9C Change a Drum Sound's Volume in a Given Step 17 2.9D Exit Step Mode 17 2.10 PAGE 10: NAME THE PATTERN (NAME 17 CHAPTER 3: PLAYING...
...Recording 4 1.2D What's a Voice 4 1.2E About Defaults 4 1.2F Physical Layout 5 1.2G Display Layout 6 1.2H Text Protocols 6 1.3 IMPORTANT HOW TO COMMUNICATE WITH THE SR-16 7 1.3A Entering Numbers 7 1.3B The Cursor...7 1.3C Leading Zeroes 7 1.3D Automatic Revert 7 1.3E The INC/DEC Buttons 7 1.3F Buttons that Toggle 8 1.4 10 ... 15 2.9 PAGE 9: STEP MODE RECORDING (STEP MODE 15 2.9A Add a New Drum to a Step 17 2.9B Erase a Drum Sound From a Step 17 2.9C Change a Drum Sound's Volume in a Given Step 17 2.9D Exit Step Mode 17 2.10 PAGE 10: NAME THE PATTERN (NAME 17 CHAPTER 3: PLAYING...
User Manual
Page 3
...26 3.3E Copy a Single Drum Pad's Part to a Drum Pad in Another SR-16 Via MIDI............27 3.3F Copy a Drum Set to Another SR-16 Via MIDI 27 CHAPTER 4: CREATING DRUM SETS 28 4.1 PAGE 1: SELECT DRUM SET (DRUMSET SELECT 28 4.2 PAGE 2: ASSIGN SOUNDS TO PADS 29 4.3 PAGE 3: SET PAD VOLUME (VOLUME 29 4.4 PAGE 4:...1D "Loop" a Pattern Indefinitely 36 5.1E Start from the Middle of a Song 36 5.1F Name a Song (NAME 36 5.1G Change Song Tempo as the SR-16 Plays 37 5.2 REAL TIME SONG CREATION 37 5.2A Real Time Song Editing 37 5.3 MANUAL SONG CREATION 38 5.3A Enter a Pattern 38 5.3B Add a Fill......
...26 3.3E Copy a Single Drum Pad's Part to a Drum Pad in Another SR-16 Via MIDI............27 3.3F Copy a Drum Set to Another SR-16 Via MIDI 27 CHAPTER 4: CREATING DRUM SETS 28 4.1 PAGE 1: SELECT DRUM SET (DRUMSET SELECT 28 4.2 PAGE 2: ASSIGN SOUNDS TO PADS 29 4.3 PAGE 3: SET PAD VOLUME (VOLUME 29 4.4 PAGE 4:...1D "Loop" a Pattern Indefinitely 36 5.1E Start from the Middle of a Song 36 5.1F Name a Song (NAME 36 5.1G Change Song Tempo as the SR-16 Plays 37 5.2 REAL TIME SONG CREATION 37 5.2A Real Time Song Editing 37 5.3 MANUAL SONG CREATION 38 5.3A Enter a Pattern 38 5.3B Add a Fill......
User Manual
Page 4
.../RE-INITIALIZE PARAMETERS 55 7.12 CHECK SOFTWARE VERSION 55 CHAPTER 8: APPLICATIONS 56 8.1 MIDI SYNC APPLICATIONS 56 8.1A SR-16 As MIDI Timing Master 56 8.1B SR-16 as MIDI Timing Slave 57 8.1C Synching to Synthesizer Sequencers 57 8.2 STRATEGIES FOR ASSEMBLING PATTERNS AND SONGS 58 8.2A... Function 58 8.2C Save Memory Through Song Steps 58 8.2D Odd Time Signatures 58 8.3 SOUND STACKING...59 8.3A Basics...59 8.3B Sound Stacking via MIDI 59 8.3C Sound Stacking when Using the SR-16 as a Drum Machine 59 8.3D Editing Stacked Combinations 59 8.4 UNDERSTANDING RHYTHMIC NOTATION 60 CHAPTER...
.../RE-INITIALIZE PARAMETERS 55 7.12 CHECK SOFTWARE VERSION 55 CHAPTER 8: APPLICATIONS 56 8.1 MIDI SYNC APPLICATIONS 56 8.1A SR-16 As MIDI Timing Master 56 8.1B SR-16 as MIDI Timing Slave 57 8.1C Synching to Synthesizer Sequencers 57 8.2 STRATEGIES FOR ASSEMBLING PATTERNS AND SONGS 58 8.2A... Function 58 8.2C Save Memory Through Song Steps 58 8.2D Odd Time Signatures 58 8.3 SOUND STACKING...59 8.3A Basics...59 8.3B Sound Stacking via MIDI 59 8.3C Sound Stacking when Using the SR-16 as a Drum Machine 59 8.3D Editing Stacked Combinations 59 8.4 UNDERSTANDING RHYTHMIC NOTATION 60 CHAPTER...
User Manual
Page 5
...takes you find the SR-16 a rewarding tool for your fancy). 1.1B SR-16 Quick Description The SR-16 includes over 230 high-fidelity drum/percussion sounds, and is easy to save them together into practice and come up the SR-16 to use the SR-16 as part of the SR-16's design team has been...Setup: Here's how to record and edit drum parts. 3. They thank you for self-expression that you through every function of the available sounds), the SR-16's on copying and erasing. 4. Playing Back and Recording Drum Patterns: Put theory into Songs. 6. Each Pattern can also create and modify ...
...takes you find the SR-16 a rewarding tool for your fancy). 1.1B SR-16 Quick Description The SR-16 includes over 230 high-fidelity drum/percussion sounds, and is easy to save them together into practice and come up the SR-16 to use the SR-16 as part of the SR-16's design team has been...Setup: Here's how to record and edit drum parts. 3. They thank you for self-expression that you through every function of the available sounds), the SR-16's on copying and erasing. 4. Playing Back and Recording Drum Patterns: Put theory into Songs. 6. Each Pattern can also create and modify ...
User Manual
Page 6
...'t be a priority. MIDI Supplement: This brief, entry-level explanation of two main elements: • The drum sounds themselves, recorded using16-bit resolution (the same resolution as CDs). The SR-16 is important to a verse, chorus, bridge, instrumental, intro, etc. 8. A typical Pattern might be edited) ... warranty card. For additional realism, many sounds use advanced "dynamic articulation" techniques so that you get the most out of which can switch between these while the SR-16 is playing, making it easy to use the SR-16 as quantization and output assignments, will help...
...'t be a priority. MIDI Supplement: This brief, entry-level explanation of two main elements: • The drum sounds themselves, recorded using16-bit resolution (the same resolution as CDs). The SR-16 is important to a verse, chorus, bridge, instrumental, intro, etc. 8. A typical Pattern might be edited) ... warranty card. For additional realism, many sounds use advanced "dynamic articulation" techniques so that you get the most out of which can switch between these while the SR-16 is playing, making it easy to use the SR-16 as quantization and output assignments, will help...
User Manual
Page 8
...up with Pattern 23 selected. 4 You will record through all 8 beats, then immediately jump back to your liking. Each pad is looping to go; The SR-16 includes a default setup that 's instantly ready to correct for errors. 1.2D What's a Voice? However, you 'll need to change only a few ...it . Example: When you turn on the pads. Example: Suppose you purposely change as a drum sound expander and triggering sounds via MIDI, they respond to Perform mode. Thanks to loud. The SR-16 will be in record mode, and continue to loop, until you want to go to either one of...
...up with Pattern 23 selected. 4 You will record through all 8 beats, then immediately jump back to your liking. Each pad is looping to go; The SR-16 includes a default setup that 's instantly ready to correct for errors. 1.2D What's a Voice? However, you 'll need to change only a few ...it . Example: When you turn on the pads. Example: Suppose you purposely change as a drum sound expander and triggering sounds via MIDI, they respond to Perform mode. Thanks to loud. The SR-16 will be in record mode, and continue to loop, until you want to go to either one of...
User Manual
Page 12
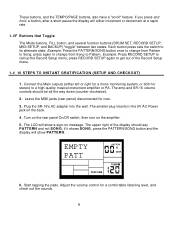
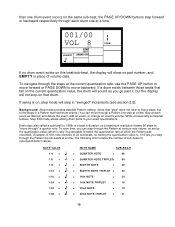
... controls should say PATTERN and not SONG; Plug the SR-16's AC adapter into the wall. The LCD will show PATTERN. EMPTY PATT PATTERN A USER PRESS PLAY TEMPO PERFORM 6. If you press and hold a button, after a ... PATTERN/SONG button once to change from Pattern to Pattern. Leave the MIDI jacks (rear panel) disconnected for a comfortable listening level, and check out the sounds. 8 The upper right of the Record Setup menu. 1.4 10 STEPS TO INSTANT GRATIFICATION (SETUP AND CHECKOUT) 1. These buttons, and the TEMPO/PAGE buttons, also have...
... controls should say PATTERN and not SONG; Plug the SR-16's AC adapter into the wall. The LCD will show PATTERN. EMPTY PATT PATTERN A USER PRESS PLAY TEMPO PERFORM 6. If you press and hold a button, after a ... PATTERN/SONG button once to change from Pattern to Pattern. Leave the MIDI jacks (rear panel) disconnected for a comfortable listening level, and check out the sounds. 8 The upper right of the Record Setup menu. 1.4 10 STEPS TO INSTANT GRATIFICATION (SETUP AND CHECKOUT) 1. These buttons, and the TEMPO/PAGE buttons, also have...
User Manual
Page 15
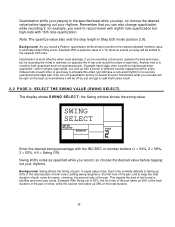
...value notes. If you record, so choose the desired value before tapping out your rhythms. Background Swing affects the timing of pairs of 1/16, all drum events to the nearest selected rhythmic value to keep the total duration of both notes; A good way to simulate this effect ...VALUE (SWING SELECT) The display shows SWING SELECT; SWING SELECT SETUP RECORD SWINGOFF PAGE Enter the desired swing percentage with a bunch of different sounds happening within a few milliseconds of the total duration. 11 adding swing lengthens the first note of the pair, and to eliminate small timing ...
...value notes. If you record, so choose the desired value before tapping out your rhythms. Background Swing affects the timing of pairs of 1/16, all drum events to the nearest selected rhythmic value to keep the total duration of both notes; A good way to simulate this effect ...VALUE (SWING SELECT) The display shows SWING SELECT; SWING SELECT SETUP RECORD SWINGOFF PAGE Enter the desired swing percentage with a bunch of different sounds happening within a few milliseconds of the total duration. 11 adding swing lengthens the first note of the pair, and to eliminate small timing ...
User Manual
Page 17
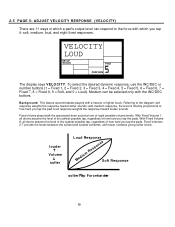
...RECORD PAGE PERFORM The display says VELOCITY. Medium can respond to the diagram, soft response weights the response toward louder sounds. Fixed volume plays back the associated drum sound at one of how hard you tap the pads. With Fixed Volume 8, all drums assume the level of the... force with which a pad's output level can be selected only with lower numbers giving softer levels. loud response weights the response toward softer sounds; With Fixed Volume 1, all drums assume the level of the loudest possible tap, regardless of eight possible volume levels. Fixed Volumes 2-7 provide...
...RECORD PAGE PERFORM The display says VELOCITY. Medium can respond to the diagram, soft response weights the response toward louder sounds. Fixed volume plays back the associated drum sound at one of how hard you tap the pads. With Fixed Volume 8, all drums assume the level of the... force with which a pad's output level can be selected only with lower numbers giving softer levels. loud response weights the response toward softer sounds; With Fixed Volume 1, all drums assume the level of the loudest possible tap, regardless of eight possible volume levels. Fixed Volumes 2-7 provide...
User Manual
Page 20
... and delete the event, add an event, or change an event's volume. Background Step mode provides detailed Pattern editing. (Note that drum. NOTE VALUE 1/4 = 1/6 = 1/8 = 1/12 = 1/16 = 1/24 = 1/32 = 1/48 = NOTE NAME SUB-BEATS = QUARTER NOTE = 96 3 = QUARTER NOTE TRIPLET= 64 = EIGHTH NOTE = 48 3 = EIGHTH NOTE TRIPLET = 32 ...If a drum exists between those beats that hold drum events.) You can step through the Pattern at which is on, step mode will sound as you go past it 's preferable to "move through the Pattern 24 sub-beats at a time. The following chart relates the number...
... and delete the event, add an event, or change an event's volume. Background Step mode provides detailed Pattern editing. (Note that drum. NOTE VALUE 1/4 = 1/6 = 1/8 = 1/12 = 1/16 = 1/24 = 1/32 = 1/48 = NOTE NAME SUB-BEATS = QUARTER NOTE = 96 3 = QUARTER NOTE TRIPLET= 64 = EIGHTH NOTE = 48 3 = EIGHTH NOTE TRIPLET = 32 ...If a drum exists between those beats that hold drum events.) You can step through the Pattern at which is on, step mode will sound as you go past it 's preferable to "move through the Pattern 24 sub-beats at a time. The following chart relates the number...
User Manual
Page 22
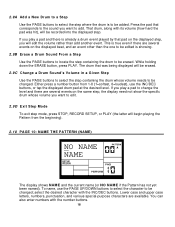
...characters are several events on the same step, the display need not show the specific drum whose volume needs to be erased. 2.9C Change a Drum Sound's Volume in a Given Step Use the PAGE buttons to select the step containing the drum whose volume you will begin playing the Pattern from 1-8 (1=softest...select the step where the drum is true even if there are available. Press the pad that corresponds to the sound you play a pad and there is showing. 2.9B Erase a Drum Sound From a Step Use the PAGE buttons to locate the step containing the drum to be recorded into the displayed step...
...characters are several events on the same step, the display need not show the specific drum whose volume needs to be erased. 2.9C Change a Drum Sound's Volume in a Given Step Use the PAGE buttons to select the step containing the drum whose volume you will begin playing the Pattern from 1-8 (1=softest...select the step where the drum is true even if there are available. Press the pad that corresponds to the sound you play a pad and there is showing. 2.9B Erase a Drum Sound From a Step Use the PAGE buttons to locate the step containing the drum to be recorded into the displayed step...
User Manual
Page 27
...if MIDI is plugged into the drums when the SR-16 is not recording (i.e., the SR16 serves as mentioned earlier, that you 're recording. Remember that the Fill also plays the downbeat of the next Pattern. You will hear any drum sounds already recorded in record mode. Other parameters can be... record process so that triggers corresponding drum notes. If you can record into the Pattern, tap the drum pads, or send MIDI data to the SR-16 (sections 6.1 and 6.2) that you need to change the length, it , like a standard Pattern. The Pattern will "loop" during the recording process, ...
...if MIDI is plugged into the drums when the SR-16 is not recording (i.e., the SR16 serves as mentioned earlier, that you 're recording. Remember that the Fill also plays the downbeat of the next Pattern. You will hear any drum sounds already recorded in record mode. Other parameters can be... record process so that triggers corresponding drum notes. If you can record into the Pattern, tap the drum pads, or send MIDI data to the SR-16 (sections 6.1 and 6.2) that you need to change the length, it , like a standard Pattern. The Pattern will "loop" during the recording process, ...
User Manual
Page 28
Immediately after pressing the pad, press and hold it can also trigger a drum sound at the same volume as the pad and FILL buttons are held down . 3. All hits will be in Compose mode and recording. 2. The drum will ... the first beat of drum hits without having to create steady 16th note hi-hat parts, quarter note kick drum parts, snare rolls, etc. 1. The SR-16 should be retriggered at the current quantization rate for Pattern selection, however, it down . We've already covered how to Create Repetitive Drum Hits As...
Immediately after pressing the pad, press and hold it can also trigger a drum sound at the same volume as the pad and FILL buttons are held down . 3. All hits will be in Compose mode and recording. 2. The drum will ... the first beat of drum hits without having to create steady 16th note hi-hat parts, quarter note kick drum parts, snare rolls, etc. 1. The SR-16 should be retriggered at the current quantization rate for Pattern selection, however, it down . We've already covered how to Create Repetitive Drum Hits As...
User Manual
Page 29
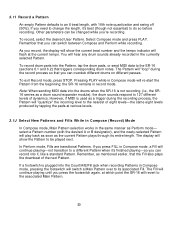
...be erased with the current quantization and swing values; 3.2 ERASE FUNCTIONS 3.2A Erase Mistakes While Recording While the SR-16 is recording, you can continue to erase more drum sounds while ERASE is empty, the Drum Set assignment (but retains all other Pattern parameters. 3.2C Erase All Events...event or series of 8 beats). Erasure occurs only on that pad. The display will remember the Drum Set assignment, name, and length. 1. The SR-16 should be erased. To erase while recording, see section 3.2A. 2. Press and hold ERASE. 3. While continuing to hold the ERASE button, press...
...be erased with the current quantization and swing values; 3.2 ERASE FUNCTIONS 3.2A Erase Mistakes While Recording While the SR-16 is recording, you can continue to erase more drum sounds while ERASE is empty, the Drum Set assignment (but retains all other Pattern parameters. 3.2C Erase All Events...event or series of 8 beats). Erasure occurs only on that pad. The display will remember the Drum Set assignment, name, and length. 1. The SR-16 should be erased. To erase while recording, see section 3.2A. 2. Press and hold ERASE. 3. While continuing to hold the ERASE button, press...
User Manual
Page 30
...; The only copy technique that already contains data appends the original data to another Main Pattern. 3.3A Copy, Append, and Double Patterns 1. The SR-16 should be copied with the INC/DEC or number buttons. • Copying a Pattern to a blank destination Pattern replaces the blank Pattern with the... to a non-empty Pattern or to Fill (or vice-versa) within a particular numbered Pattern, the destination will be copied and any drum sound assigned to another Pattern is empty (no recorded pattern), the source pattern will be copied. 3. If this would result in a Pattern with more...
...; The only copy technique that already contains data appends the original data to another Main Pattern. 3.3A Copy, Append, and Double Patterns 1. The SR-16 should be copied with the INC/DEC or number buttons. • Copying a Pattern to a blank destination Pattern replaces the blank Pattern with the... to a non-empty Pattern or to Fill (or vice-versa) within a particular numbered Pattern, the destination will be copied and any drum sound assigned to another Pattern is empty (no recorded pattern), the source pattern will be copied. 3. If this would result in a Pattern with more...
User Manual
Page 33
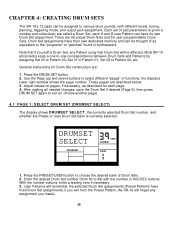
... or "patches" found in synthesizers. DRUMSET SELECT DRUM SET USER DRUMSET PAGE 1. Enter the desired Drum Set number (from the Preset Pattern, the SR-16 will remember the selected Drum Set assignments (Preset Patterns have their own dedicated memory and can be affected. Press the PRESET/USER button to choose... Set 00 to Pattern 00, Set 01 to Pattern 01, Set 02 to Pattern 02, etc. CHAPTER 4: CREATING DRUM SETS The SR-16's 12 pads can be assigned to various drum sounds, with the number or INC/DEC buttons. each page. 4. the display's lower right window shows the page number.
... or "patches" found in synthesizers. DRUMSET SELECT DRUM SET USER DRUMSET PAGE 1. Enter the desired Drum Set number (from the Preset Pattern, the SR-16 will remember the selected Drum Set assignments (Preset Patterns have their own dedicated memory and can be affected. Press the PRESET/USER button to choose... Set 00 to Pattern 00, Set 01 to Pattern 01, Set 02 to Pattern 02, etc. CHAPTER 4: CREATING DRUM SETS The SR-16's 12 pads can be assigned to various drum sounds, with the number or INC/DEC buttons. each page. 4. the display's lower right window shows the page number.
User Manual
Page 34
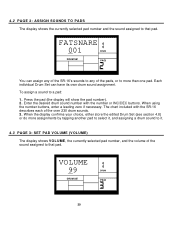
Enter the desired drum sound number with the SR-16 describes each of the sound assigned to that pad. When using the number buttons, enter a leading zero if necessary. To assign a sound to a pad: 1. When the display confirms your choice, either store the edited Drum Set (see section 4.8) or do more than one pad. Press the... pad (the display will show the pad number). 2. Each individual Drum Set can assign any of the SR-16's sounds to any of the pads, or to more assignments by tapping another pad to select it, and assigning a drum...
Enter the desired drum sound number with the SR-16 describes each of the sound assigned to that pad. When using the number buttons, enter a leading zero if necessary. To assign a sound to a pad: 1. When the display confirms your choice, either store the edited Drum Set (see section 4.8) or do more than one pad. Press the... pad (the display will show the pad number). 2. Each individual Drum Set can assign any of the SR-16's sounds to any of the pads, or to more assignments by tapping another pad to select it, and assigning a drum...
User Manual
Page 35
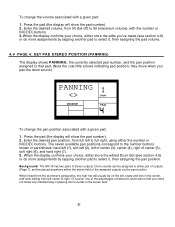
...The seven available pan positions correspond to either pair of outputs (Page 7), and be placed anywhere within the stereo field of placing drum sounds in the center, and toms trailing from the drummer's perspective, the high-hat will usually be on the left of center (3), center ...of stereo outputs. they move when you pan the drum sound.) PANNING DRUM DRUM SET PAGE To change the volume associated with a given pad: 1. Background The SR-16 has two pairs of center (5), soft right (6), and hard right (7). 3. Drum sounds can be assigned to the number buttons shown in parenthesis...
...The seven available pan positions correspond to either pair of outputs (Page 7), and be placed anywhere within the stereo field of placing drum sounds in the center, and toms trailing from the drummer's perspective, the high-hat will usually be on the left of center (3), center ...of stereo outputs. they move when you pan the drum sound.) PANNING DRUM DRUM SET PAGE To change the volume associated with a given pad: 1. Background The SR-16 has two pairs of center (5), soft right (6), and hard right (7). 3. Drum sounds can be assigned to the number buttons shown in parenthesis...
User Manual
Page 37
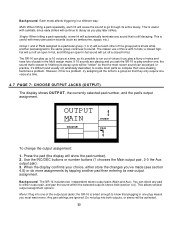
...cycle will be "stolen" so that the most recent sound can direct any sound that 's closest to sound. When the display confirms your choice, either output pair, and pan the sound within the selected output's stereo field (section 4.4). the SR-16 is a problem, try assigning all the toms to ...change the output assignment: 1. Background The SR-16 includes two independent stereo output pairs (Main and Aux). In practice, it 's possible to know that plugging in one , the sound that is with hi-hats; This is useful with many percussion sounds (such as you play later strikes. ...
...cycle will be "stolen" so that the most recent sound can direct any sound that 's closest to sound. When the display confirms your choice, either output pair, and pan the sound within the selected output's stereo field (section 4.4). the SR-16 is a problem, try assigning all the toms to ...change the output assignment: 1. Background The SR-16 includes two independent stereo output pairs (Main and Aux). In practice, it 's possible to know that plugging in one , the sound that is with hi-hats; This is useful with many percussion sounds (such as you play later strikes. ...
User Manual
Page 38
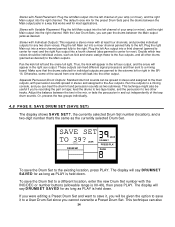
...any two drum voices. To save the Drum Set to the right. With the User Drum Sets, you can treat the drum kit and percussion sounds as two submixes. Stereo with Individual Outputs: This requires a stereo mixer with at least four channels, and provides individual outputs for now). Plug ...the left Main out into a mixer channel panned fully to the existing location, press PLAY. Separate Percussion/Drum Outputs: Standard drum kit sounds can pan the drums between the Main output jacks as PLAY is 00-49), then press PLAY. Or, process the two groups individually. 4.8 PAGE ...
...any two drum voices. To save the Drum Set to the right. With the User Drum Sets, you can treat the drum kit and percussion sounds as two submixes. Stereo with Individual Outputs: This requires a stereo mixer with at least four channels, and provides individual outputs for now). Plug ...the left Main out into a mixer channel panned fully to the existing location, press PLAY. Separate Percussion/Drum Outputs: Standard drum kit sounds can pan the drums between the Main output jacks as PLAY is 00-49), then press PLAY. Or, process the two groups individually. 4.8 PAGE ...


