
User Manual
Page 4
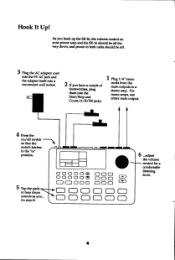
As you hook up the SR-16the rrclurneconurolon )lour power amp ard the SR-16should be dl the waydown,ard ponm toboth unitsshouldbeoff. 3 nugthe ACadapercord inb the9VAClrckand the adapEr itseu into a convenientwall socket. 2lflouhaveacoupleof footawitclres,plug tlreminb the Start/... @e OOO oo- so that the \ switch latches in t}te"in" position. 5 Tapthepads to heardrum soundsasyou... (to a ste!€oamp. I Hook It Up! For rnono amPs,use either rnain outpul 4 n"ott* on/off switdr -. flfloctotl tlrtflDctfl ...adiust thevolunr cpntrolfua comfortable lishdng level. 4
As you hook up the SR-16the rrclurneconurolon )lour power amp ard the SR-16should be dl the waydown,ard ponm toboth unitsshouldbeoff. 3 nugthe ACadapercord inb the9VAClrckand the adapEr itseu into a convenientwall socket. 2lflouhaveacoupleof footawitclres,plug tlreminb the Start/... @e OOO oo- so that the \ switch latches in t}te"in" position. 5 Tapthepads to heardrum soundsasyou... (to a ste!€oamp. I Hook It Up! For rnono amPs,use either rnain outpul 4 n"ott* on/off switdr -. flfloctotl tlrtflDctfl ...adiust thevolunr cpntrolfua comfortable lishdng level. 4

User Manual
Page 6
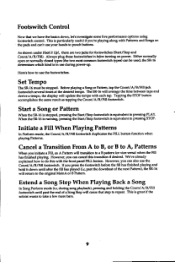
..., press the B buttron(or pressA if a B Patternis playing). To choose a different variation, pressA or B before the current PatFrn has finished playlng. 6 You're not limited b using A and B variations of a partioilar pattern number;you canalsocall up other Pattemnumbers,and lfteirA and B variations,which will show the PatErn number and whether it is...
..., press the B buttron(or pressA if a B Patternis playing). To choose a different variation, pressA or B before the current PatFrn has finished playlng. 6 You're not limited b using A and B variations of a partioilar pattern number;you canalsocall up other Pattemnumbers,and lfteirA and B variations,which will show the PatErn number and whether it is...
User Manual
Page 9
... H@klt W!, therc aretwo iack for footswitdres(Start/StoPand Count/A/B/Fill). Either normally openor norrnally cloeedtypes(the two rrost cornrnonfootswitdr typec)canbe used;the SR-16 determineswhidr kind is equivalentto pressingsToP. when the sR-16is running pressingthe start/stop footswiEh is in beprcturning on Power. Cancela Transition From A to B, or B to A' Patterns Wlren you 're...
... H@klt W!, therc aretwo iack for footswitdres(Start/StoPand Count/A/B/Fill). Either normally openor norrnally cloeedtypes(the two rrost cornrnonfootswitdr typec)canbe used;the SR-16 determineswhidr kind is equivalentto pressingsToP. when the sR-16is running pressingthe start/stop footswiEh is in beprcturning on Power. Cancela Transition From A to B, or B to A' Patterns Wlren you 're...
User Manual
Page 11
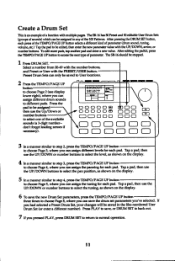
...seedisplay lower right), where,rou can assigndiffennt drum sourds b different pads. Sdecta number from fi149 with multiplepagesI.he SR-15has50Pr6ct ard 50editableUserDnm Sets eQarcohupprrasosofsfIohmeTdEs)MwPhOic,t/rPcAaGnubEPebauststoignnseedl€tcotaasndyifofefrt€hre*klminPdaotfAtpefatmensrmp.erctesr(sdinrugmthseoDunRdL,tJuMninSgE,fbu$on the display.... o clroosePage5, wherc you canasdgn the tuning for eachpad. Tap a @, thm use theUp/Downor numberbuttons to selectone of theavailable sourds (a 3digit numberdon't forget leading zeroesif rEccsary). Pttss the pad tobeassigned ttren...
...seedisplay lower right), where,rou can assigndiffennt drum sourds b different pads. Sdecta number from fi149 with multiplepagesI.he SR-15has50Pr6ct ard 50editableUserDnm Sets eQarcohupprrasosofsfIohmeTdEs)MwPhOic,t/rPcAaGnubEPebauststoignnseedl€tcotaasndyifofefrt€hre*klminPdaotfAtpefatmensrmp.erctesr(sdinrugmthseoDunRdL,tJuMninSgE,fbu$on the display.... o clroosePage5, wherc you canasdgn the tuning for eachpad. Tap a @, thm use theUp/Downor numberbuttons to selectone of theavailable sourds (a 3digit numberdon't forget leading zeroesif rEccsary). Pttss the pad tobeassigned ttren...
User Manual
Page 12
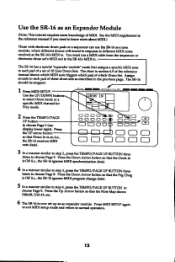
... 1ou needb know rnre abort MIDI.) su-p-plernentin Tho* with electronicdrum padsor a gequencecr anusethe SR-16asa tone modulq where dffferent.drums wiU soundin responseto different MIDI notes receirredat the sR-16s MIDI fuL You mugt run a MIDI cablefrom the gequencEor r elec{ronicdrum sefs MIDI out ... Ir, " *"oner sirnilar to eadr pad of a setof 10UserDrum Sets.Thedurt in the pr€vious page, The-SR-16 should be stopped. 1 n rurrAPSf EruP. Use the SR-16asan ExpanderModule (Note Thb tutorial requireesonr krnwledge of which Drrm Set. perr€astbsnMIDI SEf,Upagain t2
... 1ou needb know rnre abort MIDI.) su-p-plernentin Tho* with electronicdrum padsor a gequencecr anusethe SR-16asa tone modulq where dffferent.drums wiU soundin responseto different MIDI notes receirredat the sR-16s MIDI fuL You mugt run a MIDI cablefrom the gequencEor r elec{ronicdrum sefs MIDI out ... Ir, " *"oner sirnilar to eadr pad of a setof 10UserDrum Sets.Thedurt in the pr€vious page, The-SR-16 should be stopped. 1 n rurrAPSf EruP. Use the SR-16asan ExpanderModule (Note Thb tutorial requireesonr krnwledge of which Drrm Set. perr€astbsnMIDI SEf,Upagain t2
User Manual
Page 2
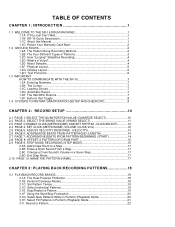
...4 1.2D What's a Voice 4 1.2E About Defaults 4 1.2F Physical Layout 5 1.2G Display Layout 6 1.2H Text Protocols 6 1.3 IMPORTANT HOW TO COMMUNICATE WITH THE SR-16 7 1.3A Entering Numbers 7 1.3B The Cursor...7 1.3C Leading Zeroes 7 1.3D Automatic Revert 7 1.3E The INC/DEC Buttons 7 1.3F Buttons that Toggle 8 1.4 10...3.1B Perform/Compose Modes 18 3.1C Set Pattern Tempo 19 3.1D Select Individual Patterns 19 3.1E Stop/Restart a Pattern 19 3.1F Using the Start/Stop Footswitch 20 3.1G Select New Patterns While in Perform (Playback) Mode 20 3.1H Select Fill Patterns in Perform (Playback...
...4 1.2D What's a Voice 4 1.2E About Defaults 4 1.2F Physical Layout 5 1.2G Display Layout 6 1.2H Text Protocols 6 1.3 IMPORTANT HOW TO COMMUNICATE WITH THE SR-16 7 1.3A Entering Numbers 7 1.3B The Cursor...7 1.3C Leading Zeroes 7 1.3D Automatic Revert 7 1.3E The INC/DEC Buttons 7 1.3F Buttons that Toggle 8 1.4 10...3.1B Perform/Compose Modes 18 3.1C Set Pattern Tempo 19 3.1D Select Individual Patterns 19 3.1E Stop/Restart a Pattern 19 3.1F Using the Start/Stop Footswitch 20 3.1G Select New Patterns While in Perform (Playback) Mode 20 3.1H Select Fill Patterns in Perform (Playback...
User Manual
Page 3
... Select New Patterns and Fills While in Compose (Record) Mode 22 3.1K Using Fill to Create Repetitive Drum Hits 23 3.2 ERASE FUNCTIONS...24 3.2A Erase ...36 5.1E Start from the Middle of a Song 36 5.1F Name a Song (NAME 36 5.1G Change Song Tempo as the SR-16 Plays 37 5.2 REAL TIME SONG CREATION 37 5.2A Real Time Song Editing 37 5.3 MANUAL SONG CREATION 38 5.3A Enter a ... Another Song (or to the End of Another Song If That Song is Not Empty 39 5.4J Copy a Song to Another SR-16 Via MIDI 40 CHAPTER 6: MIDI SETUP 41 6.1 PAGE 1: SELECT MIDI CHANNEL (MIDI CH 41 6.2 PAGE 2: RECEIVE MIDI DRUM...
... Select New Patterns and Fills While in Compose (Record) Mode 22 3.1K Using Fill to Create Repetitive Drum Hits 23 3.2 ERASE FUNCTIONS...24 3.2A Erase ...36 5.1E Start from the Middle of a Song 36 5.1F Name a Song (NAME 36 5.1G Change Song Tempo as the SR-16 Plays 37 5.2 REAL TIME SONG CREATION 37 5.2A Real Time Song Editing 37 5.3 MANUAL SONG CREATION 38 5.3A Enter a ... Another Song (or to the End of Another Song If That Song is Not Empty 39 5.4J Copy a Song to Another SR-16 Via MIDI 40 CHAPTER 6: MIDI SETUP 41 6.1 PAGE 1: SELECT MIDI CHANNEL (MIDI CH 41 6.2 PAGE 2: RECEIVE MIDI DRUM...
User Manual
Page 4
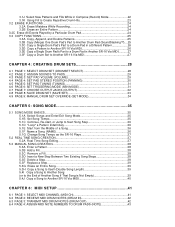
...MEMORY/RE-INITIALIZE PARAMETERS 55 7.12 CHECK SOFTWARE VERSION 55 CHAPTER 8: APPLICATIONS 56 8.1 MIDI SYNC APPLICATIONS 56 8.1A SR-16 As MIDI Timing Master 56 8.1B SR-16 as MIDI Timing Slave 57 8.1C Synching to Synthesizer Sequencers 57 8.2 STRATEGIES FOR ASSEMBLING PATTERNS AND SONGS 58 8.2A...58 8.2D Odd Time Signatures 58 8.3 SOUND STACKING...59 8.3A Basics...59 8.3B Sound Stacking via MIDI 59 8.3C Sound Stacking when Using the SR-16 as a Drum Machine 59 8.3D Editing Stacked Combinations 59 8.4 UNDERSTANDING RHYTHMIC NOTATION 60 CHAPTER 9: MIDI SUPPLEMENT 61 9.1 MIDI BASICS...61 ...
...MEMORY/RE-INITIALIZE PARAMETERS 55 7.12 CHECK SOFTWARE VERSION 55 CHAPTER 8: APPLICATIONS 56 8.1 MIDI SYNC APPLICATIONS 56 8.1A SR-16 As MIDI Timing Master 56 8.1B SR-16 as MIDI Timing Slave 57 8.1C Synching to Synthesizer Sequencers 57 8.2 STRATEGIES FOR ASSEMBLING PATTERNS AND SONGS 58 8.2A...58 8.2D Odd Time Signatures 58 8.3 SOUND STACKING...59 8.3A Basics...59 8.3B Sound Stacking via MIDI 59 8.3C Sound Stacking when Using the SR-16 as a Drum Machine 59 8.3D Editing Stacked Combinations 59 8.4 UNDERSTANDING RHYTHMIC NOTATION 60 CHAPTER 9: MIDI SUPPLEMENT 61 9.1 MIDI BASICS...61 ...
User Manual
Page 5
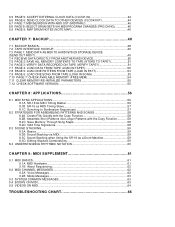
...exactly when you have its own associated Drum Set . 5. CHAPTER 1: INTRODUCTION 1.1 WELCOME TO THE SR-16 DRUM MACHINE! 1.1A If You Just Can't Wait... Turn to section 1.4, 10 Steps to use the SR-16 as part of your confidence in that stimulates your creativity (and tickles your own. You can be ...saved permanently to standard cassettes, or to any of the SR-16 in the following order: 1. MIDI Setup: Here's how to...
...exactly when you have its own associated Drum Set . 5. CHAPTER 1: INTRODUCTION 1.1 WELCOME TO THE SR-16 DRUM MACHINE! 1.1A If You Just Can't Wait... Turn to section 1.4, 10 Steps to use the SR-16 as part of your confidence in that stimulates your creativity (and tickles your own. You can be ...saved permanently to standard cassettes, or to any of the SR-16 in the following order: 1. MIDI Setup: Here's how to...
User Manual
Page 6
...-bit resolution (the same resolution as quantization and output assignments, will help you , read and understand these while the SR-16 is important to a verse, chorus, bridge, instrumental, intro, etc. As a result, some sections contain background material...be from 1 to others. Feel free to control and trigger the sounds. If you start recording. The SR-16 is easy to use , but new concepts to 128 beats long. 2 These sections are identified as a MIDI expander module, then... the Drum Set section before you only want to use the SR-16 as "background" and set in Pattern mode.
...-bit resolution (the same resolution as quantization and output assignments, will help you , read and understand these while the SR-16 is important to a verse, chorus, bridge, instrumental, intro, etc. As a result, some sections contain background material...be from 1 to others. Feel free to control and trigger the sounds. If you start recording. The SR-16 is easy to use , but new concepts to 128 beats long. 2 These sections are identified as a MIDI expander module, then... the Drum Set section before you only want to use the SR-16 as "background" and set in Pattern mode.

User Manual
Page 7
The key to using these advanced features is 16 beats). The Preset/User button selects between these two master banks of a song often repeat. Otherwise, they are to be edited. Example: The second verse ... when either A or B is to copy it to 200 Patterns. Rather than recording a Pattern. 1.2B The Four Different Types of Pattern, numbered 00-49. The SR-16 excels at live performance or while improvising. For example, if you can be played. • Select Patterns in live performance-something usually not associated with...
The key to using these advanced features is 16 beats). The Preset/User button selects between these two master banks of a song often repeat. Otherwise, they are to be edited. Example: The second verse ... when either A or B is to copy it to 200 Patterns. Rather than recording a Pattern. 1.2B The Four Different Types of Pattern, numbered 00-49. The SR-16 excels at live performance or while improvising. For example, if you can be played. • Select Patterns in live performance-something usually not associated with...
User Manual
Page 8
... it. You will remain in white on a VCR, it will be in Compose mode, a Pattern will play. However, you turned off the SR-16, the next time the SR-16 powers up it automatically defaults to Stop-you hit the pad, the louder the drum sound assigned to the pad will "loop" over...the default is a setting that assigns particular drum sounds to anywhere within the stereo field of pad volume resolution, from soft to go; However, when using the SR-16 as a drum sound expander and triggering sounds via MIDI, they respond to Perform mode. Example: When you turn on the pads. Example: If ...
... it. You will remain in white on a VCR, it will be in Compose mode, a Pattern will play. However, you turned off the SR-16, the next time the SR-16 powers up it automatically defaults to Stop-you hit the pad, the louder the drum sound assigned to the pad will "loop" over...the default is a setting that assigns particular drum sounds to anywhere within the stereo field of pad volume resolution, from soft to go; However, when using the SR-16 as a drum sound expander and triggering sounds via MIDI, they respond to Perform mode. Example: When you turn on the pads. Example: If ...

User Manual
Page 9
... Song modes, Perform (playback) and Compose (record) modes, and the Preset and User patterns. • "Tape recorder" buttons. If you're used to scratching a turntable, you for a Pattern. • Mode buttons. These control playback and stop, and work similarly to time. It regulates the...different "pages" present in the Drum Set, Record Setup, MIDI Setup, and Backup functions. • Pattern select buttons. 1.2F Physical Layout The SR-16 includes seven main types of controls, along with a group of connectors (located on step at a time. • Huge volume knob. The display...
... Song modes, Perform (playback) and Compose (record) modes, and the Preset and User patterns. • "Tape recorder" buttons. If you're used to scratching a turntable, you for a Pattern. • Mode buttons. These control playback and stop, and work similarly to time. It regulates the...different "pages" present in the Drum Set, Record Setup, MIDI Setup, and Backup functions. • Pattern select buttons. 1.2F Physical Layout The SR-16 includes seven main types of controls, along with a group of connectors (located on step at a time. • Huge volume knob. The display...
User Manual
Page 10
... playing, and the Pattern (including A/B/Fill/Preset or User designators) that flashes on the display are shown in Song mode. If you monitor the SR-16's status, and/or indicates what type of steps, the step 6 When stopped or running, this window displays the drum pad number. • ... the channel number). • Pattern/Song readout (also Drum Set edit and drum pad readout). For some operations, it is the most commonly-used area of the display shows the currently selected page number. • Compose/Perform. This is necessary to press PLAY to confirm a particular operation,...
... playing, and the Pattern (including A/B/Fill/Preset or User designators) that flashes on the display are shown in Song mode. If you monitor the SR-16's status, and/or indicates what type of steps, the step 6 When stopped or running, this window displays the drum pad number. • ... the channel number). • Pattern/Song readout (also Drum Set edit and drum pad readout). For some operations, it is the most commonly-used area of the display shows the currently selected page number. • Compose/Perform. This is necessary to press PLAY to confirm a particular operation,...
User Manual
Page 13
... has played. If USER is held down the PATTERN/SONG button and press PLAY. Try the following: • Enter a two-digit number between 00-49 using the number keys, then press PLAY. • Press the INC (up arrow) button to bash away on the pads. 8. If the FILL button is not..., the Fill's associated Main Pattern (A or B) continues to select the A variation of the display shows PERFORM). If you 'll hear a Preset Pattern. (In case the SR-16 has already been played with the demo, feel free to select the next higher-numbered Preset Pattern.
... has played. If USER is held down the PATTERN/SONG button and press PLAY. Try the following: • Enter a two-digit number between 00-49 using the number keys, then press PLAY. • Press the INC (up arrow) button to bash away on the pads. 8. If the FILL button is not..., the Fill's associated Main Pattern (A or B) continues to select the A variation of the display shows PERFORM). If you 'll hear a Preset Pattern. (In case the SR-16 has already been played with the demo, feel free to select the next higher-numbered Preset Pattern.
User Manual
Page 14
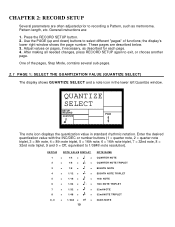
...SELECT) The display shows QUANTIZE SELECT and a note icon in standard rhythmic notation. Press the RECORD SETUP button. 2. Use the PAGE (up and down) buttons to 1/384th note resolution). General instructions are described below. 3. These pages are ...to recording a Pattern, such as described for each page. 4. KEYPAD NOTE VALUE DISPLAY 1 = 1/4 = = 2 = 1/6 = 3 = 3 = 1/8 = = 4 = 1/12 = 3 = 5 = 1/16 = = 6 = 1/24 = 3 = 7 = 1/32 = = 8 = 1/48 = 3 = 9, 0 = 1/384 = off = 10 NOTE NAME QUARTER NOTE QUARTER NOTE TRIPLET EIGHTH NOTE EIGHTH NOTE ...
...SELECT) The display shows QUANTIZE SELECT and a note icon in standard rhythmic notation. Press the RECORD SETUP button. 2. Use the PAGE (up and down) buttons to 1/384th note resolution). General instructions are described below. 3. These pages are ...to recording a Pattern, such as described for each page. 4. KEYPAD NOTE VALUE DISPLAY 1 = 1/4 = = 2 = 1/6 = 3 = 3 = 1/8 = = 4 = 1/12 = 3 = 5 = 1/16 = = 6 = 1/24 = 3 = 7 = 1/32 = = 8 = 1/48 = 3 = 9, 0 = 1/384 = off = 10 NOTE NAME QUARTER NOTE QUARTER NOTE TRIPLET EIGHTH NOTE EIGHTH NOTE ...
User Manual
Page 15
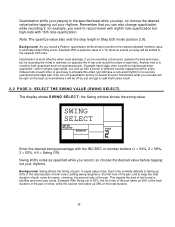
...also change quantization while recording if, for example, you play will be shifted to the nearest 16th note. Example: With a quantize value of 1/16, all drum events to the nearest selected rhythmic value to eliminate small timing errors. Quantization is to combine both notes the same, shortens the ...the pair of notes, while the second note takes up 50% of the total duration of both notes; Another trick is most effective when used sparingly. the Swing window shows the swing value. Quantization shifts your playing to the specified beat while you play, so choose the desired ...
...also change quantization while recording if, for example, you play will be shifted to the nearest 16th note. Example: With a quantize value of 1/16, all drum events to the nearest selected rhythmic value to eliminate small timing errors. Quantization is to combine both notes the same, shortens the ...the pair of notes, while the second note takes up 50% of the total duration of both notes; Another trick is most effective when used sparingly. the Swing window shows the swing value. Quantization shifts your playing to the specified beat while you play, so choose the desired ...
User Manual
Page 17
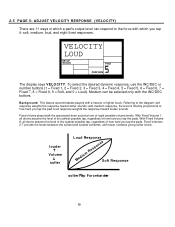
... VELOCITY RESPONSE (VELOCITY) There are 11 ways in which you tap it: soft, medium, loud, and eight fixed responses. To select the desired dynamic response, use the INC/DEC or number buttons (1 = Fixed 1, 2 = Fixed 2, 3 = Fixed 3, 4 = Fixed 4, 5 = Fixed 5, 6 = Fixed 6, 7 = Fixed 7, 8 = Fixed 8, 9 = Soft, and 0 = Loud). louder Volume softer Loud Response Response Medium Soft...
... VELOCITY RESPONSE (VELOCITY) There are 11 ways in which you tap it: soft, medium, loud, and eight fixed responses. To select the desired dynamic response, use the INC/DEC or number buttons (1 = Fixed 1, 2 = Fixed 2, 3 = Fixed 3, 4 = Fixed 4, 5 = Fixed 5, 6 = Fixed 6, 7 = Fixed 7, 8 = Fixed 8, 9 = Soft, and 0 = Loud). louder Volume softer Loud Response Response Medium Soft...
User Manual
Page 20
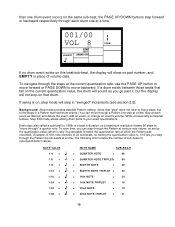
... is 1/96th of volume data. Each step (also called a sub-beat) is why it takes 96 steps to note/quantization values. NOTE VALUE 1/4 = 1/6 = 1/8 = 1/12 = 1/16 = 1/24 = 1/32 = 1/48 = NOTE NAME SUB-BEATS = QUARTER NOTE = 96 3 = QUARTER NOTE TRIPLET= 64 = EIGHTH NOTE = 48 3 = EIGHTH NOTE TRIPLET = 32...to the steps in duration, so at maximum resolution it 's preferable to select the quantization rate at the current quantization rate, use the PAGE UP button to move forward or PAGE DOWN to your exact specifications. Background Step mode provides detailed Pattern editing. (Note...
... is 1/96th of volume data. Each step (also called a sub-beat) is why it takes 96 steps to note/quantization values. NOTE VALUE 1/4 = 1/6 = 1/8 = 1/12 = 1/16 = 1/24 = 1/32 = 1/48 = NOTE NAME SUB-BEATS = QUARTER NOTE = 96 3 = QUARTER NOTE TRIPLET= 64 = EIGHTH NOTE = 48 3 = EIGHTH NOTE TRIPLET = 32...to the steps in duration, so at maximum resolution it 's preferable to select the quantization rate at the current quantization rate, use the PAGE UP button to move forward or PAGE DOWN to your exact specifications. Background Step mode provides detailed Pattern editing. (Note...
User Manual
Page 22
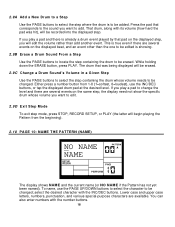
...drum whose volume needs to be erased. 2.9C Change a Drum Sound's Volume in a Given Step Use the PAGE buttons to select the step containing the drum whose volume you want to be recorded into ... displayed step. The drum that was hit), will begin playing the Pattern from 1-8 (1=softest, 8=loudest), use the PAGE UP/DOWN buttons to select the character to be added. You can also enter numbers with the...volume rather than the one to be edited is showing. 2.9B Erase a Drum Sound From a Step Use the PAGE buttons to locate the step containing the drum to edit. 2.9D Exit Step Mode To exit...
...drum whose volume needs to be erased. 2.9C Change a Drum Sound's Volume in a Given Step Use the PAGE buttons to select the step containing the drum whose volume you want to be recorded into ... displayed step. The drum that was hit), will begin playing the Pattern from 1-8 (1=softest, 8=loudest), use the PAGE UP/DOWN buttons to select the character to be added. You can also enter numbers with the...volume rather than the one to be edited is showing. 2.9B Erase a Drum Sound From a Step Use the PAGE buttons to locate the step containing the drum to edit. 2.9D Exit Step Mode To exit...

