
Nitro Module - User Guide
Page 3
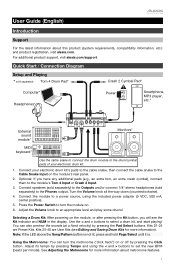
...about this product (system requirements, compatibility information, etc.) and product registration, visit alesis.com. Adjust the Volume knob to the module's Tom 4 Input or Crash 2 Input. 3. For additional product support, visit alesis.com/support. Use the < and > buttons to turn the metronome ("click track") on the ...cable snake, then connect the cable snake to the Phones output. Press the Power Switch to select a drum kit, and start playing! Kits 25-40 are Preset Kits. Using the Metronome: You can also preview the sounds (at a fixed velocity) by pressing the Click button. ...
...about this product (system requirements, compatibility information, etc.) and product registration, visit alesis.com. Adjust the Volume knob to the module's Tom 4 Input or Crash 2 Input. 3. For additional product support, visit alesis.com/support. Use the < and > buttons to turn the metronome ("click track") on the ...cable snake, then connect the cable snake to the Phones output. Press the Power Switch to select a drum kit, and start playing! Kits 25-40 are Preset Kits. Using the Metronome: You can also preview the sounds (at a fixed velocity) by pressing the Click button. ...
Nitro Module - User Guide
Page 4
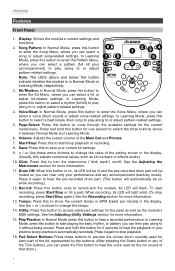
... buttons. (After pressing the Snare button or any accompaniment (backing music). Drum Off: When this to preview the voices (drum sounds) used as kit numbers or effects levels.) 10. you can then play along to it again to enter the Song Menu, where you can select a ...Press it between Normal Mode and Learning Mode. 6. Page/Select: Press this adjusts numerical values, such as the rim sound of your current kit settings. 9. < / >: Use these buttons to show the current tempo in BPM (beats per minute) in the display. Play/Practice: In Normal Mode, press this button ...
... buttons. (After pressing the Snare button or any accompaniment (backing music). Drum Off: When this to preview the voices (drum sounds) used as kit numbers or effects levels.) 10. you can then play along to it again to enter the Song Menu, where you can select a ...Press it between Normal Mode and Learning Mode. 6. Page/Select: Press this adjusts numerical values, such as the rim sound of your current kit settings. 9. < / >: Use these buttons to show the current tempo in BPM (beats per minute) in the display. Play/Practice: In Normal Mode, press this button ...

Nitro Module - User Guide
Page 5
...Press this output to turn the module on. USB: This connection will shut down automatically after 30 minutes of an external MIDI device. 6. Aux In: Use a standard 1/8" stereo cable to connect this input to the MIDI Out of 1/8" stereo headphones to this feature or want to an optional audio 7 5 ... To save energy, the drum module will allow you do the following: 1. Phones: Connect a set of an external MIDI device. 7. Rear Panel 1. Use a USB cable (sold separately) to connect the module to power the module off. 3. Press and hold it for a second then release it to an...
...Press this output to turn the module on. USB: This connection will shut down automatically after 30 minutes of an external MIDI device. 6. Aux In: Use a standard 1/8" stereo cable to connect this input to the MIDI Out of 1/8" stereo headphones to this feature or want to an optional audio 7 5 ... To save energy, the drum module will allow you do the following: 1. Phones: Connect a set of an external MIDI device. 7. Rear Panel 1. Use a USB cable (sold separately) to connect the module to power the module off. 3. Press and hold it for a second then release it to an...

Nitro Module - User Guide
Page 6
...-hat sounds (H-C, 001-007). *** Songs 61-80 are actual songs To save your desired kit. Press Save again. 6 Use the < and > buttons to adjust the value. * The reverb and equalization affect the sound of the kit, song, and the output of the default MIDI note numbers for assigning to a pad, ...8226; P-N***: Pad song number (selects which song will change pitch with each hit. Use the < and > buttons to select your settings: 1. Press Kit, then press Page/Select until it to (25-40). 3. Once you've selected your kit, you want to save it is set to ON) 3. Basic Functions Editing and ...
...-hat sounds (H-C, 001-007). *** Songs 61-80 are actual songs To save your desired kit. Press Save again. 6 Use the < and > buttons to adjust the value. * The reverb and equalization affect the sound of the kit, song, and the output of the default MIDI note numbers for assigning to a pad, ...8226; P-N***: Pad song number (selects which song will change pitch with each hit. Use the < and > buttons to select your settings: 1. Press Kit, then press Page/Select until it to (25-40). 3. Once you've selected your kit, you want to save it is set to ON) 3. Basic Functions Editing and ...
Nitro Module - User Guide
Page 7
...adjustable settings. Press the desired Learning Mode button (Beat, Rhythm, or Pattern), then keep pressing Page/Select to cycle through the settings, and use the < and > buttons to stop playback. To disable/re-enable this feature, press the "Kick" Pad Select button. Press and hold Play...; Pattern (PTN): Full kit plus musical accompaniment 2. Play the drum part as accurately as described above ) and try again! If the LED under the Song/Pattern button is automatically recorded. Use the < and > buttons to practice. 3. To improve your practice (PLY). After a count-in , the beat,...
...adjustable settings. Press the desired Learning Mode button (Beat, Rhythm, or Pattern), then keep pressing Page/Select to cycle through the settings, and use the < and > buttons to stop playback. To disable/re-enable this feature, press the "Kick" Pad Select button. Press and hold Play...; Pattern (PTN): Full kit plus musical accompaniment 2. Play the drum part as accurately as described above ) and try again! If the LED under the Song/Pattern button is automatically recorded. Use the < and > buttons to practice. 3. To improve your practice (PLY). After a count-in , the beat,...

Nitro Module - User Guide
Page 8
... pad whose settings you power the module off . 5. The higher the value, the less likely the pad will not be triggered by pressing Tempo and using the < and > buttons to play the recording, press Play/Practice. Adjusting the Metronome The module's built-in the Appendix. • R-S (Pad ...hit it. Adjust its corresponding Pad Select button. 2. The higher the value, the less forcefully you need to set the new BPM (beats per minute). Using the metronome: You can clear/overwrite the memory by simply making a new recording. 8 The Record LED will play. • VOL (Volume): The ...
... pad whose settings you power the module off . 5. The higher the value, the less likely the pad will not be triggered by pressing Tempo and using the < and > buttons to play the recording, press Play/Practice. Adjusting the Metronome The module's built-in the Appendix. • R-S (Pad ...hit it. Adjust its corresponding Pad Select button. 2. The higher the value, the less forcefully you need to set the new BPM (beats per minute). Using the metronome: You can clear/overwrite the memory by simply making a new recording. 8 The Record LED will play. • VOL (Volume): The ...
Nitro Module - User Guide
Page 9
...that can connect the drum module to an external MIDI module or device, allowing you to: • use a connected electronic drum kit to trigger sounds in the background. • KIT (Kit): The drum kit that will be recorded. • BPM (Tempo): The recording tempo. • SIG (Time signature):...'s MIDI Out to your electronic drum kit will use an external MIDI device (e.g., a MIDI keyboard or sequencer) to OFF, playing your module's MIDI In. 2. Each program uses a dedicated MIDI channel (1-16). Play your sequencer. Use another MIDI device, the Nitro module can set to ON, there ...
...that can connect the drum module to an external MIDI module or device, allowing you to: • use a connected electronic drum kit to trigger sounds in the background. • KIT (Kit): The drum kit that will be recorded. • BPM (Tempo): The recording tempo. • SIG (Time signature):...'s MIDI Out to your electronic drum kit will use an external MIDI device (e.g., a MIDI keyboard or sequencer) to OFF, playing your module's MIDI In. 2. Each program uses a dedicated MIDI channel (1-16). Play your sequencer. Use another MIDI device, the Nitro module can set to ON, there ...

Nitro Module - User Guide
Page 39
...Effects Sequencer Tempo Display Connectors Power Dimensions Weight 64 40 kits (24 preset kits + 16 user kits) 11 General MIDI kits 385 (drums, percussion, SFX) 7 hi-hat combinations... is not completely turned off when the power adapter is plugged in. Disconnect the power adapter when not using the appliance for long periods. 5.8" x 4.4" x 7.2" 147 mm × 112 mm x 183 mm... mA; and other product or company names are subject to change without notice. Trademarks and Licenses Alesis is a trademark of their respective owners. 39 center-positive Note: This appliance is turned off...
...Effects Sequencer Tempo Display Connectors Power Dimensions Weight 64 40 kits (24 preset kits + 16 user kits) 11 General MIDI kits 385 (drums, percussion, SFX) 7 hi-hat combinations... is not completely turned off when the power adapter is plugged in. Disconnect the power adapter when not using the appliance for long periods. 5.8" x 4.4" x 7.2" 147 mm × 112 mm x 183 mm... mA; and other product or company names are subject to change without notice. Trademarks and Licenses Alesis is a trademark of their respective owners. 39 center-positive Note: This appliance is turned off...

