Quick Start Guide
Page 3
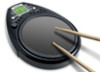
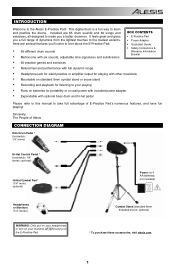
... refer to this manual to make you a full range of dynamics from the lightest touches to the Alesis E-Practice Pad! optional) Hi-Hat Cymbal Pad * (1/4" mono; Here are 65 drum sounds and 60 songs and exercises, all designed to take full advantage of Alesis CONNECTION DIAGRAM Kick Drum Pedal * (footswitch; 1/4" mono) Hi-Hat Control Pedal * (footswitch; 1/4" stereo;
... refer to this manual to make you a full range of dynamics from the lightest touches to the Alesis E-Practice Pad! optional) Hi-Hat Cymbal Pad * (1/4" mono; Here are 65 drum sounds and 60 songs and exercises, all designed to take full advantage of Alesis CONNECTION DIAGRAM Kick Drum Pedal * (footswitch; 1/4" mono) Hi-Hat Control Pedal * (footswitch; 1/4" stereo;
Quick Start Guide
Page 4
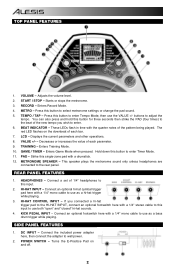
... this input to enter Tempo Mode, then use as a hi-hat trigger while playing. 3. HEADPHONES - Turns the E-Practice Pad on the downbeat of 1/4" headphones to this button to use as a bass drum trigger while playing. VOLUME - START / STOP - RECORD - Decreases or increases the value of the pattern being played....sound only unless headphones are connected to adjust the tempo. REAR PANEL FEATURES 1. Connect an optional hi-hat cymbal trigger pad here with the quarter notes of each bar. 7. KICK PEDAL INPUT - TOP PANEL FEATURES 1. TEMPO / TAP - buttons to the rear panel...
... this input to enter Tempo Mode, then use as a hi-hat trigger while playing. 3. HEADPHONES - Turns the E-Practice Pad on the downbeat of 1/4" headphones to this button to use as a bass drum trigger while playing. VOLUME - START / STOP - RECORD - Decreases or increases the value of the pattern being played....sound only unless headphones are connected to adjust the tempo. REAR PANEL FEATURES 1. Connect an optional hi-hat cymbal trigger pad here with the quarter notes of each bar. 7. KICK PEDAL INPUT - TOP PANEL FEATURES 1. TEMPO / TAP - buttons to the rear panel...
Quick Start Guide
Page 5
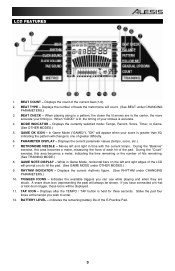
... DISPLAY - If you can use while playing and when they are to hit the pad. (See GAME MODE under OTHER MODES.) 9. Displays the count of the E-Practice Pad. 3 MODE INDICATOR - Displays the current parameter values (tempo, score, etc.). 7.... Displays after the TEMPO / TAP button is accurate. 4. During the "Balance" exercise, this area becomes a meter, indicating the time remaining or the number of your score is . Indicates the available triggers you have connected a hi-hat or kick drum...
... DISPLAY - If you can use while playing and when they are to hit the pad. (See GAME MODE under OTHER MODES.) 9. Displays the count of the E-Practice Pad. 3 MODE INDICATOR - Displays the current parameter values (tempo, score, etc.). 7.... Displays after the TEMPO / TAP button is accurate. 4. During the "Balance" exercise, this area becomes a meter, indicating the time remaining or the number of your score is . Indicates the available triggers you have connected a hi-hat or kick drum...
Quick Start Guide
Page 9
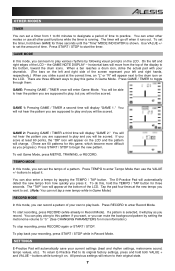
... through them: GAME: Pressing GAME / TIMER once will automatically save your drumstick. (The bars on . SETTINGS E-Practice Pad will enter Game Mode. Press GAME / TIMER to the bottom, toward the drum icons. The "TAP" icon will not be scored. Press START / STOP to set the amount of a pattern...to enter Record Mode. If you can not tap a new tempo while in Game Mode.) RECORD MODE In this game in Record Mode). The E-Practice Pad will appear on the LCD. Press RECORD to "0." (See CHANGING PARAMETERS for this , hold both VALUE + and VALUE - If a pattern is ...
... through them: GAME: Pressing GAME / TIMER once will automatically save your drumstick. (The bars on . SETTINGS E-Practice Pad will enter Game Mode. Press GAME / TIMER to the bottom, toward the drum icons. The "TAP" icon will not be scored. Press START / STOP to set the amount of a pattern...to enter Record Mode. If you can not tap a new tempo while in Game Mode.) RECORD MODE In this game in Record Mode). The E-Practice Pad will appear on the LCD. Press RECORD to "0." (See CHANGING PARAMETERS for this , hold both VALUE + and VALUE - If a pattern is ...


