
Quick Start Guide
Page 3
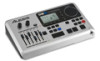
...Press O/S (F3). 4. IMPORTANT: THE DM10 MODULE MAY BE AFFECTED BY STATIC ELECTRICITY. IF THIS OCCURS, SIMPLY TURN THE MODULE OFF AND WAIT AT LEAST A FEW SECONDS BEFORE TURNING IT ON AGAIN. 1 CONNECTION DIAGRAM DRUM KIT WARNING: Use only the included Alesis power supply with the appropriate 1/4" cables....one output.) • You can connect a set 's triggers to the Kits, Instruments, Sequences, etc. Press DRUM KIT to return to the DM10 module. To turn write protection off: 1. Press VALUE DOWN or move the VALUE DIAL counterclockwise until the "WriteProt" field says "OFF." 6. octave ...
...Press O/S (F3). 4. IMPORTANT: THE DM10 MODULE MAY BE AFFECTED BY STATIC ELECTRICITY. IF THIS OCCURS, SIMPLY TURN THE MODULE OFF AND WAIT AT LEAST A FEW SECONDS BEFORE TURNING IT ON AGAIN. 1 CONNECTION DIAGRAM DRUM KIT WARNING: Use only the included Alesis power supply with the appropriate 1/4" cables....one output.) • You can connect a set 's triggers to the Kits, Instruments, Sequences, etc. Press DRUM KIT to return to the DM10 module. To turn write protection off: 1. Press VALUE DOWN or move the VALUE DIAL counterclockwise until the "WriteProt" field says "OFF." 6. octave ...

Quick Start Guide
Page 4
POWER IN - WARNING: Use only the included Alesis power supply with bow and bell sounds) does not support keyboard-...BUTTON to a power source. Connect an external sound source, such as you to trigger both zones. This connection allows the module to or independent of the MAIN OUT. 2. You can be set to connect these inputs using a stereo pair of ... dual-zone pads or cymbals (e.g., CONTROL TRIGGER INPUT a drum with head and rim triggers or a cymbal with the DM10 module. 3. will require TRS cables to navigate the menus shown in each bank. The HEADPHONES VOLUME is set to be ...
POWER IN - WARNING: Use only the included Alesis power supply with bow and bell sounds) does not support keyboard-...BUTTON to a power source. Connect an external sound source, such as you to trigger both zones. This connection allows the module to or independent of the MAIN OUT. 2. You can be set to connect these inputs using a stereo pair of ... dual-zone pads or cymbals (e.g., CONTROL TRIGGER INPUT a drum with head and rim triggers or a cymbal with the DM10 module. 3. will require TRS cables to navigate the menus shown in each bank. The HEADPHONES VOLUME is set to be ...

Quick Start Guide
Page 5
...PREVIEW - When saving a Kit, its Instruments and all available triggers.) 3 While navigating the Sequence in the LCD. SELECTING AND EDITING KITS The DM10 Module has 100 Preset Kits and 100 User Kits, which allows you to a trigger input. Hit the triggers to these parameters changes the feel and ...14. Press this button to set certain "global" parameters that make up the Main Screen. 2. Press this button to return to access the module's Sequencer where you may be stored. Press this button to the previous menu shown in the Sequence. Tap this wheel to "step" forwards or...
...PREVIEW - When saving a Kit, its Instruments and all available triggers.) 3 While navigating the Sequence in the LCD. SELECTING AND EDITING KITS The DM10 Module has 100 Preset Kits and 100 User Kits, which allows you to a trigger input. Hit the triggers to these parameters changes the feel and ...14. Press this button to set certain "global" parameters that make up the Main Screen. 2. Press this button to return to access the module's Sequencer where you may be stored. Press this button to the previous menu shown in the Sequence. Tap this wheel to "step" forwards or...

Quick Start Guide
Page 6
...the drums or Accompaniment in the Sequence, press the MUTE DRUMS or MUTE ACCOMP button, respectively. (This is a recorded pattern stored in the DM10 module that trigger by pressing EDIT INST. the Layer (each with the VALUE UP / DOWN buttons or VALUE DIAL. Select which Layer of that Layer... then striking the trigger. VALUE UP / DOWN buttons or VALUE DIAL to change it . those triggers. 8. For more information on the module. See the Operator's Manual for selected sound, strike the trigger or press PREVIEW on Sequences and Accompaniment. To allow the Sequence to play ...
...the drums or Accompaniment in the Sequence, press the MUTE DRUMS or MUTE ACCOMP button, respectively. (This is a recorded pattern stored in the DM10 module that trigger by pressing EDIT INST. the Layer (each with the VALUE UP / DOWN buttons or VALUE DIAL. Select which Layer of that Layer... then striking the trigger. VALUE UP / DOWN buttons or VALUE DIAL to change it . those triggers. 8. For more information on the module. See the Operator's Manual for selected sound, strike the trigger or press PREVIEW on Sequences and Accompaniment. To allow the Sequence to play ...


