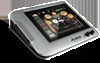
User Guide
Page 3
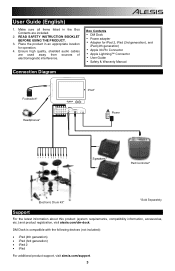
...61599; Safety & Warranty Manual Connection Diagram Footswitch* Headphones* iPad* R L 07 Hi-HA T 01 KICK 08 CRASH1 02 SNARE 09 RIDE1 03 TOM1 10 RIDE2/FX2 04 TOM2 11 CRASH2 05 TOM3 12 FX1 06 TOM4 HH CONTROL MAIN OUT DM DOCK MIDI OUT MIDI IN ...Drum Kit* *Sold Separately Support For the latest information about this product (system requirements, compatibility information, accessories, etc.) and product registration, visit alesis.com/dm-dock. DM Dock is compatible with the following devices (not included): • iPad (4th generation) • iPad (3rd generation) • iPad 2 ...
...61599; Safety & Warranty Manual Connection Diagram Footswitch* Headphones* iPad* R L 07 Hi-HA T 01 KICK 08 CRASH1 02 SNARE 09 RIDE1 03 TOM1 10 RIDE2/FX2 04 TOM2 11 CRASH2 05 TOM3 12 FX1 06 TOM4 HH CONTROL MAIN OUT DM DOCK MIDI OUT MIDI IN ...Drum Kit* *Sold Separately Support For the latest information about this product (system requirements, compatibility information, accessories, etc.) and product registration, visit alesis.com/dm-dock. DM Dock is compatible with the following devices (not included): • iPad (4th generation) • iPad (3rd generation) • iPad 2 ...
User Guide
Page 4
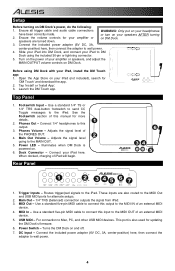
... ports for alternate setups. 2. For connection to the iPad. Slide your iPad into DM Dock, and connect your iPad to DM Dock using DM Dock with your amplifier or speakers are also routed to connect this manual for updating the DM Dock's firmware. 6. Turn on DM Dock. Open the App Store on your speakers AFTER turning on your iPad (not included...
... ports for alternate setups. 2. For connection to the iPad. Slide your iPad into DM Dock, and connect your iPad to DM Dock using DM Dock with your amplifier or speakers are also routed to connect this manual for updating the DM Dock's firmware. 6. Turn on DM Dock. Open the App Store on your speakers AFTER turning on your iPad (not included...
User Guide
Page 5
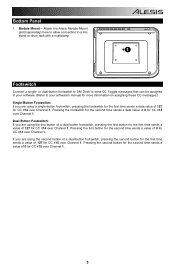
...the second time sends a value of 0 for CC #14 over Channel 1. Bottom Panel 1. Attach the Alesis Module Mount (sold separately) here to allow connection to your software's manual for more information on assigning these CC messages.) Single-Button Footswitch: If you are using a single-button footswitch...button footswitch, pressing the second button for the first time sends a value of 127 for CC #14 over Channel 1. or dual-button footswitch to DM Dock to send CC Toggle messages that can be assigned in your software. (Refer to a mic stand or drum rack with a multiclamp. 1 Footswitch ...
...the second time sends a value of 0 for CC #14 over Channel 1. Bottom Panel 1. Attach the Alesis Module Mount (sold separately) here to allow connection to your software's manual for more information on assigning these CC messages.) Single-Button Footswitch: If you are using a single-button footswitch...button footswitch, pressing the second button for the first time sends a value of 127 for CC #14 over Channel 1. or dual-button footswitch to DM Dock to send CC Toggle messages that can be assigned in your software. (Refer to a mic stand or drum rack with a multiclamp. 1 Footswitch ...