User Guide
Page 3
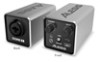
For additional product support, visit alesis.com/support. 3 User Guide (English) Introduction Box Contents Core 1 Mini-USB Cable Software Download Card User Guide Safety & Warranty Manual Support For the latest information about this product (system requirements, compatibility information, etc.) and product registration, visit alesis.com/core-1.
For additional product support, visit alesis.com/support. 3 User Guide (English) Introduction Box Contents Core 1 Mini-USB Cable Software Download Card User Guide Safety & Warranty Manual Support For the latest information about this product (system requirements, compatibility information, etc.) and product registration, visit alesis.com/core-1.

User Guide
Page 5
... input channels are a standard "left corner of the screen to go to the Desktop. 3. Use the included USB cable to connect the Core 1 to your software manual for your computer's operating system. Be sure your audio software program is a class-compliant device that can support two-channel... 7. In the Windows Sound control panel select the Playback tab and select Core 1 as an audio device that supports USB audio. Go to the Start Menu, click the lower-left -right" stereo channel pair. Click the Recording tab and select Core 1 as the default format. 8. In the new window, click the ...
... input channels are a standard "left corner of the screen to go to the Desktop. 3. Use the included USB cable to connect the Core 1 to your software manual for your computer's operating system. Be sure your audio software program is a class-compliant device that can support two-channel... 7. In the Windows Sound control panel select the Playback tab and select Core 1 as an audio device that supports USB audio. Go to the Start Menu, click the lower-left -right" stereo channel pair. Click the Recording tab and select Core 1 as the default format. 8. In the new window, click the ...
User Guide
Page 6
.... 4. Then go to Start Menu > Control Panel > Hardware and Sound > Sound. 3. Right-click Core 1, and select Use this device for sound output. 5. Use the included USB cable to connect the Core 1 to close the Properties window. 9. Click OK to your computer. Go to Applications > Utilities > ...the lower right-hand corner. 6. Uncheck both boxes under Exclusive Mode. 8. Click Properties in the left column. 3. Use the included USB cable to connect the Core 1 to close the Sound control panel. Windows 7: 1. In the new window, click the Advanced tab and select 2-channel, 24...
.... 4. Then go to Start Menu > Control Panel > Hardware and Sound > Sound. 3. Right-click Core 1, and select Use this device for sound output. 5. Use the included USB cable to connect the Core 1 to close the Properties window. 9. Click OK to your computer. Go to Applications > Utilities > ...the lower right-hand corner. 6. Uncheck both boxes under Exclusive Mode. 8. Click Properties in the left column. 3. Use the included USB cable to connect the Core 1 to close the Sound control panel. Windows 7: 1. In the new window, click the Advanced tab and select 2-channel, 24...
User Guide
Page 8
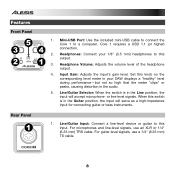
Core 1 requires a USB 1.1 (or higher) 3 4 connection. 2. Set this input. or line-level signals. For microphones and line-level signals, use a 1/4" (6.35 mm) TS cable. 8 For guitar-level signals, ... meter "clips" or peaks, causing distortion in the audio. 5. Headphone Volume: Adjusts the volume level of the headphone output. 4. Mini-USB Port: Use the included mini-USB cable to connect the Core 1 to this switch is in the Guitar position, the input will accept microphone- Input Gain: Adjusts the input's gain level. Line...
Core 1 requires a USB 1.1 (or higher) 3 4 connection. 2. Set this input. or line-level signals. For microphones and line-level signals, use a 1/4" (6.35 mm) TS cable. 8 For guitar-level signals, ... meter "clips" or peaks, causing distortion in the audio. 5. Headphone Volume: Adjusts the volume level of the headphone output. 4. Mini-USB Port: Use the included mini-USB cable to connect the Core 1 to this switch is in the Guitar position, the input will accept microphone- Input Gain: Adjusts the input's gain level. Line...
User Guide
Page 34
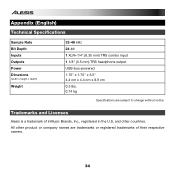
Appendix (English) Technical Specifications Sample Rate Bit Depth Inputs Outputs Power Dimesions (width x height x depth) Weight 32-48 kHz 24-bit 1 XLR+1/4" (6.35 mm) TRS combo input 1 1/8" (3.5 mm) TRS headphone output USB-bus-powered 1.75" x 1.75" x 3.5" 4.4 cm x 4.4 cm x 8.9 cm 0.3 lbs. 0.14 kg Specifications are trademarks or registered trademarks of inMusic Brands, Inc., registered in the U.S. and other product or company names are subject to change without notice. All other countries. Trademarks and Licenses Alesis is a trademark of their respective owners. 34
Appendix (English) Technical Specifications Sample Rate Bit Depth Inputs Outputs Power Dimesions (width x height x depth) Weight 32-48 kHz 24-bit 1 XLR+1/4" (6.35 mm) TRS combo input 1 1/8" (3.5 mm) TRS headphone output USB-bus-powered 1.75" x 1.75" x 3.5" 4.4 cm x 4.4 cm x 8.9 cm 0.3 lbs. 0.14 kg Specifications are trademarks or registered trademarks of inMusic Brands, Inc., registered in the U.S. and other product or company names are subject to change without notice. All other countries. Trademarks and Licenses Alesis is a trademark of their respective owners. 34


