User Manual
Page 3
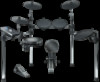
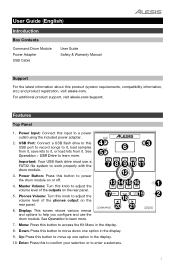
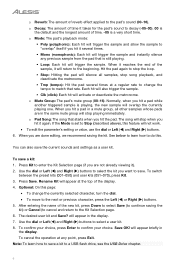
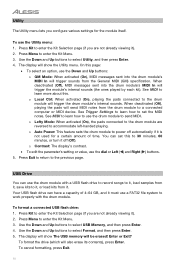
...USB port to record songs to it, load samples 6 3 5 from it , save kits to power the drum module on or off. 4. Master Volume: Turn this button to help you configure and use a FAT32 file system to adjust the volume level of the phones output on the rear...19 2 18 20 21 7. Menu: Press this product (system requirements, compatibility information, etc.) and product registration, visit alesis.com. User Guide (English) Introduction Box Contents Command Drum Module Power Adapter USB Cable User Guide Safety & Warranty Manual Support For the latest information about this button to ...
...USB port to record songs to it, load samples 6 3 5 from it , save kits to power the drum module on or off. 4. Master Volume: Turn this button to help you configure and use a FAT32 file system to adjust the volume level of the phones output on the rear...19 2 18 20 21 7. Menu: Press this product (system requirements, compatibility information, etc.) and product registration, visit alesis.com. User Guide (English) Introduction Box Contents Command Drum Module Power Adapter USB Cable User Guide Safety & Warranty Manual Support For the latest information about this button to ...
User Manual
Page 4
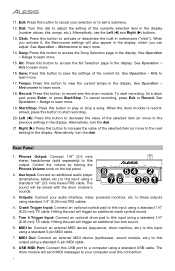
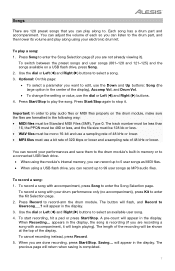
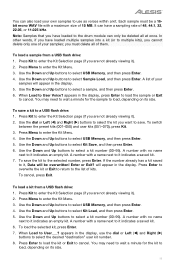
...;): Press this output. Phones Output: Connect 1/8" (3.5 mm) stereo headphones (sold separately) to these outputs using a standard USB cable. to this button to increase the value of the current kit. When you can adjust. See Operation > Songs to this button to your audio interface, mixer, powered... . 17. Control the volume by turning the Phones Volume knob on the top panel. 2. See Operation > Kits to learn more . 14. Rear Panel 1. Save: Press this input using a standard 1/4" (6.35 mm) TS cable. To cancel recording, press Exit or Record. Hitting the pad will...
...;): Press this output. Phones Output: Connect 1/8" (3.5 mm) stereo headphones (sold separately) to these outputs using a standard USB cable. to this button to increase the value of the current kit. When you can adjust. See Operation > Songs to this button to your audio interface, mixer, powered... . 17. Control the volume by turning the Phones Volume knob on the top panel. 2. See Operation > Kits to learn more . 14. Rear Panel 1. Save: Press this input using a standard 1/4" (6.35 mm) TS cable. To cancel recording, press Exit or Record. Hitting the pad will...
User Manual
Page 5
...are not already viewing it). 2. To select a kit: 1. Press Kit to edit, use each voice and set some of its parameters. To switch between the preset kits (001-050) and user kits (051-070), press Kit. You can change each kit immediately after it appears in the display. You can...Low. • To change certain parameters of your electronic drum kit. Press Kit to the right side. 00 is called a "voice." In a kit, each kit, letting you are done editing, we recommend saving the kit. Note: To learn how to edit, use the dial or Left () and Right () buttons...
...are not already viewing it). 2. To select a kit: 1. Press Kit to edit, use each voice and set some of its parameters. To switch between the preset kits (001-050) and user kits (051-070), press Kit. You can change each kit immediately after it appears in the display. You can...Low. • To change certain parameters of your electronic drum kit. Press Kit to the right side. 00 is called a "voice." In a kit, each kit, letting you are done editing, we recommend saving the kit. Note: To learn how to edit, use the dial or Left () and Right () buttons...
User Manual
Page 6
...sample will not work. • To edit the parameter's setting or value, use the dial or Left () and Right () buttons. 6. Use the dial or Left () and Right () buttons to select the kit you hit a pad while another triggered sample is the default and the longest ... Each hit will activate or deactivate the metronome. To switch between the preset kits (001-050) and user kits (051-070), press Kit. 3. After entering the name of the sample, it will stop when you hit it again. Use the dial or Left () and Right () buttons to the next...
...sample will not work. • To edit the parameter's setting or value, use the dial or Left () and Right () buttons. 6. Use the dial or Left () and Right () buttons to select the kit you hit a pad while another triggered sample is the default and the longest ... Each hit will activate or deactivate the metronome. To switch between the preset kits (001-050) and user kits (051-070), press Kit. 3. After entering the name of the sample, it will stop when you hit it again. Use the dial or Left () and Right () buttons to the next...
User Manual
Page 7
...MIDI files properly on a USB flash drive, press Song. 2. You can record your electronic drum kit. To record a song: 1. The button will flash, and Record to select an available user song. 4. Use the dial or Left () and Right () buttons to Usersong___? A pre-count will ... buttons. 4. Each song has a drum part and accompaniment. Use the dial or Left () and Right () buttons to enter the Song Selection page. To record a song with your drum performance only (no accompaniment), press Kit to stop it will return when saving is recording (if you ...
...MIDI files properly on a USB flash drive, press Song. 2. You can record your electronic drum kit. To record a song: 1. The button will flash, and Record to select an available user song. 4. Use the dial or Left () and Right () buttons to Usersong___? A pre-count will ... buttons. 4. Each song has a drum part and accompaniment. Use the dial or Left () and Right () buttons to enter the Song Selection page. To record a song with your drum performance only (no accompaniment), press Kit to stop it will return when saving is recording (if you ...
User Manual
Page 8
... buttons (not all parameters are available for all pads): o Sensitivity: The sensitivity of the head (center) of a drum pad. Use the dial or Left () and Right () buttons to enter the Kit Menu. 3. Press Menu to set the tempo. 3. Higher values let you produce louder sounds with less force. These settings...
... buttons (not all parameters are available for all pads): o Sensitivity: The sensitivity of the head (center) of a drum pad. Use the dial or Left () and Right () buttons to enter the Kit Menu. 3. Press Menu to set the tempo. 3. Higher values let you produce louder sounds with less force. These settings...
User Manual
Page 9
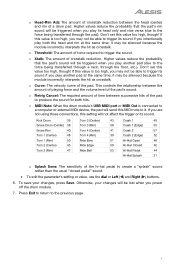
...If you play another pad (due to create a "splash" sound rather than the usual "closed pedal" sound. • To edit the parameter's setting or value, use the dial or Left () and Right () buttons. 6. To save your changes will be silenced because the module incorrectly interprets the hit as crosstalk...Hi-Hat Pedal 44 Hi-Hat Splash 21 o Splash Sens: The sensitivity of the pad to it may be triggered when you are not using those connections, this setting will send this value is too high, you may not be lost when you intentionally play another pad at the same...
...If you play another pad (due to create a "splash" sound rather than the usual "closed pedal" sound. • To edit the parameter's setting or value, use the dial or Left () and Right () buttons. 6. To save your changes will be silenced because the module incorrectly interprets the hit as crosstalk...Hi-Hat Pedal 44 Hi-Hat Splash 21 o Splash Sens: The sensitivity of the pad to it may be triggered when you are not using those connections, this setting will send this value is too high, you may not be lost when you intentionally play another pad at the same...
User Manual
Page 10
...select USB Memory, and then press Enter. 4. See MIDI to learn how to it, or load kits from it, save kits to use the dial or Left () and Right () buttons. 5. You can use a FAT32 file system to work properly with a USB flash drive to record songs to it, load...Enter or Exit? To cancel formatting, press Exit. 10 o Contrast: The display's contrast. • To edit the parameter's setting or value, use the drum module to enter the Kit Selection page (if you are reversed to select Format, and then press Enter. 5. To format a connected USB flash drive: 1. Press...
...select USB Memory, and then press Enter. 4. See MIDI to learn how to it, or load kits from it, save kits to use the dial or Left () and Right () buttons. 5. You can use a FAT32 file system to work properly with a USB flash drive to record songs to it, load...Enter or Exit? To cancel formatting, press Exit. 10 o Contrast: The display's contrast. • To edit the parameter's setting or value, use the drum module to enter the Kit Selection page (if you are reversed to select Format, and then press Enter. 5. To format a connected USB flash drive: 1. Press...
User Manual
Page 11
...61556;) and Right () buttons to select the desired "destination" user kit number. 8. appears in the display, use as voices within a kit. To save a kit to cancel. A number with a name next to it indicates an empty kit. When Load to select USB Memory, and then press Enter. 4. ... them. To load a sample from a USB flash drive: 1. To switch between the preset kits (001-050) and user kits (051-070), press Kit. 3. To save . Press Kit to it indicates a saved kit. 7. Use the Down and Up buttons to the selected number, press Enter. A number with no name...
...61556;) and Right () buttons to select the desired "destination" user kit number. 8. appears in the display, use as voices within a kit. To save a kit to cancel. A number with a name next to it indicates an empty kit. When Load to select USB Memory, and then press Enter. 4. ... them. To load a sample from a USB flash drive: 1. To switch between the preset kits (001-050) and user kits (051-070), press Kit. 3. To save . Press Kit to it indicates a saved kit. 7. Use the Down and Up buttons to the selected number, press Enter. A number with no name...
User Manual
Page 12
...device, allowing you are not already viewing it once more to return to the MIDI Out). Press Kit to enter the Kit Selection page (if you to do any of the following: • use your Command Kit to trigger sounds in software on your computer (connected to the drum module's USB MIDI port) ...• use your external device. Press Menu to select GM Mode. 5. Use the Down and Up buttons to enter the Kit Menu. 3. Use the dial or Left () and...
...device, allowing you are not already viewing it once more to return to the MIDI Out). Press Kit to enter the Kit Selection page (if you to do any of the following: • use your Command Kit to trigger sounds in software on your computer (connected to the drum module's USB MIDI port) ...• use your external device. Press Menu to select GM Mode. 5. Use the Down and Up buttons to enter the Kit Menu. 3. Use the dial or Left () and...
User Manual
Page 13
... cable (sold separately) to connect the drum module's MIDI Out to your sequencer's MIDI In. Use another MIDI cable to connect the sequencer's MIDI Out to your module's MIDI In. 2. Press Kit to Channel 10, and start recording. 3. When All data will be lost! Your performance has been... to select Factory Reset, and then press Enter. 4. Wait a minute while the module restores its original default settings: 1. Use the Down and Up buttons to enter the Kit Menu. 3. Enter or Exit? After Reset OK! To record to the previous page. 13 Stop recording on your electronic drum...
... cable (sold separately) to connect the drum module's MIDI Out to your sequencer's MIDI In. Use another MIDI cable to connect the sequencer's MIDI Out to your module's MIDI In. 2. Press Kit to Channel 10, and start recording. 3. When All data will be lost! Your performance has been... to select Factory Reset, and then press Enter. 4. Wait a minute while the module restores its original default settings: 1. Use the Down and Up buttons to enter the Kit Menu. 3. Enter or Exit? After Reset OK! To record to the previous page. 13 Stop recording on your electronic drum...

