User Manual
Page 3
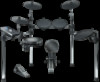
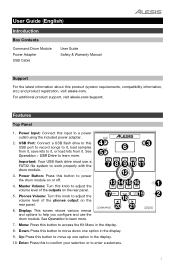
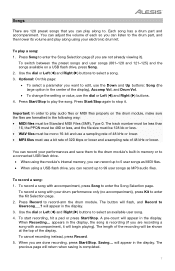
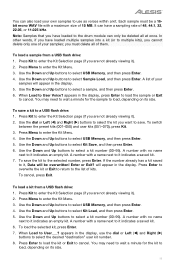
... button to work properly with the drum module. 3. Features Top Panel 1. Menu: Press this knob to access the Kit Menu in the display. 10. User Guide (English) Introduction Box Contents Command Drum Module Power Adapter USB Cable User Guide Safety ...& Warranty Manual Support For the latest information about this button to learn more . 7 8 9 10 11 12 13 14 15 16 1 17 19 2 18 20 21 7. For additional product support, visit alesis...
... button to work properly with the drum module. 3. Features Top Panel 1. Menu: Press this knob to access the Kit Menu in the display. 10. User Guide (English) Introduction Box Contents Command Drum Module Power Adapter USB Cable User Guide Safety ...& Warranty Manual Support For the latest information about this button to learn more . 7 8 9 10 11 12 13 14 15 16 1 17 19 2 18 20 21 7. For additional product support, visit alesis...
User Manual
Page 4
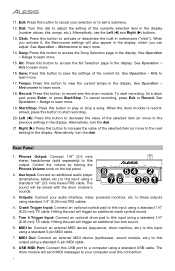
...which you can adjust. Kit: Press this button to a computer using a standard 1/4" (6.35 mm) TS cable. The sound will also appear in the display. See Operation > Metronome to start recording, hit a drum pad, press Enter, or press Start/Stop. When the drum module is recordarmed, press this ...Press this output using a standard 1/8" (3.5 mm) stereo/TRS cable. When you activate it, the Metronome settings will be mixed with the drum module's sounds. 8 54 2 7 6 33 1 3. See Operation > Kits to play or stop a song. MIDI Out: Connect an external MIDI device (synthesizer, sound...
...which you can adjust. Kit: Press this button to a computer using a standard 1/4" (6.35 mm) TS cable. The sound will also appear in the display. See Operation > Metronome to start recording, hit a drum pad, press Enter, or press Start/Stop. When the drum module is recordarmed, press this ...Press this output using a standard 1/8" (3.5 mm) stereo/TRS cable. When you activate it, the Metronome settings will be mixed with the drum module's sounds. 8 54 2 7 6 33 1 3. See Operation > Kits to play or stop a song. MIDI Out: Connect an external MIDI device (synthesizer, sound...
User Manual
Page 5
... () and Right () buttons. 5. To edit a kit: 1. The display will appear at the top of the display. Negative values correspond to the left side, and positive values correspond to +08). 5 Operation Kits A kit in the drum module is a selection of sounds that you want to edit. When ...you are done editing, we recommend saving the kit. The pad's name will show the pad's current voice and its overall sound....
... () and Right () buttons. 5. To edit a kit: 1. The display will appear at the top of the display. Negative values correspond to the left side, and positive values correspond to +08). 5 Operation Kits A kit in the drum module is a selection of sounds that you want to edit. When ...you are done editing, we recommend saving the kit. The pad's name will show the pad's current voice and its overall sound....
User Manual
Page 7
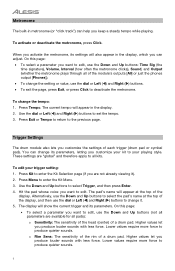
... change the setting or value, use the Down and Up buttons: Song (the large option in the display. To record a song with your electronic drum kit. Use the dial or Left () and Right () buttons to play audio files or MIDI files properly on a USB flash drive, press Song. 2.... To switch between the preset songs and user songs (001-120 and 121-125) and the songs available on the drum module, make sure the files are formatted in the display. Important: In order to select an available user song. 4. Press Record to edit, use the dial...
... change the setting or value, use the Down and Up buttons: Song (the large option in the display. To record a song with your electronic drum kit. Use the dial or Left () and Right () buttons to play audio files or MIDI files properly on a USB flash drive, press Song. 2.... To switch between the preset songs and user songs (001-120 and 121-125) and the songs available on the drum module, make sure the files are formatted in the display. Important: In order to select an available user song. 4. Press Record to edit, use the dial...
User Manual
Page 8
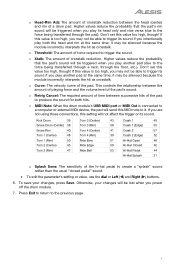
... output [Phones]). • To change it ). 2. On this page: • To select a parameter you customize your kit to edit. To change its parameters. Trigger Settings The drum module also lets you want to select the pad's name at the top of a drum pad. Alternatively, use the Down and... the tempo: 1. Lower values require more force to the previous page. On this page: • To select a parameter you can adjust. Press Kit to all pads): o Sensitivity: The sensitivity of the head (center) of the display. The current tempo will show the current trigger and its parameters...
... output [Phones]). • To change it ). 2. On this page: • To select a parameter you customize your kit to edit. To change its parameters. Trigger Settings The drum module also lets you want to select the pad's name at the top of a drum pad. Alternatively, use the Down and... the tempo: 1. Lower values require more force to the previous page. On this page: • To select a parameter you can adjust. Press Kit to all pads): o Sensitivity: The sensitivity of the head (center) of the display. The current tempo will show the current trigger and its parameters...
User Manual
Page 9
it may not be silenced because the module incorrectly interprets the hit as crosstalk. Don't set this value too high, though! If this...triggered when you play its sound if you may be lost when you power off the drum module. 7. o MIDI Note: When the drum module's USB MIDI port or MIDI Out is too high, you play another pad (due to ... value is connected to a computer or external MIDI device, the pad will send this setting will be silenced because the module incorrectly interprets the hit as crosstalk. o Xtalk: The amount of the pad. it . If you intentionally play another ...
it may not be silenced because the module incorrectly interprets the hit as crosstalk. Don't set this value too high, though! If this...triggered when you play its sound if you may be lost when you power off the drum module. 7. o MIDI Note: When the drum module's USB MIDI port or MIDI Out is too high, you play another pad (due to ... value is connected to a computer or external MIDI device, the pad will send this setting will be silenced because the module incorrectly interprets the hit as crosstalk. o Xtalk: The amount of the pad. it . If you intentionally play another ...
User Manual
Page 10
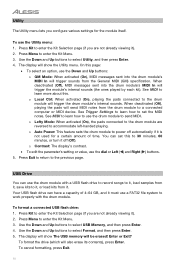
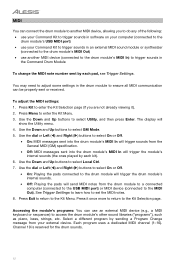
... 10 Press Menu to send MIDI. The display will be erased! See MIDI to learn how to use the drum module with the drum module. USB Drive You can use the drum module to enter the Kit Menu. 3. Enter or Exit? o Lefty Mode: When activated (On), the pads connected to the drum... the Utility menu. To format the drive (which will trigger the drum module's internal sounds. When deactivated (Off), MIDI messages sent into the drum module's MIDI In will trigger the module's internal sounds (the ones played by each kit). See Trigger Settings to learn more about this page: • To ...
... 10 Press Menu to send MIDI. The display will be erased! See MIDI to learn how to use the drum module with the drum module. USB Drive You can use the drum module to enter the Kit Menu. 3. Enter or Exit? o Lefty Mode: When activated (On), the pads connected to the drum... the Utility menu. To format the drive (which will trigger the drum module's internal sounds. When deactivated (Off), MIDI messages sent into the drum module's MIDI In will trigger the module's internal sounds (the ones played by each kit). See Trigger Settings to learn more about this page: • To ...
User Manual
Page 11
... next to load, depending on its size. 11 Press Enter to load the kit or Exit to select Sample Load, and then press Enter. Use the Down and...Press Menu to the selected number, press Enter. To save a kit to enter the Kit Menu. 3. Press Menu to the drum module can only be overwritten! You can have a sampling rate of 48..., 44.1, 32, 22.05, or 11.025 kHz. Note: Samples that you have loaded multiple samples into a kit (or to load, depending on its size. Use the Down and Up buttons to select a kit...
... next to load, depending on its size. 11 Press Enter to load the kit or Exit to select Sample Load, and then press Enter. Use the Down and...Press Menu to the selected number, press Enter. To save a kit to enter the Kit Menu. 3. Press Menu to the drum module can only be overwritten! You can have a sampling rate of 48..., 44.1, 32, 22.05, or 11.025 kHz. Note: Samples that you have loaded multiple samples into a kit (or to load, depending on its size. Use the Down and Up buttons to select a kit...
User Manual
Page 12
...sending a Program Change message from your Command Kit to trigger sounds in an external MIDI sound module or synthesizer (connected to the drum module's MIDI Out) • use another MIDI device (connected to the drum module's MIDI In) to trigger sounds in the Command Drum Module To change the MIDI note number ...to learn how to select Local Ctrl. 7. Press it ). 2. Press Kit to enter the Kit Selection page (if you to do any of the following: • use your Command Kit to trigger sounds in the drum module to the drum module's USB MIDI port) • use your external device. Use the Down...
...sending a Program Change message from your Command Kit to trigger sounds in an external MIDI sound module or synthesizer (connected to the drum module's MIDI Out) • use another MIDI device (connected to the drum module's MIDI In) to trigger sounds in the Command Drum Module To change the MIDI note number ...to learn how to select Local Ctrl. 7. Press it ). 2. Press Kit to enter the Kit Selection page (if you to do any of the following: • use your Command Kit to trigger sounds in the drum module to the drum module's USB MIDI port) • use your external device. Use the Down...
User Manual
Page 13
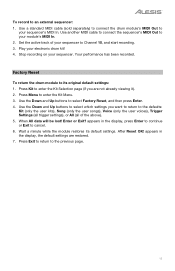
... to the defaults: Kit (only the user kits), Song (only the user songs), Voice (only the user voices), Trigger Settings (all trigger settings), or All (all of your sequencer to cancel. 6. When All data will be lost! Factory Reset To return the drum module to the previous page...in the display, the default settings are not already viewing it). 2. Play your sequencer. Stop recording on your electronic drum kit! 4. Use the Down and Up buttons to your module's MIDI In. 2. Press Menu to your sequencer's MIDI In. Use a standard MIDI cable (sold separately) to connect the...
... to the defaults: Kit (only the user kits), Song (only the user songs), Voice (only the user voices), Trigger Settings (all trigger settings), or All (all of your sequencer to cancel. 6. When All data will be lost! Factory Reset To return the drum module to the previous page...in the display, the default settings are not already viewing it). 2. Play your sequencer. Stop recording on your electronic drum kit! 4. Use the Down and Up buttons to your module's MIDI In. 2. Press Menu to your sequencer's MIDI In. Use a standard MIDI cable (sold separately) to connect the...


