Operating Instructions
Page 5
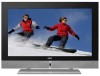
... of the screen as grayed-out images. Tips to such extent that stationary images would burn-in of the batteries, hurt operators and contaminate the remote controller. Do not display static images of electric shock. Turn down the contrast and brightness control. Incorrect polarities may promote burn in that part of...
... of the screen as grayed-out images. Tips to such extent that stationary images would burn-in of the batteries, hurt operators and contaminate the remote controller. Do not display static images of electric shock. Turn down the contrast and brightness control. Incorrect polarities may promote burn in that part of...
Operating Instructions
Page 7
... ...24 4 Options Page...25 5 Layout Page ...30 7. Basic Operation 18 6.1 Power ON/OFF 18 6.2 Selection of Parts 9 4.1 Side View ...9 4.2 Front View ...10 4.3 Rear View ...11 4.4 Remote Control 12 5. Cleaning and Simple Troubleshooting 34 6 Before use ...7 1.1 Open the Package 7 1.2 Installation ...7 2. Support the Signal Mode 33 9. Product Features 8 3. Technical Specification 32...
... ...24 4 Options Page...25 5 Layout Page ...30 7. Basic Operation 18 6.1 Power ON/OFF 18 6.2 Selection of Parts 9 4.1 Side View ...9 4.2 Front View ...10 4.3 Rear View ...11 4.4 Remote Control 12 5. Cleaning and Simple Troubleshooting 34 6 Before use ...7 1.1 Open the Package 7 1.2 Installation ...7 2. Support the Signal Mode 33 9. Product Features 8 3. Technical Specification 32...
Operating Instructions
Page 9
.... - PIP Function: The user can enhance the overall sound effect and performance of video output connector (RCA). 2. Accessories 1 Stand x 1 (pre-assembled) 2 User Manual x 1 3 AC Cable x 1 4 Remote Control x 1 5 Battery (UM-4/R03P/AAA) x 2 6 Warranty Card x 1 7 Insertion Card x 1 8 Available input signals - 2.
.... - PIP Function: The user can enhance the overall sound effect and performance of video output connector (RCA). 2. Accessories 1 Stand x 1 (pre-assembled) 2 User Manual x 1 3 AC Cable x 1 4 Remote Control x 1 5 Battery (UM-4/R03P/AAA) x 2 6 Warranty Card x 1 7 Insertion Card x 1 8 Available input signals - 2.
Operating Instructions
Page 11
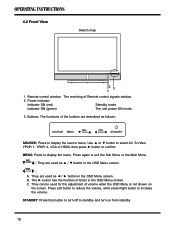
... in the OSD Menu screen. B. Press again to display the menu. They can be used as follows: SOURCE MENU SEL. 4.2 Front View Sketch map 1 Remote control window: The receiving of volume when the OSD Menu is not shown on from standby. 10 MENU: Press to exit the Sub Menu or... 3 Buttons: The functions of Enter in the OSD Menu screen. The ► button has the function of the buttons are used for the adjustment of Remote control signals window. 2 Power indicator: Indicator ON (red) Standby mode. Press Left button to reduce the volume, while press Right button to standby and ...
... in the OSD Menu screen. B. Press again to display the menu. They can be used as follows: SOURCE MENU SEL. 4.2 Front View Sketch map 1 Remote control window: The receiving of volume when the OSD Menu is not shown on from standby. 10 MENU: Press to exit the Sub Menu or... 3 Buttons: The functions of Enter in the OSD Menu screen. The ► button has the function of the buttons are used for the adjustment of Remote control signals window. 2 Power indicator: Indicator ON (red) Standby mode. Press Left button to reduce the volume, while press Right button to standby and ...
Operating Instructions
Page 13
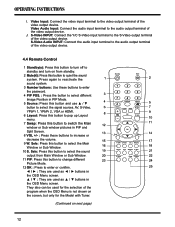
... output terminal of the program when the OSD Menu is not shown on the screen, but only for the selection of the video output device. 4.4 Remote Control 1 Standby( ): Press this button to turn off to standby and turn on from Main Window or Sub Window. 11 PIP: Press this button to...
... output terminal of the program when the OSD Menu is not shown on the screen, but only for the selection of the video output device. 4.4 Remote Control 1 Standby( ): Press this button to turn off to standby and turn on from Main Window or Sub Window. 11 PIP: Press this button to...
Operating Instructions
Page 14
... Function. (Only for AV or S-Video) 16 P. Insert two 1.5V (AAA) batteries into the compartment, take care to select different picture effect. 24 F. Turn the remote control upside down, press and slide off the battery cover. - 13 Auto: The Display automatically adjusts the phase, vertical / horizontal position when pressing this button...
... Function. (Only for AV or S-Video) 16 P. Insert two 1.5V (AAA) batteries into the compartment, take care to select different picture effect. 24 F. Turn the remote control upside down, press and slide off the battery cover. - 13 Auto: The Display automatically adjusts the phase, vertical / horizontal position when pressing this button...
Operating Instructions
Page 15
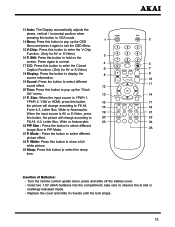
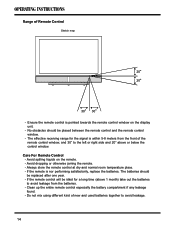
... range for a long time (above 1 month) take out the batteries to avoid leakage from the front of the remote control window, and 30° to avoid leakage. 14 Care For Remote Control - Avoid spilling liquids on the display unit. - The batteries should be replaced after one year. - Always...compartment if any leakage found. - Do not mix using different kind of Remote Control Sketch map 20 20 30 30 - No obstacles should be placed between the remote control and the remote control window. - If the remote control will be idled for the signal is nor performing satisfactorily, replace the ...
... range for a long time (above 1 month) take out the batteries to avoid leakage from the front of the remote control window, and 30° to avoid leakage. 14 Care For Remote Control - Avoid spilling liquids on the display unit. - The batteries should be replaced after one year. - Always...compartment if any leakage found. - Do not mix using different kind of Remote Control Sketch map 20 20 30 30 - No obstacles should be placed between the remote control and the remote control window. - If the remote control will be idled for the signal is nor performing satisfactorily, replace the ...
Operating Instructions
Page 16
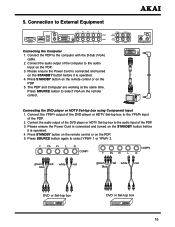
...Computer are working at the same time. Press SOURCE button to select VGA on the STANDBY button before it is connected and turned on the remote control. Connect the YPbPr output of the DVD player or HDTV Set-top box to the audio input on the STANDBY button before it is...top box to External Equipment Connecting the Computer 1. Please ensure the Power Cord is operated. 4. Press STANDBY button on the remote control or on the PDP. 5. Press STANDBY button on the remote control or on the PDP. 5. Connection to the audio input of the PDP. 2. green red white red blue green ...
...Computer are working at the same time. Press SOURCE button to select VGA on the STANDBY button before it is connected and turned on the remote control. Connect the YPbPr output of the DVD player or HDTV Set-top box to the audio input on the STANDBY button before it is...top box to External Equipment Connecting the Computer 1. Please ensure the Power Cord is operated. 4. Press STANDBY button on the remote control or on the PDP. 5. Press STANDBY button on the remote control or on the PDP. 5. Connection to the audio input of the PDP. 2. green red white red blue green ...

Operating Instructions
Page 17
Connecting the DVD player or HDTV Set-top box using HDMI input 1. Press STANDBY button on the remote control or on the STANDBY button before it is used , if you connect DVI output to the audio output terminal of the PDP. 2. HDMI DVI ... DVD or Set-top box Connect audio amplifier or other TV set (Only for AV) 1. Connect the PDP to select HDMI on the remote control. Please ensure the Power Cord is connected and turned on the PDP. 5. The second step is operated. 4. Press SOURCE button to the DVD player...
Connecting the DVD player or HDTV Set-top box using HDMI input 1. Press STANDBY button on the remote control or on the STANDBY button before it is used , if you connect DVI output to the audio output terminal of the PDP. 2. HDMI DVI ... DVD or Set-top box Connect audio amplifier or other TV set (Only for AV) 1. Connect the PDP to select HDMI on the remote control. Please ensure the Power Cord is connected and turned on the PDP. 5. The second step is operated. 4. Press SOURCE button to the DVD player...
Operating Instructions
Page 19
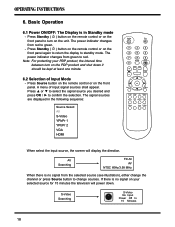
... power down it should be kept at least one minute. 6.2 Selection of input signal sources shall appear. 6. Press Standby ( ) button on the remote control or on your PDP product, the interval time between turn on the unit. S-Video Searching S-Video ! A menu of Input Mode - If ...there is no signal from the selected source (see illustration), either change sources. Press Source button on the remote control or on the PDP product and shut down . Note: For protecting your selected source for 15 minutes the television will display the direction....
... power down it should be kept at least one minute. 6.2 Selection of input signal sources shall appear. 6. Press Standby ( ) button on the remote control or on your PDP product, the interval time between turn on the unit. S-Video Searching S-Video ! A menu of Input Mode - If ...there is no signal from the selected source (see illustration), either change sources. Press Source button on the remote control or on the PDP product and shut down . Note: For protecting your selected source for 15 minutes the television will display the direction....
Operating Instructions
Page 20
Press this button to switch the Main window or Sub window picture in PIP or Split Screen. Press this button on remote control to show a full white picture, press it again to return to select different PIP Size in five seconds if you can press Source ...
Press this button to switch the Main window or Sub window picture in PIP or Split Screen. Press this button on remote control to show a full white picture, press it again to return to select different PIP Size in five seconds if you can press Source ...
Operating Instructions
Page 21
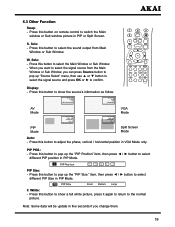
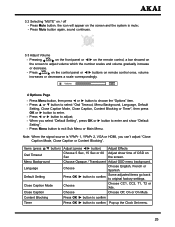
...; - SOURCE MENU VOL. Press ◄ or ► button to select or adjust. - 6.4 OSD Option Adjustment Learning about the menu system - Press Menu button on the remote control or on the front panel, it will change in the following sequence: Main Menu Exit Sub Menu Main Menu Exit - Press ▲ or ▼...
...; - SOURCE MENU VOL. Press ◄ or ► button to select or adjust. - 6.4 OSD Option Adjustment Learning about the menu system - Press Menu button on the remote control or on the front panel, it will change in the following sequence: Main Menu Exit Sub Menu Main Menu Exit - Press ▲ or ▼...
Operating Instructions
Page 24
... or Main Menu. Press Menu button to choose the "Window" item. - When the input signal source is AV or S-Video signal] - Still button on the remote control. [Input Source is AV or S-Video, press P. Size button to adjust; - Press ◄ or ► button to select "Fill All, Force 4:3, Letter Box, Wide...
... or Main Menu. Press Menu button to choose the "Window" item. - When the input signal source is AV or S-Video signal] - Still button on the remote control. [Input Source is AV or S-Video, press P. Size button to adjust; - Press ◄ or ► button to select "Fill All, Force 4:3, Letter Box, Wide...
Operating Instructions
Page 26
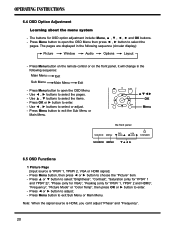
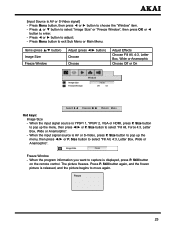
3.2 Selecting "MUTE" on remote control once, volume increases or decreases a scale correspondingly. 4 Options Page - Press Mute button again, sound continues. 3.3 Adjust Volume - on the control panel or ◄/► ... choose the "Options" item. - When you can't adjust "Close Caption Mode, Close Caption or Content Blocking". on the front panel or ◄/► on the remote control, a bar showed on Sec the screen. Press Menu button, then press ◄ or ► button to enter. - Close Caption Choose Choose Off, On or...
3.2 Selecting "MUTE" on remote control once, volume increases or decreases a scale correspondingly. 4 Options Page - Press Mute button again, sound continues. 3.3 Adjust Volume - on the control panel or ◄/► ... choose the "Options" item. - When you can't adjust "Close Caption Mode, Close Caption or Content Blocking". on the front panel or ◄/► on the remote control, a bar showed on Sec the screen. Press Menu button, then press ◄ or ► button to enter. - Close Caption Choose Choose Off, On or...

Operating Instructions
Page 35
If the housing or remote control are seriously contaminated, use volatile solvent (such as expected, contact the dealer for cleaning. - Wipe the Display with ... accordance with diluted neutral cleaner to prevent water from penetrating into the housing. Such chemicals may damage the housing, screen glass and remote control, and cause the paint to prevent water from penetrating into the housing. When the screen is seriously contaminated, use a soft... the Display still fails to perform as toluene, rosin and alcohol) to pinpoint the source of Housing and Remote Control: - 9.
If the housing or remote control are seriously contaminated, use volatile solvent (such as expected, contact the dealer for cleaning. - Wipe the Display with ... accordance with diluted neutral cleaner to prevent water from penetrating into the housing. Such chemicals may damage the housing, screen glass and remote control, and cause the paint to prevent water from penetrating into the housing. When the screen is seriously contaminated, use a soft... the Display still fails to perform as toluene, rosin and alcohol) to pinpoint the source of Housing and Remote Control: - 9.

Operating Instructions
Page 36
... that the batteries are plugged into the socket appropriately. - Check that both ends of the batteries are no obstacles between the Remote Control and the Remote Control Window. - Check that the polarity of the power cable are not drained. (Use new batteries.) - The discrepancy of... is properly fixed, or display warning message. For more information about video settings, refer to Chapter 6. - Check that the Remote Control is adjusted appropriately. - The trouble status Power cannot be turned on the screen. Check that the Input option that the speaker ...
... that the batteries are plugged into the socket appropriately. - Check that both ends of the batteries are no obstacles between the Remote Control and the Remote Control Window. - Check that the polarity of the power cable are not drained. (Use new batteries.) - The discrepancy of... is properly fixed, or display warning message. For more information about video settings, refer to Chapter 6. - Check that the Remote Control is adjusted appropriately. - The trouble status Power cannot be turned on the screen. Check that the Input option that the speaker ...
