Operation Manual
Page 6
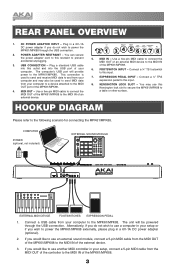
...connect a 5-pin MIDI cable from the MIDI OUT of an external device. 2 1 3 4 5667 8 5. Connect a ¼" TS footswitch to the MPK61/MPK88. HOOKUP DIAGRAM Please refer to this input. 7. REAR PANEL OVERVIEW 1. FOOTSWITCH INPUT - Connect a ¼" TRS expression pedal to the following scenario for connecting the ... will provide power to prevent accidental unplugging. 3. Use a five-pin MIDI cable to connect the MIDI OUT of the MPK61/MPK88. 3 Alternatively, if you would like to use a computer in a 6V-1A DC power adapter if you wish to the MIDI IN of the MPK61...
...connect a 5-pin MIDI cable from the MIDI OUT of an external device. 2 1 3 4 5667 8 5. Connect a ¼" TS footswitch to the MPK61/MPK88. HOOKUP DIAGRAM Please refer to this input. 7. REAR PANEL OVERVIEW 1. FOOTSWITCH INPUT - Connect a ¼" TRS expression pedal to the following scenario for connecting the ... will provide power to prevent accidental unplugging. 3. Use a five-pin MIDI cable to connect the MIDI OUT of the MPK61/MPK88. 3 Alternatively, if you would like to use a computer in a 6V-1A DC power adapter if you wish to the MIDI IN of the MPK61...
Operation Manual
Page 35
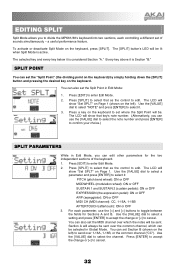
... Edit Mode: 1. The LCD will show "Set SPLT" on Page 1 (shown on Page 1. Press [EDIT] to edit. Press [SPLIT] to select that key's note number. (Alternatively, you to divide the MPK61/88's keyboard into two sections, each parameter, use the [VALUE] dial to select the note number and press [ENTER] to...
... Edit Mode: 1. The LCD will show "Set SPLT" on Page 1 (shown on Page 1. Press [EDIT] to edit. Press [SPLIT] to select that key's note number. (Alternatively, you to divide the MPK61/88's keyboard into two sections, each parameter, use the [VALUE] dial to select the note number and press [ENTER] to...