Quick Installation Guide
Page 3
...for energy saving, easy installation and high performance in an environment where network traffic and the number of the 16-Port 10/100Mbps Green Switch! You can add other Ethernet devices, such as computers, IP cameras, and Network Attached Storage (NAS) to extend your network structure .... Before you to your network quickly and easily. The 16-Port 10/100Mbps Green Switch is an easy-to-install network switch which helps you begin the installation, please check the items of ASW316v2 automatically reduces the power consumption when a connected port is detected inactive (idle or cable...
...for energy saving, easy installation and high performance in an environment where network traffic and the number of the 16-Port 10/100Mbps Green Switch! You can add other Ethernet devices, such as computers, IP cameras, and Network Attached Storage (NAS) to extend your network structure .... Before you to your network quickly and easily. The 16-Port 10/100Mbps Green Switch is an easy-to-install network switch which helps you begin the installation, please check the items of ASW316v2 automatically reduces the power consumption when a connected port is detected inactive (idle or cable...
Quick Installation Guide
Page 4
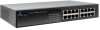
... Ports x All ports support auto MDI/MDIX, no need to use cross-over cables 1.2 Panel 1.2.1 Front Panel The front panel of the Switch consists of the Switch x 10/100Mbps Ports (Port 1~16): These ports support 10/100Mbps, and can operate in Half/Full Duplex transfer modes. Figure 1-1 Front ...Panel view of LED indicators, and 16 10/100Mbps ports. x LED Indicators: Comprehensive LED indicators display the status of the Switch. These ports also support automatic MDI/MDI-X crossover detection, giving true "plug and play" capability. The figure below shows the front panel of the...
... Ports x All ports support auto MDI/MDIX, no need to use cross-over cables 1.2 Panel 1.2.1 Front Panel The front panel of the Switch consists of the Switch x 10/100Mbps Ports (Port 1~16): These ports support 10/100Mbps, and can operate in Half/Full Duplex transfer modes. Figure 1-1 Front ...Panel view of LED indicators, and 16 10/100Mbps ports. x LED Indicators: Comprehensive LED indicators display the status of the Switch. These ports also support automatic MDI/MDI-X crossover detection, giving true "plug and play" capability. The figure below shows the front panel of the...

Quick Installation Guide
Page 5
Figure 1-3 Front Panel View of the Switch x AC Power Connector: Supports AC 100~240V, 50~60Hz. NOTE: Do not cover or put anything on or surrounding the Switch while the Switch is operating. 1.2.3 LED Indicators Information The front panel LEDs provide instant status feedback and help monitoring and troubleshooting when needed. 1.2.2 Rear Panel Figure 1-2 Rear Panel View of the Switch 4
Figure 1-3 Front Panel View of the Switch x AC Power Connector: Supports AC 100~240V, 50~60Hz. NOTE: Do not cover or put anything on or surrounding the Switch while the Switch is operating. 1.2.3 LED Indicators Information The front panel LEDs provide instant status feedback and help monitoring and troubleshooting when needed. 1.2.2 Rear Panel Figure 1-2 Rear Panel View of the Switch 4
Quick Installation Guide
Page 6
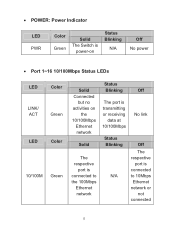
x POWER: Power Indicator LED PWR Color Green Solid The Switch is power-on Status Blinking N/A Off No power x Port 1~16 10/100Mbps Status LEDs LED Color LINK/ ACT Green LED Color 10/100M Green Solid Connected but no activities on the 10/100Mbps Ethernet network Solid The respective port is connected to the 100Mbps Ethernet network Status Blinking Off The port is transmitting or receiving data at 10/100Mbps No link Status Blinking N/A Off The respective port is connected to 10Mbps Ethernet network or not connected 5
x POWER: Power Indicator LED PWR Color Green Solid The Switch is power-on Status Blinking N/A Off No power x Port 1~16 10/100Mbps Status LEDs LED Color LINK/ ACT Green LED Color 10/100M Green Solid Connected but no activities on the 10/100Mbps Ethernet network Solid The respective port is connected to the 100Mbps Ethernet network Status Blinking Off The port is transmitting or receiving data at 10/100Mbps No link Status Blinking N/A Off The respective port is connected to 10Mbps Ethernet network or not connected 5
Quick Installation Guide
Page 7
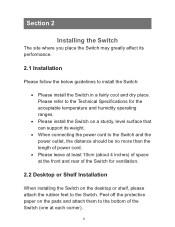
..., the distance should be no more than the length of the Switch (one at the front and rear of the Switch for the acceptable temperature and humidity operating ranges. Please refer to the Switch. x Please install the Switch on the desktop or shelf, please attach the rubber feet to... the Technical Specifications for ventilation. 2.2 Desktop or Shelf Installation When installing the Switch on a sturdy, level surface that can support its performance. 2.1 Installation Please follow the below guidelines to the bottom of power cord. x...
..., the distance should be no more than the length of the Switch (one at the front and rear of the Switch for the acceptable temperature and humidity operating ranges. Please refer to the Switch. x Please install the Switch on the desktop or shelf, please attach the rubber feet to... the Technical Specifications for ventilation. 2.2 Desktop or Shelf Installation When installing the Switch on a sturdy, level surface that can support its performance. 2.1 Installation Please follow the below guidelines to the bottom of power cord. x...
Quick Installation Guide
Page 8
2.3 Rack Installation The Switch is located at the rear of the unit. To do this, first install the mounting brackets on the Switch's side panels (one on each side), secure them with the included screws, and then use the screws provided with the equipment rack to the local power source automatically. 7 The switch's power supply will adjust to mount the Switch. 2.4 Power on an EIA 11-inch equipment rack. The AC power connector is rack-mountable and can be installed on the Switch The Switch has a universal power supply ranging from 100V to 240V AC, 50 ~ 60Hz power source.
2.3 Rack Installation The Switch is located at the rear of the unit. To do this, first install the mounting brackets on the Switch's side panels (one on each side), secure them with the included screws, and then use the screws provided with the equipment rack to the local power source automatically. 7 The switch's power supply will adjust to mount the Switch. 2.4 Power on an EIA 11-inch equipment rack. The AC power connector is rack-mountable and can be installed on the Switch The Switch has a universal power supply ranging from 100V to 240V AC, 50 ~ 60Hz power source.
Quick Installation Guide
Page 9
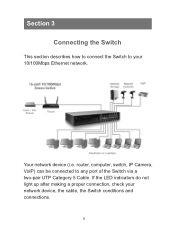
Section 3 Connecting the Switch This section describes how to connect the Switch to any port of the Switch via a two-pair UTP Category 5 Cable. If the LED indicators do not light up after making a proper connection, check your 10/100Mbps Ethernet network. Your network device (i.e. router, computer, switch, IP Camera, VoIP) can be connected to your network device, the cable, the Switch conditions and connections. 8
Section 3 Connecting the Switch This section describes how to connect the Switch to any port of the Switch via a two-pair UTP Category 5 Cable. If the LED indicators do not light up after making a proper connection, check your 10/100Mbps Ethernet network. Your network device (i.e. router, computer, switch, IP Camera, VoIP) can be connected to your network device, the cable, the Switch conditions and connections. 8

Quick Installation Guide
Page 10
Link/Activity is not lit when connect to the switch and the network device. make sure it is firmly plugged into the power socket of the network device attached to the power outlet. x Check the ...network cable; Section 4 Troubleshooting 1. Make sure the power jack is turned ON. make sure it is properly connected to the switch; Power LED is not lit x Check if the power adapter is properly connected to 10/100Mbps device x Check the power...
Link/Activity is not lit when connect to the switch and the network device. make sure it is firmly plugged into the power socket of the network device attached to the power outlet. x Check the ...network cable; Section 4 Troubleshooting 1. Make sure the power jack is turned ON. make sure it is properly connected to the switch; Power LED is not lit x Check if the power adapter is properly connected to 10/100Mbps device x Check the power...
