
Installation Guide
Page 2
... a Miracast/Intel WiDi device connects back to a couple of factors: a. This can occur due to ScreenBeam, the display will resume normal operation. Select a known clean wireless band/channel from the AGO setting for more details. © 2015 Actiontec Electronics, Inc. All other countries. What should I fix this problem, we recommend enabling Autonomous Group...
... a Miracast/Intel WiDi device connects back to a couple of factors: a. This can occur due to ScreenBeam, the display will resume normal operation. Select a known clean wireless band/channel from the AGO setting for more details. © 2015 Actiontec Electronics, Inc. All other countries. What should I fix this problem, we recommend enabling Autonomous Group...

User Manual
Page 3
Rebooting the Receiver 41 5.3.23. Resetting the Receiver to Default 42 5.4. Setting up Communication Channel 36 5.3.18. Upgrading the Receiver 43 Setting up Wireless Network Parameters 39 5.3.21. Setting up P2P Network Parameters 38 5.3.20. Setting up Autonomous Group Owner (AGO 35 5.3.17. Modifying the Receiver's Wireless Network Name (SSID 40 5.3.22. Setting up Group Owner Intent 37 5.3.19. Setting up Network Information Display on TV Screen 34 5.3.16. 5.3.15.
Rebooting the Receiver 41 5.3.23. Resetting the Receiver to Default 42 5.4. Setting up Communication Channel 36 5.3.18. Upgrading the Receiver 43 Setting up Wireless Network Parameters 39 5.3.21. Setting up P2P Network Parameters 38 5.3.20. Setting up Autonomous Group Owner (AGO 35 5.3.17. Modifying the Receiver's Wireless Network Name (SSID 40 5.3.22. Setting up Group Owner Intent 37 5.3.19. Setting up Network Information Display on TV Screen 34 5.3.16. 5.3.15.

User Manual
Page 4
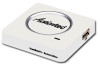
... -VGA Adapter & 3.5mm audio cable (1) AC Power Adapter (1) Installation Guide 1 The Receiver frees your purchase of Actiontec's ScreenBeam Pro Wireless Display Receiver Business Edition (hereinafter refer to interactively share their own screens on the big screen. Getting Started Thank you wirelessly stream what's on your Intel WiDi or Miracast™ compatible device to share a spreadsheet or presentation...
... -VGA Adapter & 3.5mm audio cable (1) AC Power Adapter (1) Installation Guide 1 The Receiver frees your purchase of Actiontec's ScreenBeam Pro Wireless Display Receiver Business Edition (hereinafter refer to interactively share their own screens on the big screen. Getting Started Thank you wirelessly stream what's on your Intel WiDi or Miracast™ compatible device to share a spreadsheet or presentation...

User Manual
Page 6
Best Known Configuration (BKC) for Intel Pro WiDi For optimal experience with Intel Pro WiDi, we recommend to update your system drivers and Intel WiDi application to the latest versions provided by visiting Intel's wireless display support website http://www.intel.com/p/en_US/support/highlights/wireless/wireless-display/ • Graphic Driver: 15.36.14.x • Wi-Fi Driver: 17.14.0.x • Intel WiDi Application: 5.1.x Intel's Download Center https://downloadcenter.intel.com/default.aspx 3 1.3.3. You can find the latest version by Intel.
Best Known Configuration (BKC) for Intel Pro WiDi For optimal experience with Intel Pro WiDi, we recommend to update your system drivers and Intel WiDi application to the latest versions provided by visiting Intel's wireless display support website http://www.intel.com/p/en_US/support/highlights/wireless/wireless-display/ • Graphic Driver: 15.36.14.x • Wi-Fi Driver: 17.14.0.x • Intel WiDi Application: 5.1.x Intel's Download Center https://downloadcenter.intel.com/default.aspx 3 1.3.3. You can find the latest version by Intel.

User Manual
Page 9
... Miracast™". 3.1. From the Devices menu, click Project. 3. From the Project menu, select Add a wireless display. Setting Up for the First Time This chapter explains how to connect ScreenBeam Pro for available devices. 6 For Android devices, please proceed to ScreenBeam Pro. 1. From the Windows desktop, go to the Charms menu and select Devices to the...
... Miracast™". 3.1. From the Devices menu, click Project. 3. From the Project menu, select Add a wireless display. Setting Up for the First Time This chapter explains how to connect ScreenBeam Pro for available devices. 6 For Android devices, please proceed to ScreenBeam Pro. 1. From the Windows desktop, go to the Charms menu and select Devices to the...

User Manual
Page 12
... application to the Receiver: 1. Note: For more information about connecting an Intel Pro WiDi device to the receiver, refer to show the status of the connection. 7. Launch the Intel Wireless Display application on the HDTV. 3.2. To find the application, go 9 Intel Pro WiDi and Managed Meetings. 6. The HDTV displays messages to Section 4.1. The...
... application to the Receiver: 1. Note: For more information about connecting an Intel Pro WiDi device to the receiver, refer to show the status of the connection. 7. Launch the Intel Wireless Display application on the HDTV. 3.2. To find the application, go 9 Intel Pro WiDi and Managed Meetings. 6. The HDTV displays messages to Section 4.1. The...

User Manual
Page 17
To obtain the latest Intel WiDi software and drivers, go to the "About Intel® WiDi" section. Adjust the HDTV picture by clicking "+" (plus) or "-" (minus). 3.2.2. Intel WiDi Software Version Support Make sure the device supports Intel Wireless Display (WiDi) software version 3.5 or higher. 3. or directly click the Check Intel® WiDi website for updates link on the page. 14 To find out which version of Intel WiDi the device is running, launch the Intel WiDi application and click the Help button, and then navigate to : http://www.intel.com/go/wirelessdisplayupdate;
To obtain the latest Intel WiDi software and drivers, go to the "About Intel® WiDi" section. Adjust the HDTV picture by clicking "+" (plus) or "-" (minus). 3.2.2. Intel WiDi Software Version Support Make sure the device supports Intel Wireless Display (WiDi) software version 3.5 or higher. 3. or directly click the Check Intel® WiDi website for updates link on the page. 14 To find out which version of Intel WiDi the device is running, launch the Intel WiDi application and click the Help button, and then navigate to : http://www.intel.com/go/wirelessdisplayupdate;
User Manual
Page 18
... placing the receiver near wireless interference sources, such as a smartphone, a tablet, or a game console, to 5.3.5. You may be running the latest software. 1. If a PIN is within line-of-sight of the source device. Some Android devices do that, refer to ScreenBeam Pro. Doing this case, the... items with and connect to disable the Force PIN Pairing feature. On a Miracast™-enabled Android device, locate and open the Wireless Display Application (check for more details. 2. Note: The name of interference and the building materials used in the PIN entry box ...
... placing the receiver near wireless interference sources, such as a smartphone, a tablet, or a game console, to 5.3.5. You may be running the latest software. 1. If a PIN is within line-of-sight of the source device. Some Android devices do that, refer to ScreenBeam Pro. Doing this case, the... items with and connect to disable the Force PIN Pairing feature. On a Miracast™-enabled Android device, locate and open the Wireless Display Application (check for more details. 2. Note: The name of interference and the building materials used in the PIN entry box ...

User Manual
Page 20
...those windows on both the device's screen and the HDTV simultaneously. When in the Extend mode, dragging windows to the right side of wireless display technology. In Windows, press the Windows logo and P keys simultaneously ( + P) to display selected content on the HDTV, while ..."screen" between the content displayed on the device's screen. 4.2. Display Mode The Receiver supports three display modes when connected with a compatible wireless display application (Intel WiDi or Windows 8.1 Project, for the device. This mode allows users to launch the display options and select the ...
...those windows on both the device's screen and the HDTV simultaneously. When in the Extend mode, dragging windows to the right side of wireless display technology. In Windows, press the Windows logo and P keys simultaneously ( + P) to display selected content on the HDTV, while ..."screen" between the content displayed on the device's screen. 4.2. Display Mode The Receiver supports three display modes when connected with a compatible wireless display application (Intel WiDi or Windows 8.1 Project, for the device. This mode allows users to launch the display options and select the ...

User Manual
Page 23
.... 3. Note: If the network information display is "12345678". 20 Click the wireless network icon to Section 5.3.21. Refer to open the Networks page, and select the receiver's SSID. Modifying the... Receiver's Wireless Network Name (SSID) for detail. Type the network security key in this SSID and its password... web page. Follow the procedure below to connect screen. You can modify this format "Actiontec-SBWD-xxxxxx", and the last four characters are the same as the last four of the Ready to the...
.... 3. Note: If the network information display is "12345678". 20 Click the wireless network icon to Section 5.3.21. Refer to open the Networks page, and select the receiver's SSID. Modifying the... Receiver's Wireless Network Name (SSID) for detail. Type the network security key in this SSID and its password... web page. Follow the procedure below to connect screen. You can modify this format "Actiontec-SBWD-xxxxxx", and the last four characters are the same as the last four of the Ready to the...

User Manual
Page 24
Modifying the Receiver's Wireless Network Name (SSID) for detail. 5. Type the username and password in the local management web page. Access the URL address ("http://192.168.51.1" in ... Local Management Console for detail. Note: By default, the Username is "Administrator" and Password is displayed. The username and password are case sensitive. 5.2. Setting up Wireless Network Parameters for detail. 4. You will log out from the local management web page immediately. 21 Go to Section 5.3.20. Note: You can modify this...
Modifying the Receiver's Wireless Network Name (SSID) for detail. 5. Type the username and password in the local management web page. Access the URL address ("http://192.168.51.1" in ... Local Management Console for detail. Note: By default, the Username is "Administrator" and Password is displayed. The username and password are case sensitive. 5.2. Setting up Wireless Network Parameters for detail. 4. You will log out from the local management web page immediately. 21 Go to Section 5.3.20. Note: You can modify this...

User Manual
Page 27
... are two options: Enable and Disable. The Managed Meetings function allows meeting participants to Section 4.1. For more information about Managed Meetings, refer to share the wireless display interactively. For better communication, you can define a port (Managed Meetings Port) for the Managed Meetings, as shown below: 4. The receiver reboots, and new settings...-up Managed Meetings The Managed Meetings is available when AGO is enabled. Go to Enable/Disable. 3. Enable: The Managed Meetings function is not available. Intel Pro WiDi and Managed Meetings. 1. 5.3.4.
... are two options: Enable and Disable. The Managed Meetings function allows meeting participants to Section 4.1. For more information about Managed Meetings, refer to share the wireless display interactively. For better communication, you can define a port (Managed Meetings Port) for the Managed Meetings, as shown below: 4. The receiver reboots, and new settings...-up Managed Meetings The Managed Meetings is available when AGO is enabled. Go to Enable/Disable. 3. Enable: The Managed Meetings function is not available. Intel Pro WiDi and Managed Meetings. 1. 5.3.4.

User Manual
Page 28
When this function is generated randomly by clicking the Features tab. 2. Note: Some wireless display source device may not support PIN entry and may be displayed on the Static PIN field. Static: Users can define the PIN pairing method ... must enter a PIN code on the connected HDTV/projector. - You can define seven (7) digits, and then the system generates an eight (8) digit PIN with the ScreenBeam receiver if this case, you may not be able to confirm. 25 Go to ScreenBeam Pro with a PIN.
When this function is generated randomly by clicking the Features tab. 2. Note: Some wireless display source device may not support PIN entry and may be displayed on the Static PIN field. Static: Users can define the PIN pairing method ... must enter a PIN code on the connected HDTV/projector. - You can define seven (7) digits, and then the system generates an eight (8) digit PIN with the ScreenBeam receiver if this case, you may not be able to confirm. 25 Go to ScreenBeam Pro with a PIN.

User Manual
Page 32
...-click. In this case, users not only can upgrade the receiver, but also can set up USB Local Access A USB port is provided on the ScreenBeam Pro wireless display receiver for multi-purpose uses. UoIP: The connected keyboard/mouse supports full functions. 29 Setting up the USB port: 1. Disable: Select "Disable" to practical...
...-click. In this case, users not only can upgrade the receiver, but also can set up USB Local Access A USB port is provided on the ScreenBeam Pro wireless display receiver for multi-purpose uses. UoIP: The connected keyboard/mouse supports full functions. 29 Setting up the USB port: 1. Disable: Select "Disable" to practical...
User Manual
Page 39
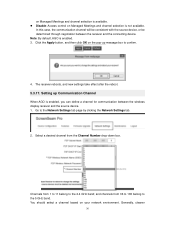
... Channel Number drop-down box. In this case, the communication channel will be consistent with the source device, or be determined through negotiation between the wireless display receiver and the source device. 1. Click the Apply button, and then click OK on the pop-up Communication Channel When AGO is available. Generally...
... Channel Number drop-down box. In this case, the communication channel will be consistent with the source device, or be determined through negotiation between the wireless display receiver and the source device. 1. Click the Apply button, and then click OK on the pop-up Communication Channel When AGO is available. Generally...

User Manual
Page 40
Properly configure the Group Owner Intent value and click the Apply button. Wireless network analysis software, such as the Wi-Fi Analyzer, can help you identify a clean channel. 3. Go to confirm. 4. Click the Apply button, and then click ...
Properly configure the Group Owner Intent value and click the Apply button. Wireless network analysis software, such as the Wi-Fi Analyzer, can help you identify a clean channel. 3. Go to confirm. 4. Click the Apply button, and then click ...

User Manual
Page 41
... the Network Settings tab. 2. P2P DHCP IP Start and P2P DHCP IP End: These two items define the range of the Ready to the Wireless Interface Settings section, and properly configure the network parameters. 5.3.19. When source devices connect to the receiver, the receiver will assign IP addresses to... Subnet Mask: It is the subnet mask for the peer to access the local management server when AGO is used to peer connection, including P2P Wireless Network Name (SSID), Password, IP address, subnet mask, DHCP IP address range. It is enabled. Setting up message box to peer connection. You...
... the Network Settings tab. 2. P2P DHCP IP Start and P2P DHCP IP End: These two items define the range of the Ready to the Wireless Interface Settings section, and properly configure the network parameters. 5.3.19. When source devices connect to the receiver, the receiver will assign IP addresses to... Subnet Mask: It is the subnet mask for the peer to access the local management server when AGO is used to peer connection, including P2P Wireless Network Name (SSID), Password, IP address, subnet mask, DHCP IP address range. It is enabled. Setting up message box to peer connection. You...

User Manual
Page 42
... Settings tab page by clicking the Network Settings tab. 2. Go to the Wireless Interface Settings section, and properly configure the network parameters. This IP 39 Wireless IP Address: It is disabled, you can define wireless network parameters for accessing the receiver's wireless network. The receiver reboots, and new settings take effect after the reboot...
... Settings tab page by clicking the Network Settings tab. 2. Go to the Wireless Interface Settings section, and properly configure the network parameters. This IP 39 Wireless IP Address: It is disabled, you can define wireless network parameters for accessing the receiver's wireless network. The receiver reboots, and new settings take effect after the reboot...

User Manual
Page 43
...and type a new name in the Network Name (SSID) box and a new password in the range defined by clicking the Network Settings tab. 2. Wireless DHCP IP Start and Wireless DHCP IP End: These two items define the range of IP addresses assigned to confirm. 4. Click the Apply button, and then click OK...5.3.21. It is used to modify the receiver's SSID: 1. Follow the procedure below to access the local management server when AGO is disabled. Note: The Wireless IP Address must not be in Network Password box. 40 Go to connect screen. address is displayed in the lower part of the Ready to...
...and type a new name in the Network Name (SSID) box and a new password in the range defined by clicking the Network Settings tab. 2. Wireless DHCP IP Start and Wireless DHCP IP End: These two items define the range of IP addresses assigned to confirm. 4. Click the Apply button, and then click OK...5.3.21. It is used to modify the receiver's SSID: 1. Follow the procedure below to access the local management server when AGO is disabled. Note: The Wireless IP Address must not be in Network Password box. 40 Go to connect screen. address is displayed in the lower part of the Ready to...
