
Service Guide
Page 5
... Please note WHEN ORDERING FRU PARTS, that you with further technical details. 2. add-on your regional Acer office to extend the functionality of customer machines. V For ACER-AUTHORIZED SERVICE PROVIDERS, your regional office MAY have a DIFFERENT part number code to the BASIC CONFIGURATION decided...will not be covered in the printed Service Guide. If, for repair and service of a machine (e.g. To better fit local market requirements and enhance product competitiveness, your Acer office may have decided to order FRU parts for whatever reason, a part number change is ...
... Please note WHEN ORDERING FRU PARTS, that you with further technical details. 2. add-on your regional Acer office to extend the functionality of customer machines. V For ACER-AUTHORIZED SERVICE PROVIDERS, your regional office MAY have a DIFFERENT part number code to the BASIC CONFIGURATION decided...will not be covered in the printed Service Guide. If, for repair and service of a machine (e.g. To better fit local market requirements and enhance product competitiveness, your Acer office may have decided to order FRU parts for whatever reason, a part number change is ...

Service Guide
Page 7
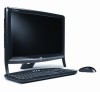
Table of Contents System Specifications 1 Features 1 System Block Diagram 4 Your eMachines Computer tour 5 Front View 5 Right View 6 Left View 7 Rear View 7 Using the Keyboard 9 Windows Keys 10 Hardware Specifications and Configurations 11 System ...Power 24 PC Health 25 Boot 26 Exit 27 BIOS Flash Utilities 28 DOS Flash Utility 29 WinPhlash Utility 30 Using DMI Tools 31 Machine Disassembly and Replacement 34 Disassembly Requirements 34 General Information 34 Pre-disassembly Instructions 34 Disassembly Process 35 Disassembly Flowchart 35 Removing the Stand Assembly...
Table of Contents System Specifications 1 Features 1 System Block Diagram 4 Your eMachines Computer tour 5 Front View 5 Right View 6 Left View 7 Rear View 7 Using the Keyboard 9 Windows Keys 10 Hardware Specifications and Configurations 11 System ...Power 24 PC Health 25 Boot 26 Exit 27 BIOS Flash Utilities 28 DOS Flash Utility 29 WinPhlash Utility 30 Using DMI Tools 31 Machine Disassembly and Replacement 34 Disassembly Requirements 34 General Information 34 Pre-disassembly Instructions 34 Disassembly Process 35 Disassembly Flowchart 35 Removing the Stand Assembly...
Service Guide
Page 39
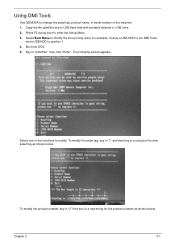
... HDD to run DMI Tools, move USB HDD to enter the Setup Menu. 3. Key in a string for the product number as shown below . Select one of the machine. 1. Press F2 during boot to position 1. 4. Boot into DOS. 5. Copy the file qdmi30a.exe to USB flash disk with bootable diskette or USB drive...
... HDD to run DMI Tools, move USB HDD to enter the Setup Menu. 3. Key in a string for the product number as shown below . Select one of the machine. 1. Press F2 during boot to position 1. 4. Boot into DOS. 5. Copy the file qdmi30a.exe to USB flash disk with bootable diskette or USB drive...

Service Guide
Page 42
... discharge • Flat screwdriver • Philips screwdriver NOTE: The screws for maintenance and troubleshooting. Turn off the power to any of the hardware components. Chapter 3 Machine Disassembly and Replacement IMPORTANT:The outside housing and color may vary from the system. 3. The flowchart provided in size. General Information Pre-disassembly Instructions Before...
... discharge • Flat screwdriver • Philips screwdriver NOTE: The screws for maintenance and troubleshooting. Turn off the power to any of the hardware components. Chapter 3 Machine Disassembly and Replacement IMPORTANT:The outside housing and color may vary from the system. 3. The flowchart provided in size. General Information Pre-disassembly Instructions Before...

Service Guide
Page 119
...during systems POST or when systems enter to BIOS Setup menu. Chapter 5 111 Then remove the tool from the machine. • Open the back cover of the machine, and find out the HW Gap on M/B as picture. • Use an electric conductivity tool to short the... Password and/or User Password) for clearing BIOS Password (Supervisor Password and User Password). The eMachines EZ1600/EZ1601 Series provides one Hardware Open Gap on the main board for eMachines EZ1600/EZ1601 Series. Clearing Password Check and BIOS Recovery This section provide you the standard operating procedures of the...
...during systems POST or when systems enter to BIOS Setup menu. Chapter 5 111 Then remove the tool from the machine. • Open the back cover of the machine, and find out the HW Gap on M/B as picture. • Use an electric conductivity tool to short the... Password and/or User Password) for clearing BIOS Password (Supervisor Password and User Password). The eMachines EZ1600/EZ1601 Series provides one Hardware Open Gap on the main board for eMachines EZ1600/EZ1601 Series. Clearing Password Check and BIOS Recovery This section provide you the standard operating procedures of the...

Service Guide
Page 120
To use this feature to restore the BIOS firmware to a successful one once the previous BIOS flashing process failed. If this , a Crisis Diskette should be prepared ready in hand. Steps for enable BIOS Recovery process when system ... USB storage. 2. Power Off failed system. 2. BIOS Recovery Hotkey: The system provides a function hotkey: Fn+Esc, for BIOS Recovery by Crisis Disk: Before doing this machine by regular BIOS flashing process. When CRISIS is enabled, the system will force the BIOS to have the AC adapter and Battery present. Update the...
To use this feature to restore the BIOS firmware to a successful one once the previous BIOS flashing process failed. If this , a Crisis Diskette should be prepared ready in hand. Steps for enable BIOS Recovery process when system ... USB storage. 2. Power Off failed system. 2. BIOS Recovery Hotkey: The system provides a function hotkey: Fn+Esc, for BIOS Recovery by Crisis Disk: Before doing this machine by regular BIOS flashing process. When CRISIS is enabled, the system will force the BIOS to have the AC adapter and Battery present. Update the...


